Table of Contents
Advertisement
Quick Links
Advertisement
Table of Contents

Related Manuals for Gewa DP 340 G


Summary of Contents for Gewa DP 340 G
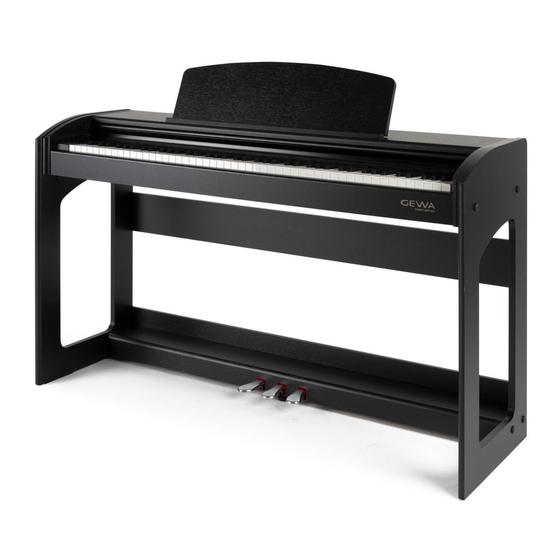
- Page 1 USER MANUAL GEWA Digital Piano DP 340 G Bedienungsanleitung | User manual | Mode d’emploi | Manual de instrucciones www.gewakeys.com Read these operating instructions before use and observe the safety information! Keep the instruction manual for future reference.
- Page 2 Manufacturer: GEWA music GmbH Werkstraße 1 08626 Adorf GERMANY www.gewamusic.com Version 1.0 Last update: 10.04.2019...
-
Page 3: Table Of Contents
CONTENTS SAFETY INFORMATION ......................... 5 Key ............................5 Intended use .......................... 6 Improper use ......................... 6 Precautions ..........................7 CE mark ..........................8 Disposal ..........................8 DELIVERY ............................9 ASSEMBLY INSTRUCTIONS ....................... 10 FIRST STEPS ..........................12 Control elements of your digital piano ................12 Control buttons and pedals .................... - Page 4 CONTENTS USER CALIBRATION OF THE KEYBOARD .................28 Selecting the calibration mode ................... 28 Creating a user calibration ....................28 Comparing factory and user calibration ................29 Exit calibration mode ......................29 CONNECTING EXTERNAL DEVICES (ACCESSORIES) ............30 Connecting headphones ..................... 30 Connecting a playback device ..................
-
Page 5: Safety Information
SAFETY INFORMATION Dear Customer, Thank you for choosing a digital piano from GEWA music! You have chosen a high-quality digital piano that will give you an impressive sound experience and lots of fun. Additional functions extend the capabilities of your digital piano far beyond piano playing. -
Page 6: Intended Use
SAFETY INFORMATION INTENDED USE INTENDED USE The digital piano is intended for use in dry rooms. • Devices for audio playback (as input or output) or for data communication can be connected. However, the respective technical specifications must be complied with (see the section “Technical data“). • The electrical connection may only be made to correctly installed power supplies, fulfilling the respective regulations. The mains voltage on the identification plate must correspond to the mains voltage of the country of use. -
Page 7: Precautions
• Turn off the digital piano or unplug the power cable if: - There is a sudden loss of sound while using the digital piano - The digital piano generates an unusual smell or smoke • Be sure to have the digital piano checked by your GEWA service representative WARNING Protection against fire • Open flames such as candles or tealights can tip over and cause a fire... -
Page 8: Ce Mark
EN300328:V2.1.1 The conformity with the regulations listed above is confirmed by the CE sign on the device. The declaration of conformity can be viewed at the following address: GEWA music GmbH, Werkstraße 1, 08626 Adorf, GERMANY DISPOSAL To dispose of the old device, please take it to your local waste management authority (e.g. disposal company or recycling centre). -
Page 9: Delivery
DELIVERY DELIVERY Check that the contents of the package is complete before commencing with assembly. Description Quantity Keyboard with keyboard cover Music desk Brace pedalboard Brace back panel, above Pedalboard Right side panel Left side panel Connecting cable power supply Phillips screw M6 x 16 (headphone hanger) Phillips screw M6 x 35 Phillips wood screw 3.5 x 25... -
Page 10: Assembly Instructions
ASSEMBLY INSTRUCTIONS ASSEMBLY INSTRUCTIONS This section tells you how to correctly set up your digital piano. For assembly you will need: • A size 2 phillips screwdriver • Another person Do not tighten the phillips screws until all parts of your digital piano have been pre- NOTE assembled and aligned. - Page 11 ASSEMBLY INSTRUCTIONS 9. Place your digital piano at the desired location and make sure that the adjustment screw ( 13 ) touches the floor as shown below. 10. Insert the pedal cable true to side into the pedal cable socket on the underside of the keyboard ( 1 ). It should slide easily into the socket. Then plug the power cable ( 7 ) into the power socket on the back of the piano (not shown).
-
Page 12: First Steps
‘sustain’ on the rear panel. FIRST STEPS In this section, we familiarise you with the controls on your digital piano. THE CONTROL ELEMENTS OF YOUR DIGITAL PIANO Your GEWA digital piano has the following controls: Speakers Indicator LED Keyboard... -
Page 13: Control Buttons And Pedals
9 Function Activate the function menu to change various settings (–> page 20). 10 REC This puts your GEWA digital piano into Recording mode (–> page 27). 11 Play/Stop Start and Stop recorded music playback (–> page 27). 12 Song Select Choose a memory space to record or play a song (->... - Page 14 Furthermore, all the other strings can freely resonate, so their frequencies contribute to a richer sound. All this is simulated by the pedal of your Gewa piano. It is also possible to play with half pedal, which means the simulated dampers are only lifted slightly, so that the sustaining notes are decaying faster than with the pedal fully depressed.
-
Page 15: Keyboard / Connections Panel / Back
FIRST STEPS CONNECTIONS KEYBOARD / CONNECTIONS / UNDERSIDE General View Speakers Speakers Diagram A Diagram B Turn your digital piano on and off. Power On/Off Connect one or two sets of headphones here. Headphone sockets Pedal cable socket Connect the pedal cable here. - Page 16 FIRST STEPS CONNECTIONS KEYBOARD / CONNECTIONS REAR PANEL Diagram C This port is for external sound source playback (e.g. MP3 LINE IN players) through the speaker system via a 3.5 mm jack socket. (-> page 26) You can connect a standard sustain pedal to this 6.3 mm SUSTAIN jack socket, if you want to use your digital piano with an external stand.
-
Page 17: Operating Use
3. Press the Play/Stop buttons to start or stop playing a song. You can accompany a DEMO song on your digital piano. 4. Press the Voice button to exit the DEMO mode. CHOICE OF SOUNDS Your GEWA digital piano contains more than 20 sounds: Sounds 1 - 10 Sounds 11 - 20 Display... -
Page 18: Dual Mode
CONTROLS REVERB AND CHORUS DUAL MODE 5.3.1 Your digital piano can be set to play two different sounds as you play. To combine two sounds together: 1. Select a sound, as described above. 2. Press and hold the Voice button. The Voice button LED will start to flash. The display will show OFF. 3. Use the Left or Right cursor button to select a second sound. 4. -
Page 19: Chorus And Other Effects
CONTROLS METRONOME CHORUS AND OTHER EFFECTS 5.4.2 The Chorus function includes the following effects: Display Name Description Makes the sound fuller and gives the same Chorus1 richness of sound as in an ensemble. Like CH1 but more intense. Chorus2 Great for E-piano and string instruments. Similar to Chorus, with slight changes in pitch. -
Page 20: Metronome - Changing Speed
CONTROLS FUNCTIONS MENU METRONOME – CHANGING SPEED 5.5.2 1. Switch the metronome on. 2. Use the upper and lower cursor keys to increase/decrease the tempo in increments of 10, and press the left and right cursor keys to increase/decrease the tempo in increments of one. -
Page 21: Settings
CONTROLS TABLE OF SETTINGS TABLE OF SETTINGS Display Description Adjustable values Transpose (–> page 21) -6 to 6 Fine-tuning the sounds (–> page 22) 270 to 530 (in increments of 5) Sets keyboard sensitivity OFF / HE2 / HE1 / Std / Li1 / Li2 Change the volume of two sounds 1-5 to 5-1 in dual mode (–>... -
Page 22: Fine-Tuning The Sounds
CONTROLS FINE-TUNING THE SOUNDS FINE-TUNING THE SOUNDS If you need to fine-tune the sounds of your digital piano, you can do it in this way: 1. Activate the Functions Menu (–> vpage 20). 2. Press the left or right cursor keys until “tun“ and the current setting in the display. 3. Press the upper or lower cursor keys to change the tuning of your digital piano. The higher you set the values in the display, the higher you tune your digital piano. -
Page 23: Brilliance Settings
CONTROLS BRILLIANCE SETTINGS BRILLIANCE SETTINGS If you want an even brighter tone, you can achieve this via the Brilliance Settings. Proceed as follows: 1. Activate the Functions Menu (–> page 20). 2. Press the left or right cursor keys until ‘‘bri‘‘ and its current setting appear in the display. -
Page 24: Program Change Function
CONTROLS BRILLIANCE SETTINGS PROGRAM CHANGE FUNCTION The Program Change function indicates whether the program change information is transmitted to a MIDI device connected to the MIDI OUT terminal. To adjust the Program Change Function, proceed as follows: 1. Activate the Functions Menu (–> page 20). 2. -
Page 25: Changing The Tuning
You can adjust the tuning, also called ‘temperament‘, of your digital piano e.g. to play music from older epochs with the utmost authenticity. Due to a variety of works from various pre-Bach epochs, this is especially useful for the harpsichord sound of your GEWA digital piano. -
Page 26: Adjusting Damper Resonance
CONTROLS RECORDING AND PLAYBACK FUNCTIONS ADJUSTING DAMPER RESONANCE 6.13 You set the string resonance (–> page 25) here when you press the damper pedal. Proceed as follows: 1. Activate the Functions Menu (–> page 20). 2. Press the left or right cursor button until “dMP“ and the set value alternately flash appears in the display. -
Page 27: Recording And Playback Functions
CONTROLS RECORDING AND PLAYBACK FUNCTIONS RECORDING AND PLAYBACK FUNCTIONS Your digital piano has a feature to record your playing. You can save up to three pieces on the digital piano. RECORDING MUSIC To activate the recording mode, follow these steps: Your recording will be automatically saved to the first of three possible memory slots. -
Page 28: User Calibration Of The Keyboard
Your GEWA digital piano is much less sensitive to transport or stress. However, if it happens that one or more keys play too loudly or too quietly, you can easily adjust this in the software of the piano itself. -
Page 29: Comparing Factory And User Calibration
USER CALIBRATION OF THE KEYBOARD COMPARE FACTORY AND USER CALIBRATION To check that the user calibration was successful, it is recommended that you compare the touch sensitivity to the original factory calibration. • To play the factory calibration, press the Voice button. •... -
Page 30: Connecting External Devices (Accessories)
CONNECTING EXTERNAL DEVICES CONNECTING HEADPHONES CONNECTING EXTERNAL DEVICES Find out more about the connectivity options for your digital piano here. CONNECTING HEADPHONES Connect your headphones by using one of the two 6.3 mm jack sockets below the keyboard. When headphones are connected to one or both sockets, the speakers of your digital piano NOTE are automatically muted until you remove BOTH headphones. -
Page 31: Useful Information
USEFUL INFORMATION DEFINITIONS OF TERMS USEFUL INFORMATION At this point, we would like to provide definitions for a few terms that are used in this manual. We also explain the special features of your digital piano here. INDEX 10.1 Term Definition MIDI Musical Instrument Digital Interface is a data transmission protocol. -
Page 32: Warranty
USEFUL INFORMATION WARRANTY WARRANTY 10.2 The dealer from whom the device was purchased warrants the material and manufacture of the device for a period of 2 years from the date of purchase. In the case of a defect product, the buyer is initially only entitled to a subsequent performance. This includes either the repair or the delivery of a replacement product. -
Page 33: Troubleshooting
TROUBLESHOOTING AND REPAIR TROUBLESHOOTING AND REPAIR If malfunctions occur, you can use the tips listed here to find and solve the issue yourself. If you are unsuccessful, please contact your dealer. Possible cause and solution Problem Possible cause(s) Possible solution(s) • Power plug is not plugged • Check the power cable and The piano does not its connections. -
Page 34: Technical Specifications
88 keys, Concert Pianist, Grand Touch Touch sensitivity 6 levels (2 x light, medium, 2 x hard and constant) Pedals Damper-, Sostenuto- and Piano Pedal Sound source GEWA 4-layer music samples Polyphony max 256 notes No. of integrated sample-sounds Amplified rated power... - Page 36 Manufacturer: GEWA music GmbH Werkstraße 1 08626 Adorf GERMANY www.gewamusic.com Version 1.0 Errors and omissions excepted!
Need help?
Do you have a question about the DP 340 G and is the answer not in the manual?
Questions and answers