
Related Manuals for Dell OptiPlex 7060 Micro


Summary of Contents for Dell OptiPlex 7060 Micro
- Page 1 OptiPlex 7060 Micro Setup and specifications guide Regulatory Model: D10U Regulatory Type: D10U003...
- Page 2 A WARNING indicates a potential for property damage, personal injury, or death. © 2018 Dell Inc. or its subsidiaries. All rights reserved. Dell, EMC, and other trademarks are trademarks of Dell Inc. or its subsidiaries. Other trademarks may be trademarks of their respective owners.
-
Page 3: Table Of Contents
Contents 1 Set up your computer.............................5 2 Chassis................................8 Front view................................... 8 Back view.................................... 9 3 System specifications..........................10 Chipset....................................10 Processor...................................10 Memory....................................11 Storage....................................12 Storage combinations...............................12 Audio....................................12 Video....................................13 Communications................................13 Ports and connectors...............................13 System board connectors..............................14 Operating system................................14 Power supply..................................14 Physical specifications.............................. - Page 4 Updating your system BIOS using a USB flash drive.....................27 Updating the Dell BIOS in Linux and Ubuntu environments................. 27 Flashing the BIOS from the F12 One-Time boot menu..................27 System and setup password............................31 Assigning a system password and setup password....................32 Deleting or changing an existing system setup password..................
-
Page 5: Set Up Your Computer
Set up your computer Connect the keyboard and mouse. Connect to your network using a cable, or connect to a wireless network. Connect the display. Set up your computer... - Page 6 NOTE: If you ordered your computer with a discrete graphics card, the HDMI and the display ports on the back panel of your computer are covered. Connect the display to the discrete graphics card. Connect the power cable. Press the power button. Follow the instructions on the screen to finish Windows setup: Set up your computer...
- Page 7 Connect to a network. b Sign-in to your Microsoft account or create a new account. Locate Dell apps. Table 1. Locate Dell apps Register your computer Dell Help & Support SupportAssist — Check and update your computer Set up your computer...
-
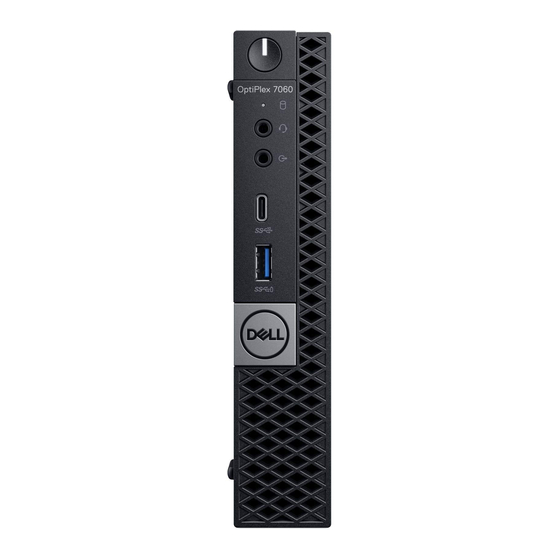
Page 8: Chassis
Chassis This chapter illustrates the multiple chassis views along with the ports and connectors and also explains the FN hot key combinations. Topics: • Front view • Back view Front view Power button and power light Hard drive activity light Headset/Universal audio jack port Line-out port USB 3.1 Gen 2 Type-C port with PowerShare... -
Page 9: Back View
Back view External antenna connectors (2) (optional) DisplayPort/VGA/HDMI 2.0b/DP/ USB Type-C alt mode (optional) USB 3.1 Gen 1 ports (3) Cable holder Padlock ring Network port USB 3.1 Gen 1 port (supports Smart Power On) Service tag Kensington security cable slot DisplayPorts (2) Power connector port Chassis... -
Page 10: System Specifications
Processor Global Standard Products (GSP) are a subset of Dell’s relationship products that are managed for availability and synchronized transitions on a worldwide basis. They ensure the same platform is available for purchase globally. This allows customers to reduce the number of configurations managed on a worldwide basis, thereby reducing their costs. -
Page 11: Memory
NOTE: Processor numbers are not a measure of performance. Processor availability is subject to change and may vary by region/ country. Table 3. Processor specifications Type UMA Graphics Intel UHD Graphics 630 Intel Core i3-8100 (4 Cores/6MB/4T/3.6GHz/65W) Intel UHD Graphics 630 Intel Core i3-8300 (4 Cores/8MB/4T/3.7GHz/65W) Intel UHD Graphics 630 Intel Core i5-8400 (6 Cores/9MB/6T/up to 4.0GHz/65W) -
Page 12: Storage
Controller Realtek ALC3234 Type Integrated Speakers Internal speaker (mono) Interface • AC511 Sound Bar (optional) • AC411 External speakers (optional) • Dell AX210CR USB Stereo speakers (optional) • Stereo headset/mic combo Internal speaker amplifier 2W (RMS) per channel System specifications... -
Page 13: Video
Video Table 8. Video Controller Type CPU Dependency Graphics Capacity External Maximum memory display resolution type support Intel UHD Graphics Integrated Shared DisplayPort VGA: 8th Generation Intel Core system 2048x1536@60 Hz Processor i3, i5,i7 memory HDMI 1.4 HDMI : 1920x1080@60 Hz Communications Table 9. -
Page 14: System Board Connectors
System board connectors Table 11. System board connectors M.2 Connectors • 1 - 2230/2280 (Support SATA & PCIe interface) • 1 - 2230 (keyed to support Integrated or Discrete WiFi, Support Intel CNVi or USB2.0/PCIe) Serial ATA (SATA) connector 1 (Support Standard Rev 3.0) Operating system Table 12. -
Page 15: Environmental
Width (inches / centimeters) 9.4/23.8 Depth (inches / centimeters) 19.6/49.8 Environmental NOTE: For more details on Dell environmental features, please go to the environmental attributes section. See your specific region for availability. Table 17. Environmental Energy efficient power supply Standard Customer replaceable unit... -
Page 16: System Setup
Boot menu Press <F12> when the Dell logo appears to initiate a one-time boot menu with a list of the valid boot devices for the system. Diagnostics and BIOS Setup options are also included in this menu. The devices listed on the boot menu depend on the bootable devices in the system. -
Page 17: System Setup Options
Keys Navigation Enter Selects a value in the selected field (if applicable) or follow the link in the field. Spacebar Expands or collapses a drop‐down list, if applicable. Moves to the next focus area. NOTE: For the standard graphics browser only. Moves to the previous page until you view the main screen. -
Page 18: System Information
System information Table 19. System Configuration Option Description Integrated NIC Allows you to control the on-board LAN controller. The option ‘Enable UEFI Network Stack’ is not selected by default. The options are: • Disabled • Enabled • Enabled w/PXE (default) NOTE: Depending on the computer and its installed devices, the items listed in this section may or may not appear. -
Page 19: Video Screen Options
Option Description • Disabled (default) • 15 days • 30 days • 60 days • 90 days • 120 days • 150 days • 180 days Video screen options Table 20. Video Option Description Primary Display Allows you to select the primary display when multiple controllers are available in the system. •... -
Page 20: Secure Boot Options
Option Description Allow Non-Admin Password Changes - This option is enabled by default. UEFI Capsule Firmware Updates This option controls whether this system allows BIOS updates via UEFI capsule update packages. This option is selected by default. Disabling this option will block BIOS updates from services such as Microsoft Windows Update and Linux Vendor Firmware Service (LVFS) TPM 2.0 Security Allows you to control whether the Trusted Platform Module (TPM) is visible to the operating system. -
Page 21: Intel Software Guard Extensions Options
Option Description • Secure Boot Enable This option is not selected by default. Secure Boot Mode Allows you to modify the behavior of Secure Boot to allow evaluation or enforcement of UEFI driver signatures. • Deployed Mode (default) • Audit Mode Expert key Management Allows you to manipulate the security key databases only if the system is in Custom Mode. -
Page 22: Performance
Performance Table 24. Performance Option Description Multi Core Support This field specifies whether the process has one or all cores enabled. The performance of some applications improves with the additional cores. • All—Default • • • Allows you to enable or disable the Intel SpeedStep mode of Intel SpeedStep processor. -
Page 23: Post Behavior
Option Description This option is set to Power Off by default. Enable Intel Speed Shift Allows you to enable or disable Intel Speed Shift Technology support. The option Enable Intel Speed Technology Shift Technology is set by default. Auto On Time Sets time to automatically turn on the computer. -
Page 24: Manageability
Option Description • 5 seconds • 10 seconds Full Screen Logo This option will display full screen logo if your image match screen resolution. The option Enable Full Screen Logo is not set by default. Warnings and Errors This option causes the boot process to only pause when warning or errors are detected. Choose any one of the option: •... -
Page 25: Wireless Options
Wireless options Table 29. Wireless Option Description Allows you to enable or disable the internal wireless devices. Wireless Device Enable The options are: • WLAN/WiGig • Bluetooth All the options are enabled by default. Maintenance Table 30. Maintenance Option Description Service Tag Displays the service tag of your computer. -
Page 26: Advanced Configuration
If BitLocker is enabled, it must be suspended prior to updating the system BIOS, and then re-enabled after the BIOS update is completed. Restart the computer. Go to Dell.com/support. • Enter the Service Tag or Express Service Code and click Submit. -
Page 27: Updating Your System Bios Using A Usb Flash Drive
Insert the USB Flash drive into the system that requires the BIOS update. Restart the system and press F12 when the Dell Splash logo appears to display the One Time Boot Menu. Using arrow keys, select USB Storage Device and click Return. - Page 28 Most Dell systems built after 2012 have this capability and you can confirm by booting your system to the F12 One-Time Boot Menu to see if BIOS FLASH UPDATE is listed as a boot option for your system. If the option is listed, then the BIOS supports this BIOS update option.
- Page 29 The E5450A14.exe file is shown as an example in the following screenshot. The actual file name may vary. Once the file is selected, it will show in the file selection box and you can click the OK button to continue. System setup...
- Page 30 Click the Begin Flash Update button. A warning box is displayed asking you if you want to proceed. Click the Yes button to begin the flash. System setup...
-
Page 31: System And Setup Password
At this point the BIOS flash will execute, the system will reboot and then the BIOS flash will start and a progress bar will show the progress of the flash. Depending on the changes included in the update, the progress bar may go from zero to 100 multiple times and the flash process could take as long as 10 minutes. -
Page 32: Assigning A System Password And Setup Password
Setup password Password that you must enter to access and make changes to the BIOS settings of your computer. You can create a system password and a setup password to secure your computer. CAUTION: The password features provide a basic level of security for the data on your computer. CAUTION: Anyone can access the data stored on your computer if it is not locked and left unattended. -
Page 33: Software
Neokylin v6.0 SP4 (China only) Downloading drivers Turn on the desktop. Go to Dell.com/support. Click Product Support, enter the Service Tag of your desktop, and then click Submit. NOTE: If you do not have the Service Tag, use the auto detect feature or manually browse for your desktop model. -
Page 34: Serial Io Driver
Serial IO driver Verify if the drivers for Touchpad, IR camera, and keyboard and are installed. Software... -
Page 35: Security Drivers
Figure 2. Serial IO driver Security drivers Verify if the security drivers are already installed in the system. USB drivers Verify if the USB drivers are already installed in the computer. Network adapter drivers Verify if the Network adapter drivers are already installed in the system. Realtek Audio Verify if audio drivers are already installed in the computer. -
Page 36: Storage Controller
Storage controller Verify if the storage control drivers are already installed in the system. Software... -
Page 37: Getting Help
Dell product catalog. Dell provides several online and telephone-based support and service options. Availability varies by country and product, and some services may not be available in your area. To contact Dell for sales, technical support, or customer service issues: Go to Dell.com/support.
Need help?
Do you have a question about the OptiPlex 7060 Micro and is the answer not in the manual?
Questions and answers