Advertisement
Quick Links
THIS INSTRUCTION MANUAL CONTAINS IMPORTANT INFORMATION NECESSARY FOR THE PROPER ASSEMBLY AND SAFE USE OF THIS PRODUCT.
Read and follow all warnings and instructions in included instruction manual before assembly and use of appliance.
Model: DJ60LW
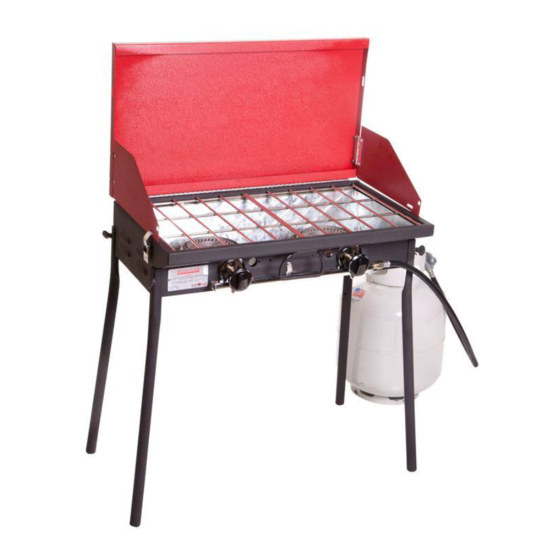
• Two 40,000 BTU Cast Aluminum Burners
• Suitcase Style Lid Design
• Detachable Legs
• Convenient Cooking Height
FOR OUTDOOR USE ONLY
Weekender
DJ60 INSTRUCTIONS AND TROUBLE SHOOTING
1. Open stove lid, remove, grate and retrieve legs from the inside of the stove.
Reinstall the grate.
2. Turn stove upside down and assemble leg extensions to stove as shown by
inserting the threaded bolt on the legs into the threaded fastener on the corner of
the stove and tightening. (See Fig. 1)
3. Stand stove upright. Open lid. Fold windscreens out and locate the tab on the
windscreens into the cutout on the top edge of the stove. Use the latch to hold
the windscreens in place. (See Fig. 2)
BURNERS WILL NOT IGNITE
1. Make sure there is propane in the tank and turn propane tank is turned on.
2. Follow all instructions in instruction manual for lighting the burner
YELLOW FLAME
1. Adjust Air Shutter until burner has blue flame - Some yellow tipping of the flame
is normal.
2. See Instruction Manual for Cleaning the burner
FLAME IS VERY SMALL AND WON'T INCREASE.
1. Make sure there is propane in the tank and turn propane tank is turned on a
minimum of 3 full turns
2. Follow all instructions in manual for leak testing the stove.
3. Turn all valves on the stove to the off position. Turn the Propane Tank off.
Disconnect regulator from the tank. Reconnect regulator to the tank. Slowly turn
tank on. Follow all instructions in the manual for leak testing the stove. If no
leaks are found follow all instructions in the manual for lighting the appliance.
LATCHES ARE TOO LOOSE TO HOLD LID OR WINDSCREEN TIGHT.
Tank Sold Separately
Use a pair of pliers and bend the latch hook slightly to tighten up the fit. Try
latching the lid and windscreen and if either it is still loose try bending the hook a
little more.
MAX POT DIAMETER 10"
KEEP FOR FUTURE REFERENCE
Regulator Model
150/451, R329, RA329, RJ-A
JY70-003, JY95A7A (JY95-007)
RYQ Series (RYQF01)
Advertisement

Related Manuals for Camp Chef Weekender DJ60LW


Summary of Contents for Camp Chef Weekender DJ60LW
- Page 1 THIS INSTRUCTION MANUAL CONTAINS IMPORTANT INFORMATION NECESSARY FOR THE PROPER ASSEMBLY AND SAFE USE OF THIS PRODUCT. Weekender Read and follow all warnings and instructions in included instruction manual before assembly and use of appliance. Model: DJ60LW DJ60 INSTRUCTIONS AND TROUBLE SHOOTING •...
- Page 2 DJ60LW -2 PARTS LIST BURNER SHORT (2) 0808-AS AIR VENT(2) 0826L VALVE (2) DJ60-2 GRATE (1) KNOB (2) 106678 330092 LP SPRING (2) 0980 M3 X 6 MACHINE SCREW (4) LID LATCH (2) ATS-4 HEAT DEFLECTOR (1) DJ60-1 1/4 THUMB SCREW (4) SSL-1 LP REGULATOR 1/4-20 RETAINER NUT (4)
- Page 3 How to Convert a Fire Pit, Stove , & Smoker to Natural Gas...
- Page 4 NGKIT, which is our Natural Gas Conversion Kit, is needed to convert any Low Pressure Stove, Smoke Vault, or Fire Pit.
- Page 5 Fire Pit Conversion to Natural Gas Remove valve from Safety first! Make sure burner, unscrew from everything is shut off and thermocouple wire, and that hose is removed disconnect electrode from propane tank. wire. Remove knob and valve cover. Once valve is removed from fire pit, drill the orifice with a 1/8th drill bit.
- Page 6 Stove Conversion to Natural Gas Start by making sure all is shut off and that hose is removed from propane tank. Remove knobs and front panel. At this point all you need to do is remove NOTE: Only low pressure stoves the manifold from (30,000BTU or the valves..
- Page 7 Smoke Vault Conversion to Natural Gas To convert the Smoke Vault to natural gas you’ll need the NGKIT and a #51 drill bit. If you haven’t assembled your smoker yet, remove the valve from the burner and use the specified drill to widen the valve’s orifice.
- Page 8 If your smoker is already assembled and has been used, make sure everything is turned off and disconnect the hose from your smoker. Then lay the smoker on it’s back and remove the burner. This will give you access to the valve. Drill valve’s orifice with a #51 drill bit.
Need help?
Do you have a question about the Weekender DJ60LW and is the answer not in the manual?
Questions and answers