Table of Contents
Advertisement
Quick Links
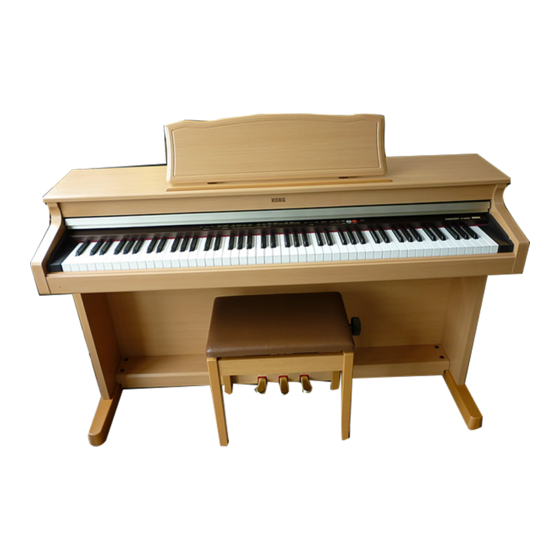
Thank you for purchasing the Korg Digital
Piano Concert C-3200. To ensure long, trouble-
free operation, please read this manual
carefully.
Main features ................................................................. 4
Parts of the C-3200 and their function ....................... 4
Switch and key functions ............................................. 6
1. Sound selector switches ...................................... 6
2. Recorder section ................................................... 6
3. Keyboard ............................................................... 6
Getting ready to play .................................................... 7
1. Before you start playing ..................................... 7
2. Using headphones with the C-3200 .................. 7
3. Using the music stand ......................................... 7
Listening to the demo songs ........................................ 8
1. To listen to all the demo songs .......................... 8
2. To listen to an individual demo song ............... 8
3. To pause the Demo playback ............................. 9
4. Practicing along with a demo song .................. 9
Playing the C-3200....................................................... 10
1. Selecting sounds ................................................ 10
2. Adding effects to the sound ............................. 12
3. Using the pedals ................................................ 12
4. Playing along with the metronome ................ 13
5. Selecting the Touch Response Curve .............. 14
Owner's Manual
Table of contents
6. Changing the key (Transposing) ..................... 15
7. Making fine adjustments to the pitch ............. 15
8. Selecting a temperament .................................. 16
9. Storing your settings ......................................... 16
10. Restoring the factory settings ........................ 16
1. Recording your performance ........................... 17
2. Listening to a song you recorded .................... 18
3. Erasing parts ....................................................... 18
Connecting to other devices ...................................... 19
system ...................................................................... 19
2. Connections with MIDI devices ...................... 19
Troubleshooting ........................................................... 23
Specifications ................................................................ 23
Assembling the stand (STD-3200) ............................ 24
Cautions for assembly ........................................... 24
Assembly procedure ............................................. 24
Other cautions ........................................................ 26
MIDI Implementation Chart ...................................... 27
E
1
Advertisement
Table of Contents

Related Manuals for Korg CONCERT C-3200


Summary of Contents for Korg CONCERT C-3200
-
Page 1: Table Of Contents
Thank you for purchasing the Korg Digital Owner’s Manual Piano Concert C-3200. To ensure long, trouble- free operation, please read this manual carefully. Table of contents Main features ..............4 6. Changing the key (Transposing) ..... 15 7. Making fine adjustments to the pitch ..... 15 Parts of the C-3200 and their function ....... - Page 2 IMPORTANT SAFETY INSTRUCTIONS THE FCC REGULATION WARNING (for U.S.A.) This equipment has been tested and found to comply with the limits • Read these instructions. for a Class B digital device, pursuant to Part 15 of the FCC Rules. • Keep these instructions. These limits are designed to provide reasonable protection against harmful interference in a residential installation.
- Page 3 Since it is possible for the contents of memory to be accidentally lost, you should save important data on an external data filer (storage device) etc. Korg will accept no responsibility for any damages that may result from loss of data. Conventions in this manual This symbol indicates a caution.
-
Page 4: Main Features
( p.10) Choose from eight high-quality sounds developed by Korg, including a superb concert grand piano. There is also an additional Bass sound. You can use the Layer or Split functions to play two sounds at the same time. The... - Page 5 7. Reverb switch 14. Headphone jacks (on the bottom panel) This switch turns the reverb effect on and off ( p.12). Stereo headphones can be connected to these jacks ( p.7). 8. Chorus switch 15. Power indicator This switch turns the chorus effect on and off ( p.12). 9.
-
Page 6: Switch And Key Functions
Switch and key functions This page lists the functions you can set from the switches and keys. 1. Sound selector switches MIDI settings Volume setting* Octave setting* ( p.20—22) ( p.10, 11) ( p.10, 11) Local Program change Control change Increase volume of Increase volume of Lower the octave... -
Page 7: Getting Ready To Play
4. Adjust the volume. Getting ready to play The Volume slider controls the volume of the built-in speakers, the headphone jacks, and the output jacks. 1. Before you start playing 1. Connect the power cable. Plug the power cable connector into the socket Softer Louder located on the bottom of the piano ( p.26). -
Page 8: Listening To The Demo Songs
Fantasy-Impromptu Op.66 / F.Chopin Demo song no.1 “Fantasy Impromptu, Op.66” will begin, and the playback will continue consecutively 2 Piano 2 Harmony of Love / KORG Original through no.32 “Salut d'Amour.” 3 E.Piano 1 Confusion / KORG Original When demo song no.32 finishes playing, the demo 4 E.Piano 2... -
Page 9: To Pause The Demo Playback
To select a song from bank B 4. Practicing along with a demo song 1. Press the Demo switch twice. All of the sound selector indicators will blink simulta- To practice right and left hands neously. separately 2. Press a sound selector switch to choose a demo song. -
Page 10: Playing The C-3200
To adjust the volume balance of the two sounds Playing the C-3200 You can adjust the volume balance of the two sounds you selected. 1. Selecting sounds The C-3200 can remember this setting even when the power is turned off. For details, refer to “9. •... - Page 11 Using the Split function To adjust the volume balance of the two sounds You can adjust the volume balance of the two sounds You can select different sounds for the lower and upper you selected. ranges of the keyboard. This is called the Split function. 1.
-
Page 12: Adding Effects To The Sound
2. Adding effects to the sound Adding Chorus to the sound The Chorus effect adds modulation, making the sound Adjusting the brightness of the sound richer and more spacious. The C-3200 can remember this setting even when The C-3200 can remember this setting even when the power is turned off. -
Page 13: Playing Along With The Metronome
Pedal settings for the Layer and Split 4. Playing along with the functions metronome You can select which sound(s) will be affected by the It is convenient to use the metronome when you want to damper pedal when using the Layer and Split functions. play in a precise tempo. -
Page 14: Selecting The Touch Response Curve
2. Hold down the Metronome switch and press a 3. To return to the conventional sound for the sound selector switch. accented beat, hold down the Metronome switch and press the Pipe Organ sound selector The indicator of the switch you pressed will light. switch. -
Page 15: Changing The Key (Transposing)
6. Changing the key (Transposing) 7. Making fine adjustments to the pitch The C-3200's Transpose function lets you change the pitch in semitone steps. You can use this function to play You can make fine adjustments to the pitch. a song at the correct pitch but in an easier key (e.g., a key Use this to correct small differences in pitch when you with fewer sharps or flats), or to play a song at a differ- play together with other instruments, or when playing... -
Page 16: Selecting A Temperament
8. Selecting a temperament 9. Storing your settings Many classical compositions were originally composed The preceding pages of this manual have described how using various temperaments. So that you can reproduce various settings can be adjusted to suit your own play- the original sound of these compositions, the C-3200 lets ing. -
Page 17: Recording And Playing-Back Your Performance
It is not possible to put both parts in record-ready Recording and playing-back mode at the same time. If one part is set to record- ready, and the other part already contains data, your performance pressing the switch for the recorded part will alternate between the playback and mute modes. -
Page 18: Listening To A Song You Recorded
If you play the keyboard while in record-ready 3. Erasing parts mode, recording will start from the paused To erase a recorded part. location without a count. When you resume recording after pausing, the 1. With playback stopped, hold down the Trans- transition may not always be recorded smoothly. -
Page 19: Connecting To Other Devices
MIDI connections Connecting to other devices Commercially-available MIDI cables are used to transfer MIDI data. Connect these cables between the MIDI connec- 1. Connections with a synthesizer, tors of the C-3200 and the MIDI connectors of the other MIDI device. The C-3200 has two types of MIDI connector. or audio system You can connect a synthesizer or audio system to the C- MIDI IN connector... - Page 20 Using the C-3200 as a multi-timbral Receiving program changes When a program change is received from an external tone generator device, sounds of the C-3200 will change as shown in the The C-3200 can function as a 16-part multi-timbral tone following table.
- Page 21 Disabling program changes Split Sound (Lower, Upper) If you do not want to receive or transmit program change Piano 2, E.Piano 2 messages, you can disable them. Piano 2, Harpsichord Piano 2, Pipe Organ When the C-3200 is first turned on, program changes will Piano 2, E.Organ automatically be enabled for all MIDI channels.
- Page 22 Synchronizing an external sequencer To load performance data from a data filer back to the C-3200's recorder An external MIDI sequencer or rhythm machine can be 1. Use a MIDI cable to connect the MIDI IN of synchronized to the C-3200's recorder. the C-3200 to the MIDI OUT of your data filer.
-
Page 23: Troubleshooting
Troubleshooting Specifications Power does not turn on Keyboard 88 key (A0–C8) • Is the power cable connected to the C-3200? RH2 (Real Weighted Hammer • Is the power cable connected to an appropriate AC outlet? Action 2) keyboard • Is the power switch turned on? ( p.7) Sounds 9 sounds: Piano 1 •... -
Page 24: Assembling The Stand (Std-3200)
Assembling the stand (STD-3200) Montage du support (STD-3200) Warning Avertissement Two or more people are required in order to assemble the stand. Le montage du support requiert au minimum deux personnes. Cautions for assembly In order to assemble the stand correctly, please note the following points. •... - Page 25 4. Insert the back panel into the grooves of the side panels. 4. Glissez le panneau arrière dans les rainures des panneaux latéraux. 5. Use screws (c) to fasten the back panel. 5. Fixez le panneau arrière avec les vis (c). First use screws to fasten the two top locations.
-
Page 26: Other Cautions
10. Connect the pedal cable and power cable to the bottom panel 10. Branchez le câble des pédales et of the panel, and use the cable holders to fasten the cables. le cordon d'alimentation au bas du piano et fixez-les avec les Pay attention to the orientation of the connectors when you plug serre-câbles. -
Page 27: Midi Implementation Chart
*4: Transmitted Sequence data only : Yes Mode 1: OMNI ON, POLY Mode 2: OMNI ON, MONO X: No Mode 3: OMNI OFF, POLY Mode 4: OMNI OFF, MONO Consult your lacal Korg distributor for more imformation on MIDI Implemantation. - Page 28 Please also retain your receipt as proof of purchase otherwise your product may be disqualified from the manufacturer's or distributor's warranty. KORG INC. 15-12, Shimotakaido 1-chome, Suginami-ku, Tokyo, Japan © 2002 KORG INC. 1405 EH Printed in Japan...
Need help?
Do you have a question about the CONCERT C-3200 and is the answer not in the manual?
Questions and answers