
Subscribe to Our Youtube Channel
Related Manuals for SHOWTEC PHANTOM 300 LED MATRIX


Summary of Contents for SHOWTEC PHANTOM 300 LED MATRIX
- Page 1 MANUAL ENGLISH Phantom 300 LED Matrix Ordercode: 40060 Highlite International B.V. – Vestastraat 2 – 6468 EX – Kerkrade – the Netherlands...
-
Page 2: Table Of Contents
Phantom 300 LED Matrix Table of contents Warning ....................................3 Safety Instructions ................................. 3 Operating Determinations ............................5 Rigging .................................... 5 Connection with the mains............................6 Return Procedure ................................7 Claims ....................................7 Description of the device ..............................8 Frontside..................................8 Backside .................................. - Page 3 Phantom 300 LED Matrix 5.9. Auto Test ................................25 6. Version ................................... 25 DMX Channels ................................26 12 Channels ................................26 20 Channels ................................28 120 Channels ................................31 Maintenance ..................................35 Replacing the Fuse ..............................35 Troubleshooting ................................35 No Light ..................................35 No Response to DMX..............................
-
Page 4: Warning
Save the carton and all packing materials. In the event that a fixture must be returned to the factory, it is important that the fixture be returned in the original factory box and packing. Your shipment includes: Showtec Phantom 300 LED Matrix • 2 mounting brackets with 4 quick-locks •... - Page 5 • For replacement use fuses of same type and rating only. The user is responsible for correct positioning and operating of the Phantom 300 LED Matrix. The • manufacturer will not accept liability for damages caused by the misuse or incorrect installation of this device.
-
Page 6: Operating Determinations
Do not attempt the installation yourself ! Always let the installation be carried out by an authorized dealer ! Procedure: If the Phantom 300 LED Matrix is lowered from the ceiling or high joists, professional trussing systems • have to be used. -
Page 7: Connection With The Mains
Phantom 300 LED Matrix The Phantom 300 LED Matrix can be placed on a flat stage floor or be mounted to any kind of truss by means of a mounting bracket with quick-locks. Improper installation can cause serious damage to people and property! Connection with the mains Connect the device to the mains with the power-plug. -
Page 8: Return Procedure
Phantom 300 LED Matrix Return Procedure Returned merchandise must be sent prepaid and in the original packing, call tags will not be issued. Package must be clearly labeled with a Return Authorization Number (RMA number). Products returned without an RMA number will be refused. Highlite will not accept the returned goods or any responsibility. -
Page 9: Description Of The Device
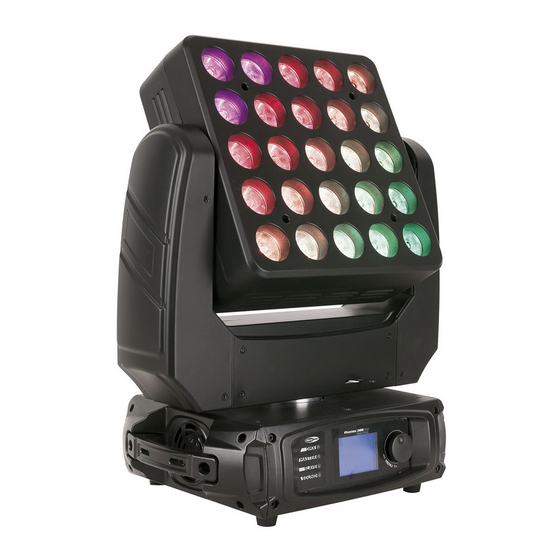
Phantom 300 LED Matrix Description of the device Features The Showtec Phantom 300 LED Matrix is a moving head with high output and great effects. • Input voltage: 100-240V AC, 60/50Hz • Power consumption: 340W • Light source: 25 x 10W RGBW 4-in-1 LEDs •... -
Page 10: Backside
13) RJ45 Ethernet connector IN Installation Remove all packing materials from the Phantom 300 LED Matrix. Check if all foam and plastic padding is removed. Connect all cables. Do not supply power before the whole system is set up and connected properly. -
Page 11: Control Modes
Phantom 300 LED Matrix Control Modes There are 5 modes: • Built-in programs (Master mode) • Manual • Sound-controlled • Master/Slave mode • DMX-512, ArtNet (12CH, 20CH, 120CH) One Phantom (Built-in Programs and Manual) 01) Fasten the effect light onto firm trussing. Leave at least 0,5 meter on all sides for air circulation. -
Page 12: Multiple Phantoms (Dmx Control)
Phantom 300 LED Matrix Multiple Phantoms (DMX Control) 01) Fasten the effect light onto firm trussing. Leave at least 0,5 meter on all sides for air circulation. 02) Always use a safety cable (ordercode 70140 / 70141). 03) Plug the end of the electric mains power cord into a proper electric power supply socket. -
Page 13: Multiple Phantoms (Artnet Control)
Phantom 300 LED Matrix Multiple Phantoms (ArtNet Control) 01) Fasten the effect light to a firm trussing. Leave at least 0,5 meter on all sides for air circulation. 02) Always use a safety cable (ordercode 70140 / 70141). 03) Use a CAT-5/CAT-6 cable to connect the Phantom’s "in" socket to your software/light controller’s output. -
Page 14: Connecting To A Network
01) Install any ArtNet-based software on your PC (Windows or Mac) or use a light controller which supports ArtNet. 02) Connect the power supply to the Phantom 300 LED Matrix.. 03) Connect the device’s Ethernet connector (13) to your software/light controller’s Ethernet connector, using a CAT-5/CAT-6 cable. -
Page 15: How To Make A Data Cable
Phantom 300 LED Matrix How to make a data cable A Standard ETHERNET cable can be used to replace the data cable required to transmit the data for the Phantom 300 LED Matrix. Please follow the instructions below in order to create an extra Net Cable. -
Page 16: Fixture Linking
Phantom 300 LED Matrix Fixture Linking You will need a serial data link to run light shows of one or more fixtures using a DMX-512 controller or to run synchronized shows of two or more fixtures set to a master/slave operating mode. The combined number of channels required by all the fixtures on a serial data link determines the number of fixtures the data link can support. -
Page 17: Control Panel
If there is no data received at the DMX input, the DMX LED will not blink. The problem may be: The XLR cable from the controller is not connected with the input of the Phantom 300 LED Matrix. •... -
Page 18: Menu Overview
Phantom 300 LED Matrix Menu Overview Ordercode: 40060... -
Page 19: Main Menu Options
Phantom 300 LED Matrix Main Menu Options There are 6 menu modes: • 1. DMX-512 • 2. ArtNet Settings • 3. Channel Mode • 4. Run Mode • 5. Functions • 6. Version 1. DMX-512 With this menu you can adjust the device’s DMX settings. -
Page 20: Artnet Settings
Phantom 300 LED Matrix 2. ArtNet Settings With this menu you can adjust the device’s ArtNet settings. 01) While in the main menu, turn the MENU control (04) until the display shows: 02) Press the MENU control (04) to enter the menu. -
Page 21: Subnet Mask
Phantom 300 LED Matrix 2.2. Subnet Mask 01) Turn the MENU control (04) to select the section of the subnet mask which you want to edit. 02) Press the MENU control (04) to enter edition mode. 03) Turn the MENU control (04) to adjust the value. -
Page 22: Universe
Phantom 300 LED Matrix 2.5. Universe 01) Turn the MENU control (04) to set the desired universe number. The adjustment range is between 000- 015. 02) Press the MENU control (04) to confirm your choice. 3. Channel Mode 01) While in main menu, turn the MENU control (04) until the display shows: 02) Press the MENU control (04) to enter the menu. -
Page 23: Dmx Mode
Phantom 300 LED Matrix 4.1. DMX Mode 01) Press the MENU control (04) to activate DMX mode. 4.2. ArtNet 01) Press the MENU control (04) to activate ArtNet mode. 4.3. Master Mode 01) Turn the MENU control (04) to choose one of 8 built-in auto shows: Showmode 01 –... -
Page 24: Functions
Phantom 300 LED Matrix 5. Functions 01) While in main menu, turn the MENU control (04) until the display shows: 02) Press the MENU control (04) to enter the menu. 03) Turn the MENU control (04) to toggle between the 9 available functions: Pan Invert •... -
Page 25: Dimmer Curve
Phantom 300 LED Matrix 5.3. Dimmer Curve 01) Turn the MENU control (04) to toggle between the 4 available modes: Square Law • Linear • S-curve • InvSquare Law • 02) Press the MENU control (04) to confirm the mode of your choice. -
Page 26: Back Light
Phantom 300 LED Matrix 5.6. Back Light 01) Turn the MENU control (04) to toggle between the 3 options: ON (Display continuously ON) • OFF (Display turns OFF after 10 seconds) • Adjust (Display brightness) • 02) Turn the MENU control (04) to choose Adjust and press the MENU control (04) to enter the menu. -
Page 27: Dmx Channels
Phantom 300 LED Matrix DMX Channels 12 Channels Channel 1 – Horizontal movement (Pan) Push the slider up, in order to move head horizontally (PAN). Gradual head adjustment, between 0-127. The head can be turned by 540° and stopped at any position you wish. - Page 28 Phantom 300 LED Matrix 168-174 Color24(R255, G000, B175, W000) 175-181 Color25(R255, G000, B100, W000) 182-188 Color26(R255, G000, B100, W050) 189-195 Color27(R255, G000, B025, W050) 196-202 Color28(R255, G000, B025, W025) 203-209 Color29(R255, G000, B025, W000) 210-216 Color30(R000, G000, B000, W255) 217-223...
-
Page 29: Channels
Phantom 300 LED Matrix 81-90 Slave1 91-96 Slave2 97-160 Sound sensitivity, from low sensitivity to high sensitivity 161-170 Pan inversion 171-180 Tilt inversion 181-190 Pan normal 191-200 Tilt normal 201-220 Pan/Tilt blackout ON 221-240 Pan/Tilt blackout OFF 241-255 Not functional 20 Channels Channel 1 –... - Page 30 Phantom 300 LED Matrix 28-34 Color4(R255, G050, B000, W000) 35-41 Color5(R255, G150, B000, W000) 42-48 Color6(R255, G255, B000, W000) 49-55 Color7(R255, G255, B000, W075) 56-62 Color8(R000, G255, B000, W255) 63-69 Color9(R000, G255, B000, W150) 70-76 Color10(R000, G255, B000, W050) 77-83...
- Page 31 Phantom 300 LED Matrix Channel 14 – Characters Dimmer must be open, CH11 or CH12 must be open Not functional 8-37 Digits (0-9) 38-115 Letters (A-Z) 116-255 Patterns 1-46 Channel 15 – Pattern Speed 0-255 From slow to fast Channel 16 – Functions...
-
Page 32: 120 Channels
Phantom 300 LED Matrix 120 Channels Channel 1 – Horizontal movement (Pan) Push the slider up, in order to move head horizontally (PAN). Gradual head adjustment, between 0-127. The head can be turned by 540° and stopped at any position you wish. - Page 33 Phantom 300 LED Matrix 112-118 Color16(R000, G255, B255, W150) 119-125 Color17(R000, G100, B255, W255) 126-132 Color18(R000, G000, B255, W100) 133-139 Color19(R000, G000, B255, W050) 140-146 Color20(R000, G000, B255, W000) 147-153 Color21(R075, G000, B255, W000) 154-160 Color22(R160, G000, B255, W000) 161-167...
- Page 34 Phantom 300 LED Matrix 6-10 Show1 11-20 Show2 21-30 Show3 31-40 Show4 41-50 Show5 51-60 Show6 61-70 Show7 71-80 Show8 81-90 Slave1 91-96 Slave2 97-160 Sound sensitivity, from low sensitivity to high sensitivity 161-170 Pan inversion 171-180 Tilt inversion 181-190...
- Page 35 Phantom 300 LED Matrix Channel 21 – LED 1 Red color intensity Dimmer must be open, CH11 and CH12 must be closed 0-255 Gradual adjustment Red, from 0 – 100% Channel 22 – LED 1 Green color intensity Dimmer must be open, CH11 and CH12 must be closed 0-255 Gradual adjustment Green, from 0 –...
-
Page 36: Maintenance
04) If all of the above appears to be O.K., plug the unit in again. 05) If you are unable to determine the cause of the problem, do not open the Phantom 300 LED Matrix, as this may damage the unit and the warranty will become void. -
Page 37: No Response To Dmx
Phantom 300 LED Matrix No Response to DMX Suspect the DMX cable or connectors, a controller malfunction, a light effect DMX card malfunction. 01) Check the DMX setting. Make sure that DMX addresses are correct. 02) Check the DMX cable: Unplug the unit; change the DMX cable; then reconnect to electrical power. -
Page 38: Product Specifications
Phantom 300 LED Matrix Product Specifications Model: Showtec Phantom 300 LED Matrix Input voltage: 100-240V AC, 60/50Hz Power consumption: 340W DMX linking: 30pcs Fuse: T5L/250V Dimensions: 230 x 395 x 480 mm (LxWxH) Weight: 13 kg Operating and Programming: Signal pin OUT:... -
Page 39: Dimensions
Phantom 300 LED Matrix Dimensions Ordercode: 40060... - Page 40 ©2016 Showtec...
Need help?
Do you have a question about the PHANTOM 300 LED MATRIX and is the answer not in the manual?
Questions and answers