Table of Contents
Advertisement
Quick Links
BRK Series
H.264 Digital DVR
quick install guide
MODELS
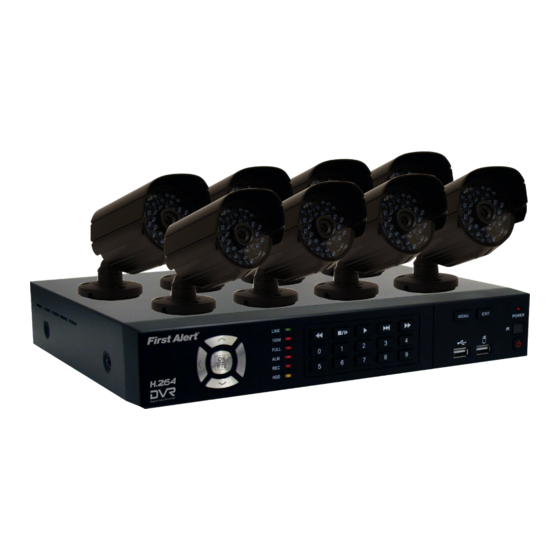
PRO-DC8810-600
PRO-DC8410-600
H.264
VIDEO
DIGITAL DVR
COMPRESSION
RECORDER
8 Channel/8 Cameras
8 Channel/4 Cameras
1.0
MOBILE PHONE/
DVR OPTIMIZED
WEB READY
SATA HDD
TB
INDOOR/OUTDOOR
600 TVL CAMERAS
NIGHT
AUTO IR
VISION
CUT FILTER
PERFORMANCE
COLD TEMP
Advertisement
Table of Contents

Subscribe to Our Youtube Channel
Related Manuals for First Alert PRO-DC8810-600


Summary of Contents for First Alert PRO-DC8810-600
- Page 1 BRK Series H.264 Digital DVR quick install guide MODELS PRO-DC8810-600 8 Channel/8 Cameras PRO-DC8410-600 8 Channel/4 Cameras H.264 VIDEO DIGITAL DVR MOBILE PHONE/ DVR OPTIMIZED INDOOR/OUTDOOR NIGHT AUTO IR COLD TEMP COMPRESSION RECORDER WEB READY SATA HDD 600 TVL CAMERAS...
-
Page 2: Product Overview
BRK Brands, Inc. is a subsidiary of Jarden Corporation (NYSE: JAH). First Alert® is a registered trademark of the First Alert Trust. To obtain warranty service, contact the Consumer Affairs Division at 1-800-323-9005, Monday through Friday, 7:30 a.m. -
Page 3: Dvr Controls
About this Quick Start Guide Thank you for choosing First Alert for your security needs! This Quick Start Guide is designed to provide you with the basic operation of your PRO-D810 DVR which is included in the PRO-DC8810-600 and the PRO-DC8410-600 security kits. Please consult the complete User’s Manual included on the CD disk for a detailed explanation of all the features and functions of... - Page 4 product overview dvr controls back Panel Item Function Description POWER Input DC 12V/5A power connection Network For connecting RJ45 ethernet cable to PC or router VGA Output For connecting to a VGA monitor Video Ouput For connecting to a BNC monitor (800 x 600) Alarm Input 8 alarm inputs Alarm Output...
- Page 5 product overview DVR controls remote control Remote Control Operation The remote control is the secondary input device for navigating the system’s interface. In device operation, the OK key has the same function as “left click” of the mouse. Item Function Description STANDBY Press to turn standby mode ON/OFF...
-
Page 6: Initial Setup
initial setup camera and power connections Step 1 ... Installing cameras Adjusting Points Installing Cable-Safe Mounting Bracket Thumb Screw Ring Decide if the camera is to be wall or ceiling mounted and if cable will be fed through mounting surface hidden directly behind the bracket or fed through the side of the bracket so cable is exposed. -
Page 7: System Operation
initial setup system operation Step 3 ... system start up Power On/Off To power the system On/Off, connect the power cable to the DC 12V port on the rear panel. Flip the toggle switch on in the back of the DVR. At startup, the system performs a basic system check and runs an initial loading sequence. - Page 8 initial setup system operation Step 4 ... language, date and time Setting Up Language/Date/Time Set the system language, date and time, passwords, and configure audio and dis- play options. The Basic Setup Menu contains the following sub-menus: Language, Date/Time, Password, Display, and Video/Audio. Language To change the system language:, from the drop-down menu select LANGUAGE.
- Page 9 initial setup system operation Step 5 ... camera display setup Setting Up Cameras for Viewing and Recording Use the Display Setup menu to customize channel titles, show/hide the date and time in live viewing and playback, and enable/ disable preview channels. To customize Display settings, click BASIC from the Main Menu, then click DISPLAY: Display Configure the following options: •...
-
Page 10: Basic Operation
initial setup Basic operation Basic Setup Use the BASIC SETUP menu to configure language, date and time settings, password setup, along with display, video and audio settings. You can also exit the system through this menu. The Basic Setup menu contains the following sub-menus: Language, Date/Time, Password, Display, Video/Audio and Exit. - Page 11 initial setup Basic operation Motion Detect Setup You can configure motion detection for each channel (Camera) connected to the DVR. To configure motion detection: From the Main Menu click ADVANCED. Then click MD (Motion Detect). Under STATUS, select ON to enable motion detection for the desired chan- nel.
- Page 12 BRK Brands, Inc. ©2012 a Jarden Corporation Company (NYSE:JAH) 3901 Liberty Street Road, Aurora, IL 60504-8122 Phone: 630-851-7330 Tech Services: 800-323-9005 www.brkelectronics.com M08-0440-000...
Need help?
Do you have a question about the PRO-DC8810-600 and is the answer not in the manual?
Questions and answers