Barazza 1ABFY Installation And Use Manual
Blaster chiller
Hide thumbs
Also See for 1ABFY:
- Installation and use manual (48 pages) ,
- Installation and use manual (48 pages)
Table of Contents
Advertisement
Available languages
Available languages
Quick Links
Advertisement
Chapters
Table of Contents

Related Manuals for Barazza 1ABFY


Summary of Contents for Barazza 1ABFY
- Page 1 1ABFY Abatidor Manual de instalación y uso...
-
Page 2: Table Of Contents
Índice INTRODUCCIÓN ............................4 Advertencias generales ........................4 Advertencias sobre seguridad ......................4 Transporte y desplazamiento ......................5 Desembalaje ............................6 INSTALACIÓN ............................6 Datos de placa ........................... 6 Advertencias para la instalación ......................7 Colocación ............................7 Temperatura ambiente y renovación de aire ..................8 Verificaciones finales ......................... - Page 3 Períodos de inactividad ........................19 MANTENIMIENTO EXTRAORDINARIO ....................20 Mal funcionamiento ........................20 Eliminación del aparato ........................20 LOCALIZACIÓN DE AVERÍAS ........................21 Tabla de alarmas ..........................21 DATOS TÉCNICOS ............................ 21 Dimensiones ............................ 21 INFORMACIÓN ............................22 Servicio ............................22 Los datos del cliente ........................
-
Page 4: Introducción
INTRODUCCIÓN Advertencias generales Este manual forma parte integrante del producto, contiene información sobre la instalación, la utilización y la seguridad del aparato. Lea detenidamente las instrucciones aquí incluidas. El usuario así como el técnico instalador deben leer obligatoriamente este manual y hacer referencia al mismo en todo momento. -
Page 5: Transporte Y Desplazamiento
Transporte y desplazamiento Las operaciones de carga y descarga del aparato del medio de transporte deben ser llevadas a cabo utilizando los medios adecuados, como por ejemplo una carretilla elevadora, faltando los cuales se requieren dos personas para realizar dichas tareas. ¡Atención! Durante las operaciones de desplazamiento deben respetarse todas aquellas medidas de precaución necesarias para no ocasionar daños a las personas, la propiedad o el aparato mismo. -
Page 6: Desembalaje
Desembalaje Abra la caja por la parte superior, doblando lateralmente los bordes para facilitar la operación, posteriormente quite la protección superior y los elementos angulares laterales de poliestireno (fig.1). Quite el plástico de protección (fig.2), por último, usando las asas de elevación correspondientes, extraiga el aparato de la caja, tirando de éste hacia arriba (fig.3). -
Page 7: Advertencias Para La Instalación
Advertencias para la instalación La instalación debe ser llevada a cabo únicamente por personal autorizado y especializado, respetando las advertencias, instrucciones y requisitos incluidos en este documento. Antes de instalar el aparato, asegúrese de que las instalaciones eléctricas ya existentes cumplan con la legislación vigente y los datos de placa del aparato que se debe instalar en términos de tensión [V], frecuencia [Hz] y potencia [W]. -
Page 8: Temperatura Ambiente Y Renovación De Aire
Fig.5 – Dimensiones del hueco de empotrar y del producto Temperatura ambiente y renovación de aire Las prestaciones del aparato están garantizadas para valores de temperatura ambiente de hasta 32°C, siempre que se asegure la renovación de aire adecuada tal como indicado en el apartado 2.3. Verificaciones finales Una vez finalizada la colocación y la conexión eléctrica del aparato: •... -
Page 9: Recipientes Y Tapas Que Deben Utilizarse
En los programas que prevén la utilización de la sonda de aguja, el final de proceso se produce de forma automática tras la consecución de la temperatura prevista en el alimento. En el caso de que la sonda de aguja no esté conectada al aparato y el usuario quisiera utilizar el modo sonda de aguja, en la pantalla aparece “Conectar la sonda para ejecutar el programa”. -
Page 10: Programas
Programas ABATIMIENTO Permite conservar los alimentos en la nevera durante 5÷7 días, gracias al enfriamiento rápido de los alimentos a +3°C. El enfriamiento impide la evaporación del agua contenida en los productos recién deshornados y reduce la proliferación bacteriana, prolongando así el tiempo de conservación del alimento. -
Page 11: La Pantalla Y La Interacción Con El Usuario
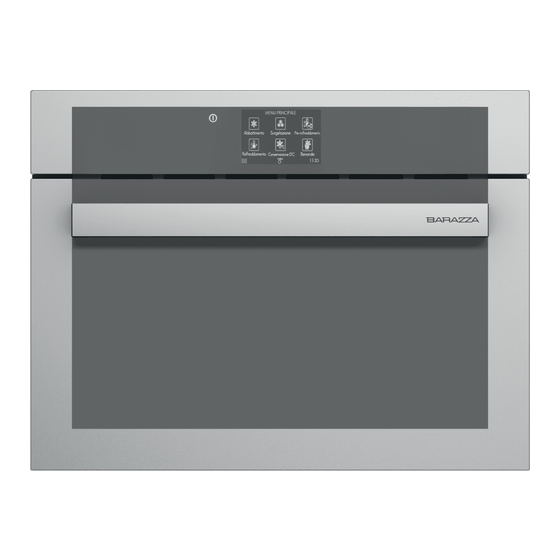
La pantalla y la interacción con el usuario El panel de mandos está compuesto por una pantalla táctil de 4,3 pulgadas y un botón de encendido ubicado lateralmente. Fig.6 – Menú principal y ejemplo de pantalla de selección 1. Icono “Programa”: tocando el icono se abre la pantalla de ejecución del programa correspondiente. 2. -
Page 12: Encendido Y Apagado
3.11 Encendido y apagado Para encender el aparato pulse el botón ON/OFF ubicado al lado de la pantalla durante al menos 2 segundos. Aparece el logotipo, luego la pantalla del “Menú principal”. En ausencia de interacción durante 5 minutos, en la pantalla aparece el salvapantallas de la hora actual. Para apagar el aparato pulse el botón ON/OFF ubicado al lado de la pantalla durante al menos 2 segundos. -
Page 13: Pre-Enfriamiento
3.12.2 Pre-enfriamiento El pre-enfriamiento es aconsejable para reducir los plazos de ejecución de los programas de abatimiento y ultracongelación. PRE-ENFRIAMIENTO Antes de iniciar el programa Es posible verificar la información en la pantalla de resumen. Programa en curso La pantalla muestra los ajustes y el tiempo restante para finalizar el ciclo. AL FINAL DEL PROGRAMA El aparato emite una señal acústica y muestra una pantalla de aviso. -
Page 14: Ultracongelación
3.12.4 Ultracongelación La ultracongelación permite reducir rápidamente la temperatura de un alimento a -18°C, permitiendo conservarlo posteriormente durante varios meses en el congelador. Se mantienen intactas las propiedades organolépticas, el sabor, el aroma y el aspecto de los alimentos mediante la micro-cristalización del agua contenida en el alimento, evitando así... -
Page 15: Bebidas
Al final del programa el aparato emite una señal acústica y visualiza una pantalla de aviso. No se realiza ninguna tarea de mantenimiento de la temperatura de la cámara. Al final no está previsto el desescarchado. 3.12.6 Bebidas El programa “Bebidas” permite reducir la temperatura de una bebida según el tiempo disponible. El abatidor cuenta con características de funcionamiento de gran utilidad cuando no se dispone de tiempo suficiente para la preparación normal para la degustación de bebidas. -
Page 16: Descongelación
PESCADO CRUDO Antes de iniciar el programa Es posible verificar la información en la pantalla de resumen. Programa en curso La pantalla muestra los ajustes y el tiempo restante para finalizar el ciclo. AL FINAL DEL PROGRAMA Al final del programa el aparato emite una señal acústica y visualiza una pantalla de aviso. Entonces se activa el modo de mantenimiento, que se encarga de mantener la temperatura de la cámara a -21°C hasta la sucesiva intervención del operador. -
Page 17: Cocción Lenta
La pantalla muestra los ajustes seleccionados, la hora de fin de ciclo y la hora en la Período de espera que inicia el calentamiento. Programa en curso La pantalla muestra los ajustes y el tiempo restante para finalizar el ciclo. AL FINAL DEL PROGRAMA Al final del programa el aparato emite una señal acústica y visualiza una pantalla de aviso. -
Page 18: Fermentación
3.12.12 Fermentación La fermentación permite crear un microclima con temperatura y humedad controladas, para favorecer la activación y transformación de las levaduras. De este modo la fermentación puede tener lugar en condiciones ideales produciendo el natural aumento de volumen de la masa. Programando la duración de la fermentación se puede reducir la cantidad de levadura, obteniendo así... -
Page 19: Mantenimiento Rutinario
Antes de iniciar el programa Es posible verificar la información en la pantalla de resumen. La pantalla muestra los ajustes seleccionados, la hora de fin de ciclo y la hora en la Período de espera que inicia la fermentación. Programa en curso La pantalla muestra los ajustes y el tiempo restante para finalizar el ciclo. -
Page 20: Mantenimiento Extraordinario
En el caso de que esté previsto no utilizar el aparato durante un largo período de tiempo, es aconsejable desconectarlo de la red de alimentación y realizar una atenta limpieza interna y externa siguiendo las instrucciones de los apartados 4.2 y 4.3. Además se aconseja dejar la puerta entreabierta durante todo el período de inactividad. -
Page 21: Localización De Averías
LOCALIZACIÓN DE AVERÍAS Tabla de alarmas CÓDIGO DESCRIPCIÓN ACCIÓN Contactar con la asistencia para la Sonda de aire averiada reparación Fallo de comunicación de datos entre Contactar con la asistencia para la la tarjeta de potencia y la interfaz de reparación usuario DATOS TÉCNICOS... -
Page 22: Información
ESQUEMA ELÉCTRICO Fig.10 – Esquema eléctrico Tarjeta de potencia Ventilador condensador Fusible Ventilador condensador Toma IEC con filtro EMI Pantalla Borne de tierra Spot-LED Resistencia de calentamiento Ventilador evaporador Compresor Sonda de aire Protección de bimetal Sonda de aguja INFORMACIÓN Servicio La asistencia técnica del producto la proporcionan los centros autorizados locales, cuyas direcciones de referencia para la zona específica figuran en el anexo a este manual. - Page 24 Barazza srl 31025 Sarano di S.Lucia di Piave (TV) ITALIA Via Risorgimento, 14 Tel. +39 0438 62888 Fax + 39 0438 64901 info@barazzasrl.it www.barazzasrl.it...
- Page 25 1ABFY Blaster chiller Installation and use manual...
- Page 26 Contents INTRODUCTION ............................4 General warnings ..........................4 Safety warnings ..........................4 Transport and handling ........................4 Unpacking ............................5 INSTALLATION ............................5 Plate data ............................5 Installation warnings ......................... 6 Positioning ............................6 Ambient temperature and air exchange ................... 7 Final checks ............................
- Page 27 ROUTINE MAINTENANCE ........................19 Safety information ........................... 19 External surface cleaning ......................... 19 Cell cleaning ............................. 19 Periods of inactivity ......................... 19 CORRECTIVE MAINTENANCE ........................20 Malfunctioning ..........................20 Disposal of device ..........................20 TROUBLESHOOTING ..........................21 Table of alarms ..........................21 TECHNICAL SPECIFICATIONS ........................
-
Page 28: Introduction
INTRODUCTION General warnings This manual constitutes an integral part of the product. It contains information on the installation, use and safety of the device. Read the instructions carefully. It is mandatory for the user and installer to read this manual carefully and to always use it as a reference. It is recommended to store this manual in a known location that is accessible to all authorised operators (installer, user, maintenance technician) for consultation at all times, and to attach it to the device if ownership is transferred. -
Page 29: Unpacking
Unpacking Open the box from the top, folding down the flaps to facilitate operations. Then remove the top and corner protections in polystyrene (fig.1). Extract the protective bag (fig.2), then using the dedicated lifting handles, extract the device from the box by lifting it upwards (fig.3). Fig.1 Fig.2 Fig.3... -
Page 30: Installation Warnings
Installation warnings Installation must be carried out only by authorised and specialised personnel in respect of the warnings, instructions and provisions contained in this document. Before installing the device, make sure the pre-existing electrical systems comply with current legislation and are compatible with the ID plate of the device being installed in terms of voltage [V], frequency [Hz] and power [W]. -
Page 31: Ambient Temperature And Air Exchange
Ambient temperature and air exchange The performance of the device is guaranteed up to an ambient temperature of 32°C provided there is a suitable air exchange as indicated in paragraph 2.3. Final checks Once the device has been positioned and electrically connected: •... -
Page 32: Usable Containers And Lids
Note: the core probe must be inserted through to the centre of the food to make sure it doesn’t fall out. To improve the efficiency of programmes, insert the probe in the largest piece. If the core probe is not inserted in the food because it has been forgotten on the floor of the cell or because it has fallen out of the food itself, after 5 minutes the device automatically switches to “recipe”... -
Page 33: Programmes
Programmes BLAST CHILLING Allows foods to be stored in the fridge for 5÷7 days thanks to their rapid cooling down to +3°C. This cooling blocks the evaporation of water from freshly cooked products and reduces the spread of bacteria, thus extending the preservation time of the food itself. BLAST FREEZING Allows foods to be stored in the freezer for several months thanks to their rapid cooling down to - 18°C. -
Page 34: Display And User Interaction
Display and user interaction The control panel consists in a 4.3 inch touch display and power-on button located on the side. Fig.6 - Main menu and example of selection screen 1. “Programme” icon: when this icon is touched, the run screen for the relative programme opens. 2. -
Page 35: Power-On And Power-Off
3.11 Power-on and power-off To power on the device press the ON/OFF key on the side of the display for at least 2 seconds. The logo will appear and therefore the “Main Menu” screen. After 5 minutes of no interaction, a screen-saver with the current time will appear on the display. To power off the device press the ON/OFF key on the side of the display for at least 2 seconds. -
Page 36: Pre-Cooling
3.12.2 Pre-cooling Pre-cooling is recommended to reduce the run time of blast chilling and blast freezing programmes. PRE-COOLING Before starting the It is possible to check the information in the summary screen. programme Programme running The display shows the settings and remaining time until the end of the cycle. AT THE END OF THE PROGRAMME The device emits an acoustic signal and opens up a notification screen. -
Page 37: Blast Freezing
3.12.4 Blast freezing Blast freezing rapidly reduces the temperature of food down to -18°C, thus allowing it to be stored for several months in the freezer. The sensory properties, taste, aroma and appearance of food is maintained through the rapid micro- crystallisation of the food's water content, thus preventing the destruction of its internal molecular structure. -
Page 38: Beverages
AT THE END OF THE PROGRAMME At the end of the programme the device emits an acoustic signal and opens up a notification screen. There is no cell temperature holding phase. There is no defrosting phase at the end. 3.12.6 Beverages The “Beverages”... -
Page 40: Thawing
RAW FISH Before starting the It is possible to check the data inserted through a summary screen. programme Programme running The display shows the settings and remaining time until the end of the cycle. AT THE END OF THE PROGRAMME At the end of the programme the device emits an acoustic signal and opens up a notification screen. -
Page 41: Slow Cooking
Before starting the It is possible to check the data inserted through a summary screen. programme The display shows the selected settings, the end cycle time and the time when Wait period heating will begin. Programme running The display shows the settings and remaining time until the end of the cycle. AT THE END OF THE PROGRAMME At the end of the programme the device emits an acoustic signal and opens up a notification screen. -
Page 42: Proofing
3.12.12 Proofing Proofing allows the creation of a micro-climate with controlled temperature and humidity to encourage the activation and transformation of the yeast. Fermentation thus occurs in best conditions, producing naturally, perfectly risen dough. By programming the duration of proofing, it is possible to reduce the amount of yeast, thus obtaining a lighter, more digestible product while at the same time encouraging the development of the desired aroma. -
Page 43: Routine Maintenance
Before starting the It is possible to check the data inserted through a summary screen. programme The display shows the selected settings, the end cycle time and the time when Wait period proofing will begin. Programme running The display shows the settings and remaining time until the end of the cycle. AT THE END OF THE PROGRAMME Regardless of the proofing mode selected, at the end of the programme the device emits an acoustic signal and opens up a notification screen. -
Page 44: Corrective Maintenance
CORRECTIVE MAINTENANCE Malfunctioning Corrective maintenance operations, the replacement of spare parts, and all operations regarding the lighting system must be carried out by qualified and authorised staff. Note: if malfunctions are identified, before calling the service centre make sure the power cord is properly inserted and check for power. -
Page 45: Troubleshooting
TROUBLESHOOTING Table of alarms CODE DESCRIPTION ACTION Faulty air probe Contact service centre for repair No data communication between Contact service centre for repair power board and user interface TECHNICAL SPECIFICATIONS Blast chilling capacity 3 kg Blast freezing capacity 3 kg Number of levels (for grilles) Electrical parameters 220/240V 50Hz... -
Page 46: Info
WIRING DIAGRAM Fig.10 - Wiring diagram Power board Capacitor fan Fuse Capacitor fan IEC outlet with EMI filter Display Ground terminal Spot-LED Heating element Evaporative cooler Compressor Air probe Bimetallic protection Core probe INFO Service Technical support for products is provided by authorised centres in your area. Addresses for specific areas are provided in the attachment to the manual. - Page 48 Barazza srl 31025 Sarano di S.Lucia di Piave (TV) ITALIA Via Risorgimento, 14 Tel. +39 0438 62888 Fax + 39 0438 64901 info@barazzasrl.it www.barazzasrl.it...
Need help?
Do you have a question about the 1ABFY and is the answer not in the manual?
Questions and answers