Table of Contents
Advertisement
Quick Links
WIRELESS 433 MHz TEMPERATURE STATION
Instruction Manual
INTRODUCTION:
Congratulations on purchasing this tiny 433MHz Temperature Station which displays the
time with second and up to three outdoor temperature readings. With only two easy to use
keys, this innovative product is ideal for use in the home or office.
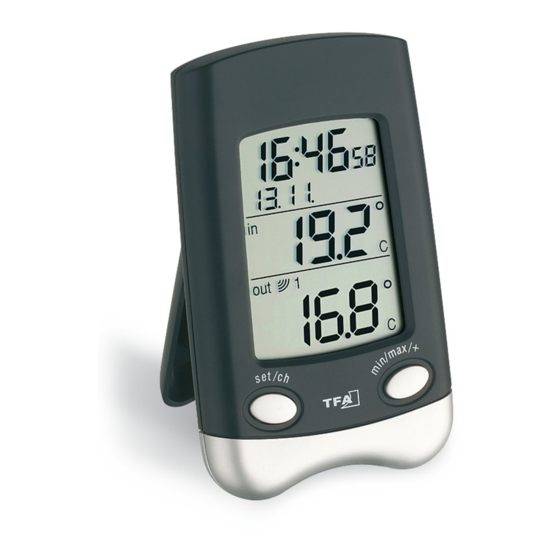
The Temperature Station
Hanging Hole
Set/ CH key
Stand
MIN/MAX/+ key
28
Advertisement
Table of Contents

Related Manuals for TFA HY40.1


Summary of Contents for TFA HY40.1
- Page 1 WIRELESS 433 MHz TEMPERATURE STATION Instruction Manual INTRODUCTION: Congratulations on purchasing this tiny 433MHz Temperature Station which displays the time with second and up to three outdoor temperature readings. With only two easy to use keys, this innovative product is ideal for use in the home or office. The Temperature Station Hanging Hole Set/ CH key...
- Page 2 The Outdoor Temperature Transmitter Holder FEATURES: The Temperature Station • LCD clock in 24 hour time display (hour, minutes, seconds) • DCF-77 Radio Controlled time with manual settings • Date and month calendar display • Indoor and outdoor temperature reading in degree Celsius (°C)
- Page 3 • Can receive up to three outdoor transmitters • Indoor and outdoor temperature with Minimum and Maximum records and time received • Table standing or wall mountable (hidden table stand) The Outdoor Temperature Transmitter • Remote transmission of outdoor temperature to Temperature Station by 433 MHz signal •...
- Page 4 Within 3 minutes of activating the Temperature Station, place the batteries into the outdoor transmitter (see “How to install and replace batteries in the outdoor transmitter” below). After a few seconds of inserting the batteries into the transmitter, the Temperature Station will start receiving data from the transmitter(s).
- Page 5 Once the remote temperature has been received and is displayed on the Temperature Station, the DCF-77 time code reception is automatically started. This takes typically between 3-5 minutes in good conditions. This time period is an excellent opportunity to locate the transmitter(s) in suitable location(s) outdoors. In order to ensure the sufficient 433 MHz transmission however, this should under good conditions be no more than 25 meters from where the Temperature Station will finally be positioned.
- Page 6 HOW TO INSTALL AND REPLACE BATTERIES IN THE TEMPERATURE STATION Flip open the battery cover at the back of the Temperature Station. Checking the correct polarization, insert 2 x AA, IEC LR6, 1.5V batteries into the battery compartment Replace the cover...
- Page 7 HOW TO INSTALL AND REPLACE BATTERIES IN THE TEMPERATURE TRANSMITTER Remove the battery cover at the front side with a small screwdriver. Insert the batteries, observing the correct polarity (see battery compartment marking). Replace the battery cover on the unit. Note: In the event of changing batteries in any of the units, all units need to be reset by launching the setting up procedures.
-
Page 8: Battery Change
BATTERY CHANGE: It is recommended to replace the batteries in all units on an annual basis to ensure optimum accuracy of these units. Please help in the preservation of the environment. Return used batteries to an authorized depot. FUNCTION KEYS: Temperature Station: There are two easy-to-use function keys in the Temperature Station SET/CH key (Setting/Channel) - Page 9 • Used to toggle between the current outdoor transmitters 1, 2 and 3 (if more than 1 transmitter is used) MIN/MAX/+ key (Min/ Max temperature) • Used to toggle between the minimum and maximum recorded readings of indoor/ outdoor temperature and the time of record.
-
Page 10: Lcd Screen
LCD SCREEN DCF Tower Icon (for Time time reception) Date and Month Indoor temperature Outdoor transmission signal Transmitter Outdoor temperature identification number... - Page 11 DCF-77 RADIO CONTROLLED TIME The time base for the radio controlled time is a Cesium Atomic Clock operated by the Physikalisch Technische Bundesanstalt Braunschweig which has a time deviation of less than one second in one million years. The time is coded and transmitted from Mainflingen near Frankfurt via frequency signal DCF-77 (77.5 kHz) and has a transmitting range of approximately 1,500 km.
- Page 12 • Recommended distance to any interfering sources like computer monitors or TV sets is a minimum of 1.5 - 2 metres. • Within ferro-concrete rooms (basements, superstructures), the received signal is naturally weakened. In extreme cases, please place the unit close to a window and/ or point its front or back towards the Frankfurt transmitter.
-
Page 13: Time Zone Setting
Press and hold the “SET/CH” key for about 3 seconds to enter the Manual time setting mode. The Minute digit in the time section starts flashing. Use the MIN/MAX/+ key to set the Minute. Press the SET/CH key to enter the hour. The hour digit start flashing. Use the MIN/MAX/+ key to set the Hour. -
Page 14: Calendar Setting
Press the “SET/CH key to confirm and enter the Calendar setting mode. Time zone (flashing) CALENDAR SETTING The date default of the Temperature station is 1. 1. in the year 2003. Once the radio - controlled time signals are received, the date is automatically updated. However, if the signals are not received, the date can also be set manually:... - Page 15 Press the SET/CH key to enter the Year (the Year digit will be flashing). Use the MIN/MAX/+ key to set the year. Year (flashing) Press the SET/CH key to enter the Month (the Month digit will be flashing). Use MIN/MAX/+ key to adjust the month Day (flashing) Month (flashing) Then press the SET/CH key to enter the Day.
- Page 16 Press the SET/CH key to confirm and exit the Calendar setting mode. CHECKING THE MIN/ MAX TEMPERATURE INDOOR MIN/ MAX TEMPERATURE Press the MIN/MAX/+ key once to display the indoor minimum display and the time of record. Press the MIN/MAX/+ key a second time to show the indoor maximum display and the time of record.
- Page 17 OUTDOOR MIN/ MAX TEMPERATURE The outdoor LCD show the outdoor temperature, the reception indicator, the minimum or maximum reading. A number above the temperature will also be shown if more than one transmitter has been used Outdoor data MIN icon reception MAX icon indicator...
- Page 18 Press the SET/CH key to select the transmitter (only available if more than one transmitter is used). Press the MIN/MAX/+ key three time to show the outdoor minimum temperature display and the time of record. Press the MIN/MAX/+ key again to show the outdoor transmitter temperature display and the time of record Press the MIN/MAX/+ to return to current outdoor temperature display.
- Page 19 RESETTING THE OUTDOOR MIN/ MAX TEMPERATURE Press the SET/CH key to select the particular transmitter to be reset (if more than one transmitter is used) Press the MIN/MAX/+ key three times to enter the outdoor temperature display Press and hold the SET/CH key for about 3 seconds. This will reset both the minimum and maximum outdoor temperature data to the current time, date and outdoor temperature.
- Page 20 433 MHz RECEPTION: The Temperature Station will receive the temperature data within 15 minutes. If the temperature data is not being received 15 minutes after setting up (the display shows “---”), then please check the following points: The distance of the Temperature Station or transmitter should be at least 1.5 to 2 meters away from any interfering sources such as computer monitors or TV sets.
- Page 21 POSITIONING THE TEMPERATURE STATION: The Temperature Station comes complete with a convenient stand that gives the option of table standing or wall mounting. Before wall mounting, please check that the outdoor temperature can be received from the desired locations. To wall mount: Fix a screw into the desired wall, leaving the head extended out the by about 5mm.
- Page 22 OUTDOOR TRANSMITTER: The Outdoor Transmitter is supplied with a holder that may be attached to a wall with the three screws or double-sided tape supplied. To attach to the wall using screws, please follow the steps below: Mark the wall using a pen through the holes in the holder to obtain the exact drilling position.
-
Page 23: Care And Maintenance
range. If for example the unit is attached to a piece of metal, it may then either reduce or increase the transmitting range. For this reason, we recommend not placing the unit on any metal surfaces or in any position where a large metal or highly polished surface is in the immediate proximity (garage doors, double glazing, etc.). -
Page 24: Specifications
• Immediately remove all low powered batteries to avoid leakage and damage. Replace only with new batteries of the recommended type. • Do not make any repair attempts to the units. Return it to its original point of purchase for repair by a qualified engineer. Opening and tampering with the units may invalidate its guarantee. -
Page 25: Liability Disclaimer
Temperature Station 2 x AA, IEC LR6, 1.5V Outdoor Temperature Transmitter 2 x AAA, IEC LR3, 1.5V Battery life cycle approximately 12 months (Alkaline batteries recommended) Dimensions (L x W x H) Temperature Station 115.2 x 70 x 29 mm Outdoor Temperature Transmitter 40 x 22 x 128 mm LIABILITY DISCLAIMER:... - Page 26 • This product is not a toy. Keep out of the reach of children. • No part of this manual may be reproduced without written consent of the manufacturer. R&TTE Directive 1999/5/EC Summary of the Declaration of Conformity: We hereby declare that this wireless transmission device does comply with the essential requirements of R&TTE Directive 1999/5/EC.
Need help?
Do you have a question about the HY40.1 and is the answer not in the manual?
Questions and answers