
Related Manuals for Bryant ZONE PERFECT PLUS A96447


Summary of Contents for Bryant ZONE PERFECT PLUS A96447
- Page 1 Zone Perfect Plus Zoning Systems USER’S INFORMATION MANUAL NOTE TO INSTALLER: This manual must be left with the equipment user.
-
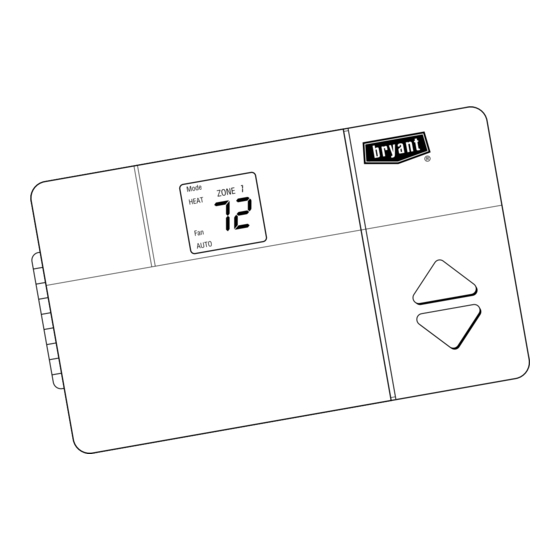
Page 2: Product View
Zone Perfect Plus allows your heating and cooling system to follow your schedule and provide greater comfort in areas which are difficult to heat or cool. Here’s how it works: Your Bryant dealer has divided your home or business into zones which are controlled separately. -
Page 3: Table Of Contents
Table of Contents Introduction..................2 Quick Start . -
Page 4: Planning Your Comfort Schedule
Planning Your Comfort Schedule To give you an idea of how to use your new Zone Perfect Plus system, let’s take the example of a 2-zone house that has been divided into a living area (Zone #1 — family room, kitchen, etc.) and a sleeping area (Zone #2 — bedrooms). For Zone #1, first decide what time each of the 4 periods begin for each day of the week. -
Page 5: Comfort Charts
Wake ZONE Time / Heat / Cool Monday Tuesday Wednesday Thursday Friday Saturday Sunday Wake ZONE Time / Heat / Cool Monday Tuesday Wednesday Thursday Friday Saturday Sunday Wake ZONE Time / Heat / Cool Monday Tuesday Wednesday Thursday Friday Saturday Sunday Wake... -
Page 6: Comfort Charts
Wake ZONE Time / Heat / Cool Monday Tuesday Wednesday Thursday Friday Saturday Sunday Wake ZONE Time / Heat / Cool Monday Tuesday Wednesday Thursday Friday Saturday Sunday Wake ZONE Time / Heat / Cool Monday Tuesday Wednesday Thursday Friday Saturday Sunday Wake... -
Page 7: Programming Your Comfort Schedule
Programming Your Comfort Schedule Now that you have completed your own comfort chart you are ready to start programming with the convenient user interface. The label on the back cover of this owner’s manual is provided to write in the numbers and descriptions of each zone. The label can then be removed from the back cover and affixed to the inside of the user interface door. - Page 8 Step 3 Press the Next Day button until Monday (Mo) is displayed . Step 4 Press the Next Period button until the WAKE period is displayed. Step 5 Press the Set Time/Temp button until the TIME icon is flashing. —8— A98157 A98158 A98159...
- Page 9 Step 6 Using the Zone 1 information from your Comfort Chart, start programming Monday’s schedule beginning with the WAKE period. Press the up or down button until the desired starting time for that period is displayed, making sure that the AM or PM is correct. Step 7 Press the Set Time/Temp button until the HEAT icon is flashing.
- Page 10 Step 9 If that zone is going to be unoccupied press the Out button. Step 10 Press the Set Time/Temp button until the COOL icon is flashing. Press the up or down button until the desired cooling temperature for that period is displayed. You have now programmed the time and the heating and cooling desired temperatures for Zone 1, Monday, WAKE.
- Page 11 Press the Next Period button until the DAY period is displayed. Repeat Steps 5–10 to set the starting time and the desired heating and cooling temperatures for Zone 1, Monday, DAY. Continue the process for the EVE and SLEEP periods. Now all of Zone 1, Monday has been programmed.
-
Page 12: Using Your System
Using Your System Now that you have completed programming your comfort schedule, it is time to use your system. There are 2 operating modes: normal operation and programming mode. Unless you are programming the times or temperatures of a zone, the user interface will be in the normal operating mode. Setting the current day: If it is not already correct, press the Next Day button until the current day of the week is shown. - Page 13 Selecting the system mode: 1. Press the Mode button until you reach the desired mode. 2. For an air conditioning system select: OFF, HEAT, COOL, or AUTO. 3. For a heat pump system select: OFF, HEAT, COOL, AUTO, or EHEAT. OFF —...
- Page 14 Viewing the temperatures in each zone: Press the Next Zone button to view the zone temperature and desired temperatures for each zone. Clean filter feature: Your Zone Perfect Plus system reminds you when to change or clean your filter. It tracks how many hours your equipment has been operating and displays a CLEAN FILTER icon when it is time to change it.
- Page 15 Displaying the outdoor air temperature: If you purchased this option with your Zone Perfect Plus system, press the up and down buttons at the same time to view the temperature outside your home or business. If 2 dashes appear (- -), your system does not include this feature.
-
Page 16: Overriding The Program Settings
Overriding the Program Settings Sometimes it may be desirable to override the program settings without changing the program. Turning a zone off: On occasion it may be desirable to turn a zone off. For example, you may have a sunroom that is only used during the summer season, or a workshop that may only be conditioned in the winter. -
Page 17: Controlling Your Indoor Humidity
Controlling Your Humidity Your Zone Perfect Plus system allows you to control the indoor humidity if you have optional equipment such as a humidifier or a variable speed system. If you do not have these options, you can still view the indoor humidity in your home or business as well as dehumidify your home or business while on vacation to prevent moisture damage. - Page 18 2. Press the Set Time/Temp button until the lower setpoint is flashing. 3. Press the up or down button to raise or lower the desired humidity setting as needed. This can be set from 10–45 percent or off. 4. Press the Fan button to select between: a.
- Page 19 Programming the dehumidification setpoint (optional feature for use with variable speed equipment): 1. Press the Set Time/Temp and Fan buttons at the same time to enter the humidity programming mode. 2. Press the Set/Time button until the upper setpoint is flashing. 3.
- Page 20 Programming your system to dehumidify while on vacation: If you are traveling or your home or business will be unoccupied for some period of time, you may want to occasionally run the air conditioner to prevent moisture damage. This feature is particularly important in very humid regions. Following the five steps listed in the previous section, adjust the dehumidification setpoint to your desired setting and activate the “Cool to Dehumidify”...
-
Page 21: Using Your Smart Sensors
Using Your Smart Sensors If you purchased optional smart or interactive sensors with your Zone Perfect Plus system, you have the ability to control the tem- perature of a zone at that zone’s location. Suppose you have a guest bedroom, and it’s used infrequently. With a smart sensor in the zone, a guest can adjust the temperature as needed for their comfort without changing the program at the user interface. -
Page 22: Frequently Asked Questions
Frequently Asked Questions: What if I go on vacation? One option is to change your program. However, it might be easier to override the program by pressing the Next Zone button until the desired zone is displayed (Zone 1 is recommended for convenience). Press the Set Time/Temp buttons until the heat icon flashes, then press the up or down arrows to change the desired heating temperature. -
Page 23: Comfort Chart
Wake ZONE Time / Heat / Cool Monday Tuesday Wednesday Thursday Friday Saturday Sunday Wake ZONE Time / Heat / Cool Monday Tuesday Wednesday Thursday Friday Saturday Sunday Wake ZONE Time / Heat / Cool Monday Tuesday Wednesday Thursday Friday Saturday Sunday Wake... - Page 24 Cancels: OM17-15 OM17-20 —24— © 1998 Bryant Heating & Cooling Systems, 7310 W. Morris St. Indpls., IN 46231 Printed in U.S.A. Catalog No. 809-601 2-98...
Need help?
Do you have a question about the ZONE PERFECT PLUS A96447 and is the answer not in the manual?
Questions and answers
How do I set the same temperature for all zones from waking until midnight?