Advertisement
Quick Links
Home
›
Power Wheelchairs
Search
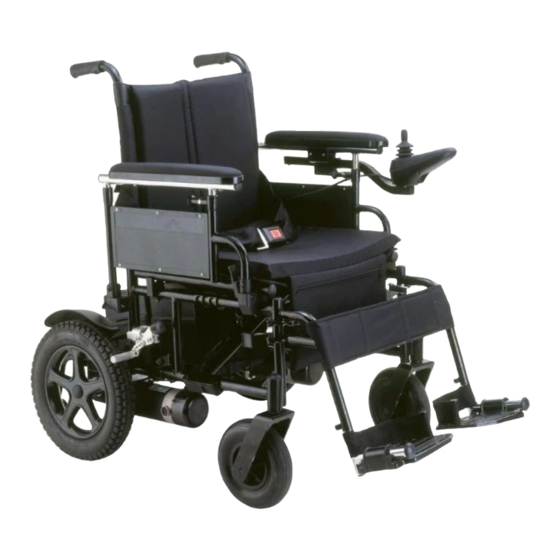
How to assemble a Cirrus Plus EC
Last Updated: Feb 25, 2015 10:09AM EST
Assembly of Cirrus Plus EC
Remove all items from the shipping carton and unfold the chair. Verify that all parts are
present.
Click here to view detailed product information and
pricing.
Call 800-397-5899 to order today!
Advertisement

Related Manuals for Drive Medical Cirrus Plus EC


Summary of Contents for Drive Medical Cirrus Plus EC
- Page 1 › Power Wheelchairs Search How to assemble a Cirrus Plus EC Last Updated: Feb 25, 2015 10:09AM EST Assembly of Cirrus Plus EC Remove all items from the shipping carton and unfold the chair. Verify that all parts are present.
- Page 2 The back upholstery outer cover is installed over the inner back upholstery which is already mounted on the Cirrus Plus power chair. Wrap the outer cover around the inner upholstery with the Drive logo facing reward. ...
- Page 3 Align the Velcro strips on the outer upholstery cover and press together. ...
- Page 4 The amount of tension in the back upholstery can be adjusted. Remove the outer cover from the back. Release one Velcro strap and pull tighter to increase tension. Loosen up to decrease tension. ...
- Page 5 When the desired tension is achieved reattach the strap. Repeat this procedure for the three other straps. Install the outer back cover. ...
- Page 6 Install the seat cushion on the seat upholstery with the pouch in the front. ...
- Page 7 ...
- Page 8 Wrap one end of one of the battery straps under either side of the rear of the battery tray. The Velcro should be facing up. Place the hook section of the Velcro over the smooth section of the Velcro and press together. ...
- Page 9 Verify that the batteries are connected in the battery boxes. ...
- Page 10 Place the battery box with only one connector on the battery tray and slide to the front of the battery tray. The connector should be facing towards the rear of the chair. ...
- Page 11 Place the remaining battery box on the tray with the red connector facing forward. ...
- Page 12 Connect the two red connectors. ...
- Page 13 Secure the battery boxes with the two battery box straps. ...
- Page 14 ...
- Page 15 Insert the joystick and arm into the joystick bracket on the arm of the Cirrus Plus power chair. Route the wire from the joystick behind the rear upright of the side frame. ...
- Page 16 Connect the large black two prongs to the black connector from the battery box. The connector will only t in one way. ...
- Page 17 Connect the connector marked right motor to the right motor. The connector will only t in one way. ...
- Page 18 Repeat for the left side. ...
- Page 19 Install one footrest by aligning the hole on the footrest hanger with the pins on the footrest mounting plate on the chair ...
- Page 20 Slide the footrest onto the pins. Swing the footrest inward until it looks into place. Repeat for the other side. ...
- Page 21 The calf strap is attached by wrapping the Velcro straps of the calf pad around each foot rest and adjusted as needed. ...
- Page 22 To remove the footrest, the calf strap must be removed. Then push the footrest release lever and swing the footrest away from the chair. ...
- Page 23 Lift the foot rest o the chair. Repeat for the other side. ...
- Page 24 Insert one anti tipper, with the wheels facing downward, into the rear lower frame of the chair. ...
- Page 25 Depress both locking buttons and continue pushing the anti tipper into the frame until the anti tipper locks in place. Repeat for the other side. ...
- Page 26 ...
- Page 27 To disengage the anti tipper, depress both locking buttons. Turn the anti tipper 180 and until it locks into place. Repeat for the other side. ...
- Page 28 ...
- Page 29 Before the Cirrus Plus power chair can be driven, both motors freewheel levers must be set to the drive position. If the Cirrus Plus power chair is to be pushed manually, put the freewheel lever in the freewheel position. ...
- Page 30 To lock the drive wheels push the wheel lock handles towards the front of the Cirrus Plus power chair. ...
- Page 31 To release the wheel locks push the wheel lock handle towards the rear of the Cirrus Plus power chair. ...
- Page 32 Connect the power cord to the battery charger. ...
- Page 33 Plug the battery charger into a wall outlet. ...
- Page 34 The red light on the charger will come on to indicate there is a good connection to the wall outlet. ...
- Page 35 Make certain that the chair is turned o . Plug the charger into the charger port on the joystick. ...
- Page 36 Turn the charger on. ...
- Page 37 The second light on the charger will light up yellow. ...
- Page 38 When charging is complete the yellow light will turn green. Turn the charger o and disconnect the charger from the chair and wall outlet. Charging time will vary with the condition of the batteries and discharged state. ...
- Page 39 Did you nd this article helpful? Related Articles How to install basket #SF8020 How to install elevating leg rests ECELR-P and SFELR How to assemble an Image EC How to install oxygen tank holder #SF8010 How to lock and unlock P&G joysticks How to eliminate caster utter on the Trident Power Wheelchair to ELR Catalina P&G Joystick Flash Codes...
- Page 40 Geo Flash Codes Image EC Flash Codes Image GT Flash Codes Intrepid P&G Joystick Flash Codes Medalist P&G Joystick Flash Codes Renegade P&G Joystick Flash Codes Sun re EC Flash Codes Sun re General Flash Codes Email Us Tech Support (866) 621-4933 Powered by Desk.com ...
Need help?
Do you have a question about the Cirrus Plus EC and is the answer not in the manual?
Questions and answers