
Related Manuals for PEZTIO Dashcam-A1


Summary of Contents for PEZTIO Dashcam-A1
- Page 2 About Model A1 1.1 Functions Introduction 4K Ultra-clear Video Equipped with a powerful NOVATEK chip, A1 can record videos up to 4K (3840×2160). We suggest you choose a high-speed SD card (Class 10) with large storage space. A1 can support an SD card up to 128GB.
- Page 3 achieve this function, please purchase the hardwire kit (not included in package). Loop Record The Loop recording video can be set the timing 1 min, 3 mins or 5 mins. It will overwrite the oldest unprotected video with the lasted footage, make space for your memory card. Auto Lock the Vital Video in An Accident When a severe bump happens to your vehicles, the current video will be automatically locked and protected in the memory...
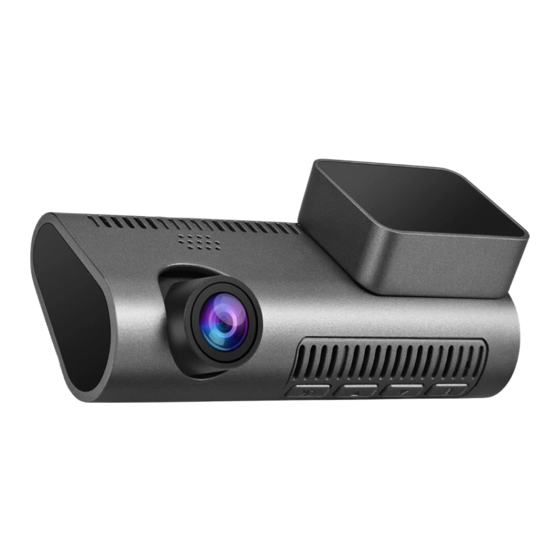
- Page 4 1.3 Product Structure...
- Page 5 Content Description 1.Press to enter setting 2.Long press to enter picture mode Menu 3.Long press twice enter playback mode Upwards 1.Downwards Down 2.In video mode,short press to turn on/off the audio Wi-Fi Long press to turn on/off Wi-Fi Press to confirm Removable power supply base Lens Adjustable lens up and down...
- Page 6 1.4 Power Supply For daily recording, A1 camera need powered by an external power, please connect the A1 to your cigarette lighter by the car charger. Note that: When without an external power supply, the battery will be drained quickly if you turn on the WiFi mode in this situation (not suggest).
- Page 7 1.5 Package Content Reset Needle Car Charger Stickers User Manual Warranty Card Start to use 2.1 Format the SD card on Computer Insert the SD card to the SD card adapter. Insert the SD card adapter to your computer. Click on the icon (My Computer) and select your SD card. Right-click to format.
- Page 8 2.3 Install the A1 to your car US Customers UK Customers Tear off the lens film and screen film. Install A1 in a suitable position on the front windshield (please choose a position that does not block the drive sight), and wipe the selected position with a paper towel. Adjust the lens to get the best recording angle.
- Page 9 2.4 Adjust the lens angle to get the best view Note: To achieve discreet design, the screen has limited size, you can only view the limited area of the video. The whole size of image will be shown on your cellphone 2.5 Format the SD card via A1 Double press Menu button to enter the system.
- Page 10 Wi-Fi Connection 3.1 TimaCam Download For iOS users, please search” TimaCam” on App Store For Android users, please search” TimaCam” on Google Play store.
- Page 11 3.2 Connect the Wi-Fi Long press the Down button to open the Wi-Fi signal. Open the smart phone WIFI and search for the device WIFI network, the name is CarDV*** Enter the password (default password: 12345678) for the first connection. Wait for the phone to connect properly.
- Page 12 3.3 APP Interface Note: 1.Any operation, press” Stop record” first. 2.In order to play the video more smoothly, please download the video to the local album first.
- Page 13 3.4 Wi-Fi Trouble shooting PROBLEMS SOLUTION 1. Make sure no other device or phone is connected to the A1 Wi-Fi. The A1 does not support connection with My phone has multiple devices at the same time. searched the Wi- 2.Disconnect the Wi-Fi and reconnect Fi of the A1 but again.
- Page 14 PROBLEMS SOLUTION This Wi-Fi is only used for data transfer I can’t connect of A1 and mobile phone, it can't access internet the Internet. when I connect this Wi-Fi? The download speed depends on the File download files size and the interference situation, speed is very please give it some minutes to finish.
- Page 15 4.2 Video Mode Interface In video mode WDR ON (turn on/off in video mode setting) Wi-Fi OFF (Long Press the Down button to open the Wi-Fi) Lock status (in record status, press the mode button to lock the current video) When in recording, it shows the recording time;...
- Page 16 4.4 Picture Mode Interface In picture mode Time-lapse picture time (can change on picture mode setting) Picture file name Value of exposure (can change on picture mode setting) Image size (can change on picture mode setting) 4.5 Playback Mode Setting **Long press the Menu button to enter playback mode when in picture mode - Delete (Delete Current/Delete All)
- Page 17 4.7 System Setting - Wi-Fi (Off/On) Long press the Down button to turn off the Wi-Fi - License plate number - Date/Time - Auto Power Off (Off/1min/3mins/5mins) - Auto LCD (Off/10s/30s/1min) - Language - Time Zone - Daylight saving time (Off/On) - Beep Sound (Off/On) - Volume (1/2/3/4/5) - Frequency (50Hz/60Hz)
- Page 18 PROBLEMS SULUTION The A1 is no Please reset the A1. (the reset needle is response. in package) With the card previously installed, you now need to push the card further inwards slightly, using your finger nail, Cannot remove until you hear and feel a small latch. Use the SD card.
- Page 19 PROBLEMS SOLUTION I take out the A1 The build-in battery can only support from without 20-30mins use time without external connecting battery. After you operating it, please power, connect it to the cigarette lighter by car shut down after charger. 25 mins.
- Page 20 ANY PROBLEMS, please contact our technical team via email below, we will support 7x24 professional customer support. (12 months warranty guarantee) Here is the E-mail address: support-us@peztio.com US Customers: support-eu@peztio.com EU Customers: E-Instruction Guidance Video...
- Page 21 This device complies with Part 15 of the FCC Rules. Operation is subject to the following two conditions: (1) this device may not cause harmful interference, and (2) this device must accept any interference received, including interference that may cause undesired operation NOTE: This equipment has been tested and found to comply with the limits for a Class B digital device, pursuant to Part 15 of the FCC...
Need help?
Do you have a question about the Dashcam-A1 and is the answer not in the manual?
Questions and answers