Table of Contents
Advertisement
Advertisement
Table of Contents

Related Manuals for Mak Grills ONE STAR GENERAL

Summary of Contents for Mak Grills ONE STAR GENERAL
- Page 1 American Made Pellet Grills OWNER’S MANUAL ONE STAR GENERAL TWO STAR GENERAL...
- Page 3 Welcome to the MAK family! Your grill was assembled by hand and inspected at every stage by tradesmen and tradeswomen who live and work amid the green hills of Oregon's Willamette Valley. If you have any questions about the grill or its operation, do not hesitate to contact us.
- Page 4 American Made Pellet Grills Please register your grill at www.makgrills.com/registration Grill Serial number Date Purchased Pellet Boss Firmware Version No. Inspected by:___________________ Date:_________________...
-
Page 5: Table Of Contents
SAFETY INFORMATION ... 9 ASSEMBLY INSTRUCTIONS ONE STAR GENERAL ..11 TWO STAR GENERAL ..19 INITIAL BURN-IN . -
Page 6: Warranty
MAK GRILLS shall not be liable under this, or any implied warranty for incidental, special, or consequential damages or any damage or defect to finish on the unit. In no event shall MAK GRILLS' obligation to customer exceed the purchase price of the unit. This warranty gives customer specific legal rights and customer may have other rights which vary from state to state. -
Page 7: Safety Information
WARNINGS & PRECAUTIONS Please read this manual before assembling or using your MAK Grill. This unit includes electrical components and produces real wood fire—failure to understand and follow proper guidelines for use can result in property damage, bodily injury, or death. Contact your local building or fire officials to learn about restrictions and installation inspection requirements in your area. - Page 8 ADDITIONAL WARNINGS Always use your MAK Grill outside in a well-ventilated area. Never use indoors, or in an enclosed area. Unplug the cord when grill is not in use. Improper installation or assembly may result in uncontrolled fire. Always maintain proper clearance between the grill and combustible materials.
-
Page 9: One Star General
ONE STAR GENERAL GENERAL SPECIFICATIONS ..12 BBQ DIAGRAM ....13 PARTS LIST ....14 ASSEMBLY INSTRUCTIONS . -
Page 10: General Specifications
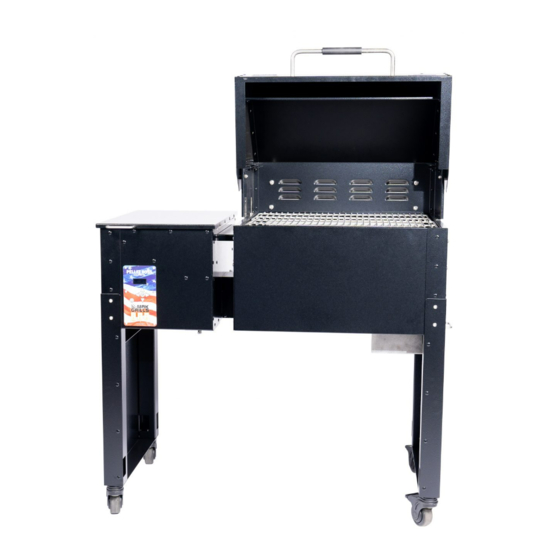
ONE-STAR GENERAL SPECIFICATIONS GRILL DIMENSIONS: 49”H x 40”W x 21.5”D PRIMARY COOKING SURFACE: 429 in.² (19.5” x 22” x 14”) TOTAL POSSIBLE COOKING SURFACE: 858 in.² (with one full slide-in upper grate) GRILL WEIGHT: 160 lbs. CONSTRUCTION: Type 1 ACS body; 304 stainless steel internal components FINISH: 850°F high-temp powder coat HOPPER CAPACITY: 20 lbs. -
Page 11: Bbq Diagram
BBQ DIAGRAM Grill Body with attached Pellet Hopper Left leg panel Right leg panel Internal grease drawer... -
Page 12: Parts List
ONE STAR GENERAL PARTS LIST GRILL BODY GREASE DRAWER EFT LEG PANEL ASH CLEANOUT W CASTERS COVER IGHT LEG PANEL GREASE SHIELD W CASTERS ARGE HANDLE W RUBBER GRIP SMALL HANDLES FLAME ZONE SPLIT COOKING FlameZone covers GRATES Diffuser HEX WRENCH SET... -
Page 13: Assembly Instructions
ASSEMBLY INSTRUCTIONS Assembly of your MAK Grill requires two people. Begin by removing the leg panel boxes, then remove the cardboard sleeve surrounding the grill. Make sure all parts and hardware are included in the packaging before beginning assembly. Remove and flatten the outer cardboard sleeve to set the grill body on top of while assembling the leg panels. - Page 14 With two #6 x 3/8” screws and lock washers, attach the grease drawer handle to the grease drawer. Then slide the grease drawer in place, inserting the top flange into the slots on the right side of the grill body. Push the drawer all the way in to capture grease runoff.
- Page 15 7 - INSTALL THE FLAMEZONE 1. Place the funnel grease tray on the lip around the inside of the cooking chamber. The lip below the slot on the right side of the tray fits over the top of the triangular grease shield. When properly installed, the grease tray slopes toward the right of the grill to channel grease into...
- Page 16 “Key Factors for choosing MAK Ÿ Made in America (This matters) Ÿ Customer Service (Second to none) Ÿ Quality – The workmanship is unbelievable. The t and nish of the metalwork is like an exotic sports car.” -Client review quote.
-
Page 17: Two Star General
TWO STAR GENERAL GENERAL SPECIFICATIONS ..20 BBQ DIAGRAM ....21 PARTS LIST ....22 ASSEMBLY INSTRUCTIONS . - Page 18 TWO-STAR GENERAL SPECIFICATIONS GRILL DIMENSIONS: 49”H x 60”W x 25”D PRIMARY COOKING SURFACE: 429 in.² (19.5” x 22” x 14”) TOTAL POSSIBLE COOKING SURFACE: 1617 in.² (with one 3/4 and two upper grates) GRILL WEIGHT: 235 lbs. CONSTRUCTION: 304 stainless steel; Type 1 ACS FINISH: 850°F high-temp powder coat HOPPER CAPACITY: 20 lbs.
- Page 19 BBQ DIAGRAM 2-Star Grill Body Back splash Warmer/Smoker box Bottom shelf Internal grease drawer Left leg panel Right leg panel...
- Page 20 TWO-STAR GENERAL PARTS LIST GRILL BODY GREASE DRAWER EFT LEG PANEL GREASE SHIELD W CASTERS IGHT LEG PANEL SMALL HANDLES W CASTERS ARGE HANDLE SPLIT COOKING GRATES W RUBBER GRIP ASH CLEANOUT COVER BOTTOM SHELF ARMER SMOKER BACK SPLASH FUNNEL GREASE ARMER SMOKER TRAY FRAME BOX GRATE...
- Page 21 ASSEMBLY INSTRUCTIONS Assembly of your MAK Grill requires two people. Begin by removing the leg panel boxes, then remove the cardboard sleeve surrounding the grill. Make sure all parts and hardware are included in the packaging before beginning assembly. Remove and flatten the outer cardboard sleeve to set the grill body on top of while assembling the leg panels.
- Page 22 Finger tighten the screws to hold the backsplash loosely in place; wait to fully tighten until the grill body has been attached to the cart. With two people, lift the grill body onto the cart assembly. Align each leg screw hole with the grill body and attach grill body to cart assembly using eight 1/4”-20 x 1/2”...
- Page 23 To install the small handles onto the pellet hopper lid, warmer box lid, and grease drawer, use two #6 x 3/8” screws and #6 x 3/8” lock washers per handle. Attach the main lid handle with two 1/4”-20 x ½” screws, two 1/4” lock washers, and two 1/4”...
- Page 24 20 - INSTALL THE FLAMEZONE 1. Place the funnel grease tray on the lip around the inside of the cooking chamber. The lip below the slot on the right side of the tray fits over the top of the triangular grease shield. When properly installed, the grease tray slopes toward the right of the grill to channel grease into...
-
Page 25: Initial Burn-In
Initial Burn-In Once the grill is assembled, it will need to be seasoned before cooking on it. This process burns away excess oils left over from manufacturing, and prepares the internal surfaces for regular use. NSTRUCTIONS ARE AS FOLLOWS Fill hopper with cooking pellets. You received a 20 lb. bag of Bear Mountain hickory pellets with your grill—all of them will t in the pellet hopper. - Page 26 After your grill is seasoned, you are ready to cook! Please allow 30 minutes after shutting off the grill before turning it back on. The rst time you start your grill, it may take 10-20 minutes before the pellets are able to reach the repot from the pellet hopper. If it takes too long for the pellets to reach the repot, you may get a “FLAME OUT”...
- Page 27 If you plan to store your grill for more than two weeks, empty the pellet hopper before storage. Also turn the auger to remove any remaining pellets from the auger tube (see instructions on page 59). For best results, we recommend emptying the repot after every 3-5 uses, or more often if you perform long-term “low 'n slow”...
- Page 28 IGNITION SEQUENCE The sequence for “Igniting” is fan on at 100%, igniter on and auger on for 2 minutes 47 seconds. Auger then stops for 3 minutes 10 seconds. The auger will repeat this process until it switches to “GRILL” mode. Once Grill mode is achieved the igniter will turn off. The fan will decrease in speed;...
-
Page 29: Pellet Boss
Pellet Boss The Pellet Boss controller is the brains of your grill. The three moving parts— the FlashFire igniter, the auger, and the fan— are all guided by the Pellet Boss. Understanding the Pellet Boss will help you get the most out of your MAK Grill. - Page 30 USING THE PELLET BOSS Six buttons control all the functions: ON/OFF Press once to turn grill on. If the grill is running, press and hold to enter COOL DOWN MODE;press any button once after that to bypass the COOL DOWN PHASE and shut the grill off completely.
- Page 31 MANUAL MODE (IN CASE OF THERMOCOUPLE DAMAGE OR FAILURE) In the event of thermocouple failure, the grill will be unable to detect temperature. However, you can still operate your MAK in Manual Mode. This function lets you use your grill until a replacement thermocouple arrives.
- Page 32 PELLET BOSS REAR VIEW Familiarize yourself with each component and plug receptacle on the back of the Pellet Boss control board with this photograph. Should grill repairs ever be necessary, you will better understand where to locate and correctly plug in components. Always remove the Pellet Boss carefully to avoid pulling out any connections or plugs on the back of the control board.
- Page 33 SCREEN DISPLAY DESCRIPTIONS AND SETTINGS SETPOINT Screen Display: SETPOINT TEMPERATURE SMOKE Displays internal temperature setting. Default setpoint is SMOKE— temperature holds between 170°F-190°F. Change setpoint in 5°F increments between 200°F and 450°F. Select setpoint GRILL for temperatures above 450°F; high temperature is governed at 600°F. To adjust setpoint, press STAR;...
- Page 34 PROBE 1 Screen Display: PROBE 1, 2, and 3 Shows the internal food temperature of each meat probe in use. To add a probe alarm, press the right arrow till you reach PROBE 1. Press star; the word “OFF” will ash.
- Page 35 USER 1 Screen Display: USER 1, 2, or 3 Up to three user programs can be preprogrammed. Setup and operation are the same procedure for each USER 2 user program. Each user program includes up to ve steps, with changes made automatically according to USER 3 time or temperature.
- Page 36 ALARMS & ALERTS When set ALARMS are reached the Pellet Boss sounds a loud beep and the appropriate display screen ashes. Alarms sound for ten minutes, then shut off automatically. To deactivate an alarm, press any button on the Pellet Boss. There are ten distinct alarms on the Pellet Boss.
- Page 37 FLAMEOUT FLAME OUT ALARM: The ame out alarm sounds when the re has died and cannot relight. The Pellet Boss display reads FLAMEOUT/FIREPOT. What to Do: Press any button to end the alarm. Remove all food from the grill. When the grill has cooled, remove the cooking grates, FlameZone pan or drip tray, and heat diffuser.
- Page 38 Make sure that the internal temperature is above 140°F to avoid food poisoning. WEB CTRL WI-FI WEB CONTROL TIMEOUT: This alert only sounds when using MAK Grills Mobile. The display reads TIME OUT and the Pellet Boss beeps for ten minutes, or until the alarm is deactivated.
- Page 39 PROBE 1 MEAT PROBE ALARM(S): CHECK When a probe reads the programmed temperature, the Pellet Boss beeps and the appropriate PROBE screen ashes. What to Do: Press any button to end the alarm. Check the temperature of the food to con rm it is at the desired temperature.
- Page 40 Pellet Boss, then reconnect it. Turn on the grill; the grill temperature and the outside ambient air temperature should be the same. If the error persists, refer to “Manual Mode” instructions below, and contact MAK Grills Support for further assistance. HOPPER HOPPER OPEN:...
- Page 41 COOLDOWN COOL & SHUT DOWN 19:42 Displays when ON/OFF is pressed to turn grill OFF. The fan will continue to blow to help burn out the remaining pellets and to cool down the grill. The cool down sequence is twenty minutes or less, depending on the internal temperature of the grill.
- Page 42 When you purchase a MAK, you directly support American engineering, construction, and employment. In return, you receive an outstanding product designed to the highest standards for a lifetime of wood- re avored family meals.
-
Page 43: Cleaning & Maintenance
Cleaning & Maintenance These cleaning tips are meant to keep your MAK Grill looking and operating correctly for as long as possible. Always let the grill cool completely before cleaning. - Page 44 EXTERIOR CLEANING FAN PANEL Use a wet/dry vacuum to clean the airholes. For deeper cleaning, remove the panel from the grill and wash it with soap and hot water; rinse and dry before reattaching. RILL ID Clean the bottom edge and inside with mild dish soap and hot water. If necessary, detach the lid to clean more thoroughly.
- Page 45 INTERIOR CLEANING SH LEAN UT When suf cient pellet ash accumulates in the bottom of the grill, remove the square ash clean out cover and brush the ash through the square opening. The ash will fall into the grease drawer on the bottom right of the grill body.
- Page 46 FIREPOT With grill completely cool, remove the repot. Dump ash into a reproof container and replace repot. For best results, empty repot every 3-5 uses. EAT IFFUSER Remove accumulated ash as needed. No other cleaning is necessary. REASE RAWER Check regularly for grease accumulation. DO NOT allow it to over ll. (For easy cleanup, press a mini aluminum loaf pan into the drawer.) When the drawer is full, carefully remove it from the cooled grill.
- Page 47 CLEANING EXHAUST LOUVERS Ÿ Proper air ow is crucial to ensure your MAK GRILL operates at optimum levels. Clean all louvers inside and out at least once every 6 months. If you frequently cook greasy or expensive cuts of meat, increase that to once every 3 months or less. Ÿ...
- Page 48 RECOMMENDED CLEANING SCHEDULE WEEKLY EXTERIOR Clean Grill Finish Grill Shelves INTERIOR Firepot MONTHLY EXTERIOR Louvers Grease Chute Grease Pan INTERIOR Quick Change Grease Pan Cooking Chamber ONCE PER QUARTER EXTERIOR Clean Pellet Hopper Warmer / Smoker Box Grease Shield INTERIOR TWICE A YEAR EXTERIOR Clean Fan Panel...
- Page 49 CARE & CLEANING OF STAINLESS STEEL Ÿ For a very dirty grill use a white or pink nylon scouring pad, applying rm pressure to dislodge all debris. Wipe the cleaned areas with a damp cloth and dry with a soft towel. Ÿ...
- Page 50 After washing and rinsing, let components dry before replacing them in the grill. An extensive FAQ on the MAK Grills website contains additional troubleshooting information. For anything not covered in this manual, call us at (503) 623-1234 Monday-Friday 8am-5pm PST, or email...
- Page 51 Should you experience an interruption in the proper operation of your grill, please consult this troubleshooting guide before contacting MAK Grills. An extensive FAQ on the MAK Grills website contains additional troubleshooting information. If you cannot nd a resolution or...
-
Page 52: Troubleshooting & Repairs
TROUBLESHOOTING & REPAIRS ALWAYS unplug your grill and allow it to cool completely before attempting service or repairs. Support videos are available on the MAK Grills website, www.makgrills.com, to guide you step-by-step through common operations. DISPLAY WILL NOT TURN ON Cause: Indicates failure of GFCI outlet or Pellet Boss controller. - Page 53 Contact MAK GRILLS Service for assistance. MY GFCI CIRCUIT KEEPS TRIPPING Cause: Indicates your igniter is failing. Ÿ Turn off your igniter (see instructions page 59). Ÿ Contact MAK Grills for a replacement igniter. Ÿ Follow “Manual Lighting Procedure” while awaiting new igniter.
- Page 54 Ÿ Carefully replace all interior components. Avoid the re, don't get burned. Ÿ Turn the grill on and cook as normal. Ÿ Contact MAK Grills for a replacement igniter. FAN DOES NOT RUN Cause: Indicates fan blades are obstructed, fuse has blown, or fan has failed.
- Page 55 Plug the grill back into electrical power and turn the grill on. NOTE: Never put spilled pellets from the ground back into your pellet hopper. NOTE: If the auger still does not operate, call MAK GRILLS Service for additional help.
- Page 56 Ÿ If the situation persist, you can override this feature by removing the fan/access panel and disconnecting the connection to the HOPPER SWITCH found on the back ride side of the Pellet Boss board. This will completely disengage this feature. Ÿ Contact MAK Grills Service for additional assistance.
- Page 57 TURNING COMPONENTS ON OR OFF USING THE PELLET BOSS Periodically you may need to turn a component off in order to perform repair or testing. Instead of having to manually unplug the components from the back of the Pellet Boss, you can now turn them on or off using settings in the maintenance screen.
- Page 58 Questions? We’ve got answers! https://makgrills.com/support NOTES...
- Page 59 TEMPERATURE GUIDE ... . 60 TIPS & TRICKS ....61 COOKING METHODS ... . . 62 COLD &...
-
Page 60: Temperature Guide
TEMPERATURE GUIDE INTERNAL FOOD TYPE TEMPERATURE (°F) Ground meat / meat mixtures Beef, pork, veal, lamb 160° Ground meat / meat mixtures Turkey, chicken 165° Fresh beef, veal, lamb Steaks, roasts, chops 145°, rest for 3 minutes Poultry Pieces, whole bird, stuf ng 165°... -
Page 61: Tips & Tricks
TIPS & TRICKS Mastering the art of cooking with real wood smoke takes years of experimentation and practice to make perfect. The MAK takes a lot of the guesswork out of the equation, and frees you up to work on your special secret sauce, your hidden weapon rub, or just to spend time with family and friends. -
Page 62: Cooking Methods
COOKING METHODS There are a few terms you will encounter often as you continue to learn about and research the best outdoor cooking recipes and methods. Here's a short glossary: BARBECUING Barbecue is a cooking method used to cook larger, tougher cuts of meat like pork shoulder or butt, beef brisket, ribs, and roasts. -
Page 63: Cold & Hot Weather Tips
COLD & HOT WEATHER COOKING TIPS MAK Grills are designed to operate consistently year-round. However, extreme weather conditions, both hot and cold, can affect time-to- temp and overall cooking time. In cold weather, start your grill earlier than you normally would in order to reach your setpoint by the time you want to put your food on the grill. -
Page 64: Rubs & Sauces
RUBS & SAUCES You received one bottle of rub and one bottle of sauce with your MAK Grill. Rubs are typically applied to food before placing it on the grill, and sauces are typically applied near the end of a cook. The following guide offers some suggestions for best results. - Page 65 RUBS IRD UB Best on game and poultry birds, including turkey, chicken, pheasant, quail, and Cornish hens. AJUN UB Add some heat and body to jambalaya, shrimp, or gumbo. Makes a great crust on cat sh. HIPOTLE UB A great go-to rub for chicken, shell sh, and hamburgers. ISH UB Delicate citrus avors will permeate your seafood and sh.
- Page 66 SAUCES EVIL S UNCH AUCE Hot as Hades! This molten liquid will bring tears of repentance to your eyes. ICKORY AUCE A tomato-based sauce that offers the perfect Texas avor to steak, roast, and chops. ONEY OURBON AUCE The sweetness of honey with the kick of bourbon imparts full-bodied avor to any cut of meat.
-
Page 67: Recipes
RECIPES Recipes, cooking tips and tricks from the MAK family! http://makgrills.com/recipes-tips or scan QR code. -
Page 68: Grill Accessories
Increase your capacity and versatility with MAK accessories! http://makgrills.com/accessories or scan QR code. -
Page 69: Stay In Touch
Stay in Touch If you've made it this far, you're ready to start cooking on your new MAK Grill. We'd love to hear about your experiences! Feel free to reach out anytime — we're always eager to hear what our MAK Family is cooking, how they're doing it, and what tips they can share for making a better outdoor cooked meal.
Need help?
Do you have a question about the ONE STAR GENERAL and is the answer not in the manual?
Questions and answers