
Related Manuals for Nacecare NUC244NX


Summary of Contents for Nacecare NUC244NX
- Page 1 NUC244NX COMPACT SCRUBBER DRYER AUTOLAVEUSE COMPACTE Original Instructions CAUTION, Read instructions before using the machine. Notice originale MISE EN GARDE. Lisez la notice avant d’utiliser la machine.
- Page 2 PLEASE READ BEFORE COMMENCING OPERATION. KEEP FOR FUTURE REFERENCE After the removal of all the packaging, carefully open and check the contents ● Owner Manual ● Battery Charger & Lead ● Battery Pack ● Scrub Brushes x 2 ● Squeegee Assembly IMPORTANT : À...
-
Page 3: Table Of Contents
NUC244NX C O M PA C T S C R U B B E R D R Y E R A U T O L AV E U S E C O M PA C T E Index Index Machine Overview ......... -
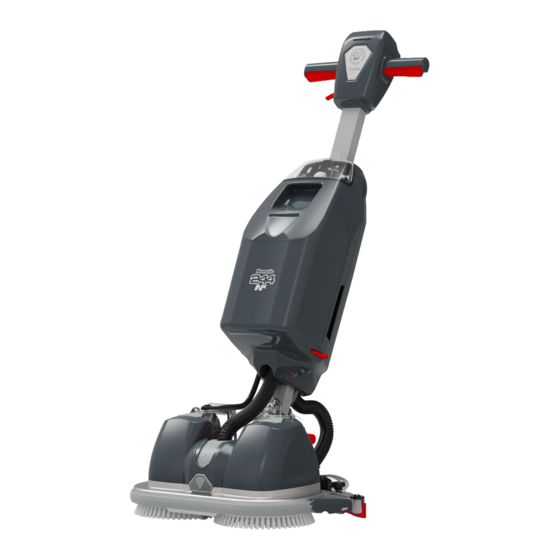
Page 4: Machine Overview
Machine Overview Vue d’ensemble de la machine... - Page 5 Machine Overview Vue d’ensemble de la machine Operator control panel Tableau de bord de l’opérateur Triggers Poignées-interrupteurs Waste-water tank Réservoir d’eau sale Clean-water tank Réservoir d’eau propre Brush deck Plateau de brosses Squeegee blades Lames de la raclette Clean water flow adjustment taps Robinets de réglage du débit d’eau propre Clean-water filling / emptying cap Bouchon de remplissage/vidange de l’eau propre.
-
Page 6: Control Panel Overview
C O M PA C T S C R U B B E R D R Y E R A U T O L AV E U S E C O M PA C T E NUC244NX Control Panel Overview... -
Page 7: Quick Set Up Guide
FR:- À LIRE AVANT D’ENTREPRENDRE TOUTE OPÉRATION APRÈS AVOIR RETIRÉ TOUS LES EMBALLAGES, OUVREZ LE CARTON AVEC PRÉCAUTION ET VÉRIFIEZ-EN LE CONTENU. NUC244NX CONTENTS Brush fitting - Make sure battery is removed before fitting or removing brushes ● Owner Manual ●... -
Page 8: Main Tank Assembly Removal
Main tank assembly removal Remove the tank assembly from the front of the Lift and tilt the top of the tank assembly away from the handle as you remove. Place the tank assembly machine. Using the inset handle on the front of on a suitable surface in its upright/uppermost position. -
Page 9: Battery Fitting & Water Flow Setting
Remove the clean water tank from the main body of the tank holder (4&5). To fill remove the rubber stop from the filling neck. Note: There is a T piece keeping the rubber stop from being completely removed. 4/5/6. Retirez le réservoir d’eau propre du corps principal du support de réservoir (4&5). Pour le remplir, retirez la butée en caoutchouc du goulot de remplissage. Remarque : Une pièce en T empêche le retrait complet de la butée en caoutchouc. - Page 10 Tilt the bottom of the tank towards the handle Line the tank up against the machine handle and Clean water tank full and fitted to the machine. above the battery. lower the tank down. Make sure it is securely fitted. 4.
-
Page 11: Machine Handle Operation
To lower the floor-tool, press down on the left foot pedal lever at the rear of the machine (10-A). To lower the machine deck to the ground. Stand behind the machine, grip the handles. With your right foot push the right pedal forward (11-B). (By pushing lever the front support wheel retracts under the deck (11-C)). Pull the small lever on the right hand side of the handle upwards (12-D) and then pull the handle backwards. -
Page 12: Storage & Transportation
Water On / Off Vacuum On / Off With either trigger pulled in press the water on button, this lights up blue to Press the vacuum on button, this lights up blue to indicate it is on and the indicate it is on. vacuum starts. -
Page 13: Regular Maintenance
Storage and Transport mode option 2 To raise the floor-tool use the toecap locations to the rear of the floor-tool and lift up (A). To raise the machine deck off the ground. Stand behind the machine, grip the handle. With your right foot push the right pedal down (B) while pulling the machine backwards until the storage wheels click into position and the front support wheel extends. -
Page 14: Clean Water Tank Outlet Cleaning
Démontage et nettoyage du séparateur 1. Attrapez la languette du séparateur entre le pouce et l’index, et tirez vers l’avant. 2. Soulevez le séparateur pour l’écarter du réservoir. 3. Amenez le séparateur à une station de nettoyage appropriée. 5. Une fois le séparateur retiré, lavez-le soigneusement sous un robinet en veillant à bien rincer les tubes et à nettoyer le filtre à grille (A). Une fois le séparateur nettoyé, vérifiez que le joint en caoutchouc n’est pas endommagé... -
Page 15: Emptying Tanks
Tilt forwards at a slight angle making sure the protruding nub fits into the recess on the float valve (B). Press down firmly on the arrow and the float valve will click into place. WARNING! DO NOT PULL ON THE FLOAT BALL (A) Pulling on the FLOAT ball will cause it to break and the vacuum shut off will fail. -
Page 16: Changing The Floor-Tool Blades
Changing the Floor Tool Blades. Remplacement des lames du suceur Always make sure that the machine is switched off and the battery is removed prior to any maintenance. To change the floor-tool, firstly lower the floor-tool using the left side floor-tool lowering foot pedal (A). Pull the floor-tool away from the machine (B). -
Page 17: Refitting The Floor-Tool Blades
Refitting the Floor Tool Blades Refit the blade holder, retain using the two outer knobs. Make sure the slotted blade goes to the front of the floor-tool. Refit the floor-tool using the two central knobs to the floor-tool. Make sure the end holes on both squeegee blades are positioned correctly on ‘T’... -
Page 18: Battery Removal & Charging
Battery removal and charging. Retrait et recharge de la batterie Removing The Battery Remove the tank assembly from the front of the machine using the inset handle on the front of the tank assembly, lift the tank assembly straight up (A). Pull the tank assembly from the machine and place on the ground. -
Page 19: Specifications
Specifications. Caractéristiques Brush / Pad Brush / Pad Brush Motor Weight Cleaning Area Brush Speed Brush / Pad Width Pressure Power in cleaning mode in cleaning mode Poids de la brosse / Pression brosse / Puissance du Zone de nettoyage Vitesse des brosses Largeur de la brosse / du patin du patin... -
Page 20: Troubleshooting
Troubleshooting. Dépannage PROBLEM CAUSE SOLUTION Machine will not operate Battery not connected Connect battery (page 9) Low battery charge Charge battery (page 9) Vacuum will not operate Vacuum not turned on Turn on vacuum (page 12) Poor water pick-up Waste-water tank full Empty waste-water tank (page 15) Clogged / blocked squeegee hose Remove and clean (page 15) -
Page 21: Rating Label / Personal Protective Equipment / Recycling
About your machine (GB) 19.4 Rating Label Company Name & Address Machine Description Battery Voltage Noise Emission Hand Arm Vibration Weight (ready to use) Ingress Protection Rating Gradient symbol Battery part number Machine QR code Approval Mark Part Number Machine yr/wk Serial number Numatic Support PPE (Personal protective equipment) that may be required for certain operations. -
Page 22: Safety Precautions
ORIGINAL INSTRUCTIONS Information for Scrubber Dryer READ MANUAL BEFORE USE COMPONENT INTERVAL INSPECT FOR Mains Lead DAILY Scuffing, cracks, splits, conductors showing Brushes DAILY Bristle damage, wear, drive collar wear Squeegee Blade BEFORE EACH USE Wear, cracks, splits Filters BEFORE EACH USE Clogging and debris retention Tanks AFTER EACH USE... -
Page 23: Plaque Signalétique / Équipement De Protection Individuelle Recyclage
À propos de la machine (FR) 19.4 Plaque signalétique Nom et adresse de la société Description de la machine Tension de la batterie Émissions sonores Vibrations main-bras Poids (prête à l'emploi) Indice de protection contre la pénétration Symbole de gradient Informations pour les importateurs de l’UE. -
Page 24: Précautions À Prendre
NOTICE ORIGINALE LISEZ LE MODE D’EMPLOI AVANT UTILISATION Informations concernant l’autolaveuse COMPOSANT INTERVALLE RECHERCHER Câble d'alimentation QUOTIDIENNEMENT Éraflures, fissures, crevasses, conducteurs apparents Brosses QUOTIDIENNEMENT Poils endommagés, usure, usure du collier d’entraînement Lame pour raclette AVANT CHAQUE UTILISATION Usure, fissures, fentes Filtres AVANT CHAQUE UTILISATION Obstruction, rétention de débris... -
Page 25: Recommended Spare Parts
Spare Parts. Pièces détachées. Part No. SPARES & ACCESSORIES Part No. SPARES & ACCESSORIES 909996 BATTERY 912353 RED PADS PACK OF 10 911334 LITHIUM BATTERY CHARGER 912354 WHITE PADS PACK OF 10 911844 DRIVE BOARD PACK OF 2 912352 GREEN PADS PACK OF 10 911500 CLEAN WATER TANK 912356... - Page 26 Notes ............................................................................................................................................................................................................................................................................................................................................................................................................................................................................................................................................................................................................................................................................................................................................................................................
- Page 27 Notes ............................................................................................................................................................................................................................................................................................................................................................................................................................................................................................................................................................................................................................................................................................................................................................................................
-
Page 28: Company Address
Cette machine a été emballée This Machine Has Been Packed Distributed by: With The Following avec les éléments suivants Distribué par : Brosse de nettoyage / patin Scrub Brush / Pad Squeegee Assembly Ensemble raclette Charger / Lead & Battery Pack Pack chargeur / câble et batterie Signed Signed...
Need help?
Do you have a question about the NUC244NX and is the answer not in the manual?
Questions and answers