
Subscribe to Our Youtube Channel
Related Manuals for Elitegroup Computer Systems LIVA Q1A/ PB01A


Summary of Contents for Elitegroup Computer Systems LIVA Q1A/ PB01A
- Page 1 1 A/PB01A Rockchip RK3288 Elitegroup Computer Systems Co., LTD. No. 239, Sec. 2, Tiding Blvd., Neihu District, Taipei City, Taiwan (11493) Tel: 02-21621177...
- Page 2 Trademark Recogni ti on Rockchip is a registered trademark of Rockchip Electronics Co.,Ltd. Other product names used in this manual are the properties of their respective owners and are acknowledged. LIVA Q1A/ PB01A ULTRA TINY PC USER MANUAL...
- Page 3 RF emission limits governing this device. Changes or modifications not expressly approved by the system’s manufacturer could void the user’s authority to operate the equipment. LIVA Q1A/ PB01A ULTRA TINY PC USER MANUAL...
- Page 4 EN 60950 Safety for information technology equipment including electrical business equipment EN 62368 Safety for information technology equipment including electrical business equipment CE marking LIVA Q1A/ PB01A ULTRA TINY PC USER MANUAL i i i...
- Page 5 Do not spill water or any other liquid on your system. • When the system is turned OFF, a small amount of electrical current still flows. Always unplug all power, modem, and network cables from the power outlets before cleaning the system. LIVA Q1A/ PB01A ULTRA TINY PC USER MANUAL...
- Page 6 2. Exposure to Radio Frequency Radiation: This equipment complies with FCC radiation exposure limits forth for an uncontrolled environmrnt. This equipment should be installed and operated with minimum dis- tance 20cm between the radiator & your body. LIVA Q1A/ PB01A ULTRA TINY PC USER MANUAL...
- Page 7 3. Do not expose this product to high levels of direct sunlight, high-humidity or wet conditions. 4. Do not block the air vents to this product or impede the airflow in any way. LIVA Q1A/ PB01A ULTRA TINY PC USER MANUAL...
- Page 8 Cet appareil numérique de la classe B respecte toutes les exigences du Réglement sur le matériel brouilieur du Canada. Software Devel opment For Android app development details, please refer to the official Android developer web site http://developer.android.com LIVA Q1A/ PB01A ULTRA TINY PC USER MANUAL vi i...
- Page 9 Memo LIVA Q1A/ PB01A ULTRA TINY PC USER MANUAL viii...
-
Page 10: Table Of Contents
TABLE OF CONTENTS Preface Chapter 1 Introducing the PC Introduction............1 Specifications..........2 Front and Rear I/O..........4 Side I/O.............6 Install the VESA Mount........7 Motherboard Components......9 LIVA Q1A/ PB0 1A ULTRA TINY PC USER MANUAL... - Page 11 Memo LIVA Q1A/ PB0 1A ULTRA TINY PC USER MANUAL...
-
Page 12: Introducing The Pc
Chapter 1 Introducing the PC Introduction Thank you for choosing LIVA Q1A/PB01A Ultra Tiny PC featuring Rockchip ® RK3288 of great performance and with stylish and flex- ible design. ® This mini PC is based on Rockchip RK3288 Mobile platform. Low power processor with ARM Quad-Cortex-A17 and integrates graph- ics, memory, and I/O interfaces into one solution. -
Page 13: Specifications
Note: ID design and specification may vary, please refer to actual goods you purchase. Specifications CPU/Chipset • Rockchip ® RK3288 Quad-core Cortex-A17 up tp 1.6GHz Memory • Onboard LPDDR3-1600 2GB Storage • Support eMMC 32 GB Panel I/O • 3 x USB 2.0 ports •... - Page 14 • 802.11 b/g/n Wifi • Bluetooth 5.2 supports BT peripheral device Power Supply • ASIAN POWER DEVICES INC. WB-24J12R Operation • Android 8.1 / LINUX(Lubuntu 18.04) System Heatsink • Heatsink Design Operation • 0~+40 Temp Dimension • 74mm x 74mm x 34.6mm Color •...
-
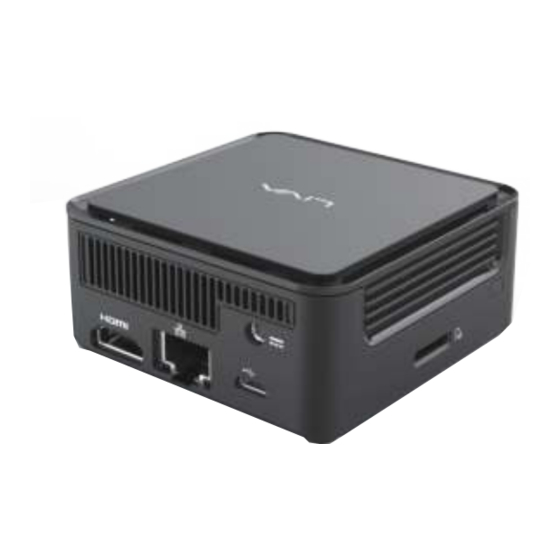
Page 15: Front And Rear I/O
Front and Rear I/O Note: ID design and specification may vary, please refer to actual goods you purchase. 1. Power Button Use this button to power on/off the system. 2. Power State LED This is power state LED light. 3. USB 2.0 Port Connect your USB 2.0 device to this port. - Page 16 HDMI Port You can connect the display device to the HDMI port. 5. Giga LAN Port Connect the RJ-45 jack to the LAN ports for Network connecting. 6. Micro USB Port Connect your Micro USB 2.0 device to this port. 7.
-
Page 17: Side I/O
Side I/O 8. Micro SD card slot This is Micro SD card slot. 9. Security Key hole This is security key hole. LI VA Q1A/ PB0 1A ULTRA TI NY PC USER M ANUAL... -
Page 18: Install The Vesa Mount
Install the VESA Mount 1. Mount 4 screws on VESA bracket. 2. Fasten 2 screws under the case. LI VA Q1A/ PB0 1A ULTRA TI NY PC USER M ANUAL... - Page 19 3. Hold the case towards the VESA bracket and insert the screws into the holes. 4. Slide the case down until it fixed. LI VA Q1A/ PB0 1A ULTRA TI NY PC USER M ANUAL...
-
Page 20: Motherboard Components
Motherboard Components Micro USB SW900 DC_IN HDMI eMMC USB2.0 USB2.0 USB2.0 PWR_BTN J1801 J1800 J1300 J1301 Note: Find J1300~1301 and J1800~1801 on the two motherboards, insert J1300~1301 into J1800~1801 correctly after their alignment. LI VA Q1A/ PB0 1A ULTRA TI NY PC USER M ANUAL... - Page 21 Table of Motherboard Components LABEL COMPONENTS 1. SoC Rockchip® RK3288 2. SW900 Recovery button 3. LED Power state LED 4. PWR_BTN Power On/Off button 5. DC_IN Power input port 6. J1800 IO board connector 7. J1801 IO board connector 8. J1301 Motherboard connector 9.
Need help?
Do you have a question about the LIVA Q1A/ PB01A and is the answer not in the manual?
Questions and answers