ClearCube R4300 Product Manual & Installation Manual
Clearcube r4300 chassis: install guide
Hide thumbs
Also See for R4300:
- Firmware update manual (3 pages) ,
- User manual (100 pages) ,
- Site preparation manual (9 pages)
Table of Contents
Advertisement
Quick Links
Download this manual
See also:
User Manual
Advertisement
Table of Contents
Troubleshooting

Subscribe to Our Youtube Channel
Related Manuals for ClearCube R4300


Summary of Contents for ClearCube R4300
-
Page 2: Technical Support
ClearCube Technology, Inc. This information is subject to change without notice and ClearCube shall not be liable for any direct, indirect, special, incidental or consequential damages in connection with the use of this material. -
Page 3: Table Of Contents
ClearCube Grid Center Software ........ - Page 4 Chassis Power Requirements ........
- Page 5 Replacing the R4300 Fan Pack ........
- Page 6 Fuse and Power Cord Replacement ........122 Appendix D – Warranty Index iv • Contents ClearCube Product Manual and Installation Guide...
- Page 7 R4300 Power Modules Locations ........55...
- Page 8 Cage with Fan Pack Removed (DCBP Shown) ......108 vi • Figures ClearCube Product Manual and Installation Guide...
- Page 9 R4300 Connect Module Features ........51...
- Page 10 • Tables ClearCube Product Manual and Installation Guide...
-
Page 11: Introduction
Thank you for purchasing your quality ClearCube products. The ClearCube Architecture was developed to bring you unprecedented levels of manageability, security, reliability, and space savings. The ease of use of ClearCube’s products will make installation straightforward. This manual provides all the product and installation information needed to set up and run ClearCube Technology’s R Series Architecture for managed desktop... -
Page 12: Weee Information
Because each end-user system environment is customized and differs from ClearCube testing platforms and because a user may use ClearCube products in combination with other products in a manner not evaluated or contemplated by ClearCube, the user is ultimately... -
Page 13: Informations Sur La Deee
Du fait que l'environnement de chaque uti- lisateur final est unique et diffère de celui des plate-formes de tests de ClearCube, et que l'utilisateur peut employer les produits ClearCube avec d'autres appareils d'une manière qui n'a pas été... -
Page 14: Informationen Über Weee
Endbenutzerumgebung speziell angepasst ist und sich von ClearCube-Testplattformen unterscheidet, und da ein Benutzer ClearCube-Produkte zusammen mit anderen Pro- dukten auf eine nicht von ClearCube in Betracht gezogene Art verwenden kann, liegt die endgültige Verantwortung über die Prüfung und Validierung der Eignung von Clear- Cube-Produkten beim Benutzer, wenn ClearCube-Produkte in ein System eingebunden sind, einschließlich und ohne Einschränkung, das geeignete Design, der Prozess und... -
Page 15: La Información De Reee
Tecnología ClearCube apoya el volver a emplear, reciclar, la recuperación, y la disposición responsable de todos los productos semejantes, no solamente nuestros sistemas. La Tecnología ClearCube esta cometida a cumplir con los requisitos de la directiva de la Unión Europea WEEE, y al corriente fomenta la implementación de planes país-especifico que conforman con la legislación de REEE. -
Page 16: Symbols - English
Symbols are used on the equipment to convey specific information to the operator and service person. It is important to understand the intended meaning of these symbols. Below are the graphical symbols that are used on ClearCube Technology, Inc. Products and their meaning. -
Page 17: Safety Guidelines
For replacement of power cords, refer to Appendix C – Technical Support. • IT Power Systems – ClearCube equipment has been evaluated and found to be compatible with IT power distribution systems with a phase-to-phase voltage not to exceed 240 V. - Page 18 ClearCube Technology products that use lasers display the following graphic on the rating label: Marked devices comply with the FDA code of Federal 21 CFR 1040 per Notice 50 and/or the Canadian Radiation Emitting Devices Act REDR C1370.
-
Page 19: Symboles - Français
Il est important de bien comprendre la signification de ces symboles. Les symboles graphiques et leur signification, ci-dessous, sont utilisés sur les produits de ClearCube Technology, Inc. Tous ces symboles sont utilisés dans ce document aux chapitres appropriés, afin d'indiquer les situations qui demandent une vérification ou la consultation d'un autre... -
Page 20: Guide De Sécurité
• Mise à la masse du châssis – Le châssis et le transceiver fibre de ClearCube ont été conçus avec un socle de connecteur trois conducteurs IEC 60320 qui, avec le cordon d'alimentation adéquat, connecte la masse protectrice externe du bâtiment à... - Page 21 L'étiquette ci-dessous est apposée sur les appareils de ClearCube Technology qui utilisent un affichage laser : Les appareils ainsi identifiés sont en conformité avec le code FDA "Federal 21 CFR 1040, Notice 50"...
-
Page 22: Symbole - Deutsche
Informationen. Es ist wichtig, die beabsichtigte Bedeutung dieser Symbole zu verstehen. Die nachstehend angezeigten Symbole verweisen auf die durch ClearCube Technology, Inc. verwendeten Symbole und ihre Bedeutungen. Diese Symbole werden im Dokument verwendet, um auf Situationen hinzuweisen, in denen dieses oder ein weiteres Handbuch zu Rate gezogen werden sollten, oder falls die Möglichkeit von Schäden oder Verletzungen besteht. -
Page 23: Sicherheitsrichtlinien
Auswechslung von Netzkabeln finden Sie im Anhang C – Technischer Support (Appendix C – Technical Support). • Netzadapter – ClearCube oder der ClearCube Vertrieb bieten Netzadapter an, die jeweils für das bestimmte Gerät entwickelt wurden und deren Verwendung durch die örtlichen Behörden des jeweiligen Landes, in dem das Gerät betrieben wird, genehmigt ist. - Page 24 VORSICHT: Die Bedienung oder das Vornehmen von Justierungen oder Vorgängen entgegen der hier aufgeführten können eine gefährliche Laserstrahlungsbelastung zur Folge haben. ClearCube Technology-Produkte, die Laser verwenden, weisen das folgende Symbol auf dem Gerätebewertungsetikett auf: Gekennzeichnete Geräte entsprechen dem FDA Code of Federal 21 CFR 1040 per Notice 50 und/oder dem Canadian Radiation Emitting Devices Act REDR C1370.
-
Page 25: Símbolos - Español
Es importante entender la intención del significado de estos símbolos. Abajo se muestran los símbolos gráficos que se usan en los productos ClearCube Technology, Inc., así como su significado. Estos mismos símbolos se usan en este documento cuando es apropiado para indicar situaciones que ameritan revisar este u otro manual, o que pudieran resultar en daño al aparato o lesión física. -
Page 26: Directrices De Seguridad
• Conexión a tierra del chasis – El Cage de ClearCube y el Transceptor de Fibra han sido diseñados con una entrada de aparato con tres conductores IEC 60320 que (con el cable de alimentación apropiado) conecta al conductor aterrizado externo protectivo de construcción a todas las partes accesibles de metal del... - Page 27 Productos de ClearCube Technology que usan láser muestran el siguiente gráfico en la etiqueta de especificaciones. Los dispositivos marcados cumplen con el código federal FDA 21 CFR 1040 por notificación 50 y/o el acta canadiense REDR C1370 para dispositivos con emisión de...
- Page 28 This page intentionally left blank. 18 • Introduction ClearCube Product Manual and Installation Guide...
-
Page 29: Clearcube Architecture And Product Overview
Blade parameters even when the Blade is powered off. The front panel LCD shows the last three digits of the Blade serial number as a default. ClearCube Switch Manager software can be used to program as many as 15 alphanumeric characters into the display. -
Page 30: Figure 1 R Series Pc Blades (Single And Dual Processor)
C/Port Link Indicator Hard Drive Activity Indicator Network Activity Indicator Cage Slot Designation (1 – 8) Figure 2 ClearCube R Series Blade Front Panel Display 20 • ClearCube Architecture and Product Overview Reset Button Power Button ClearCube Product Manual and Installation Guide... -
Page 31: Table 1 Blade Led Functions
Model R1200: 1000 Mb/s link — flashing indicates activity. Green Model R2100: 10/100/1000 Mb/s link — flashing indicates activity. Yellow/ Model R1200: 10/100 Mb/s link — flashing indicates activity. Amber Model R2100: Not applicable. No link. ClearCube Architecture and Product Overview • 21 Description... -
Page 32: R Series Cage
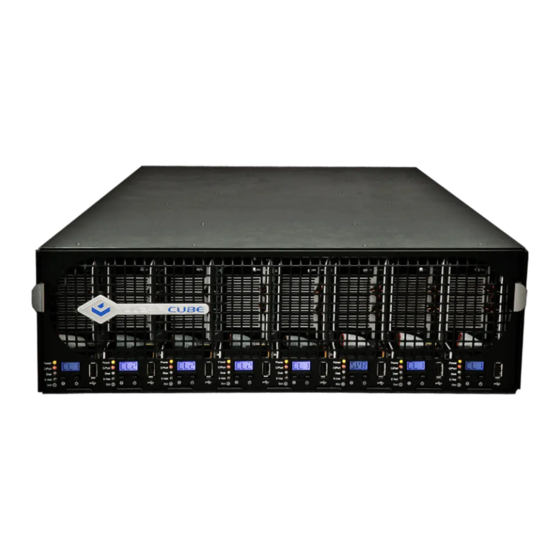
R Series Cage The ClearCube R Series Cage is a centralized chassis that houses as many as eight single-processor PC Blades and as many as four dual processor PC Blades. A standard 42U 19-inch rack can hold as many as fourteen Cages, for a total of 112 single-processor PC Blades. -
Page 33: Backpack
BackPack R4300 BackPack The R4300 BackPack, shown in Figure 4, provides a wide range of options for C/Port and I/Port connections to Blades and to the ClearCube network. The R4300 BackPack provides advanced monitoring and switching functionality, with software support for these modules provided by Switch Manager 4.6. The R4300 BackPack and Switch Manager 4.6 are fully compatible with all R-series Blades. -
Page 34: Blade Switching Backpack
(similar to traditional KVM switching capability). Switch Manager communicates with the BackPacks through an Ethernet connection on the management controller housed in each R4300 BackPack. The management controller is installed inside the BackPack and does not take up a Blade slot. -
Page 35: Direct Connect Backpack
The Direct Connect BackPack, shown in Figure 6, brings the C/Port connections and the Ethernet connections directly to the back panel from each individual PC Blade. Figure 6 Direct Connect BackPack Rear View ClearCube Product Manual and Installation Guide ClearCube Architecture and Product Overview • 25... -
Page 36: C/Port
Blade and has two USB ports, PS/2 mouse and keyboard ports, speaker and microphone ports and video output port. Other C/Port options such as the Multi-Video Expander (MVX) are also available from ClearCube. More detailed product specifications are provided in Appendix A. C/Ports are connected via standard twisted-pair copper networking cables: CAT5, CAT5e, or CAT6. -
Page 37: Multi-Video Solution
Multi-Video Solution The ClearCube multi-video solution provides a revolutionary way to multi-task and process information. While the C/Port provides all the peripheral and USB connections, the multiplexed video signal can be passed through to the Multi-Video Expander (MVX) via a noise-limiting VGA connector cable. -
Page 38: Fiber Optic Extension System
BackPack to fiber optic signals. A single 16-port Transceiver supports two standard ClearCube Cages, or 16 PC Blades. The C/Port signals from the ClearCube Cage are looped into the Transceiver over a short C/Port cable (≤ 10 meters), one for each Blade. -
Page 39: I/Port
NOTE: The Fiber C/Port has a unique power supply. The power supplies for the I/Port The ClearCube I/Port is a user port that connects to PC Blades over a standard Ethernet network. The I/Port delivers video and peripheral signals to a local user from a centralized PC Blade, just like the C/Port. -
Page 40: Capio One
When equipped with a PCI riser card adapter, the Eon e100 can accept industry-standard PCI expansion cards. While not all PCI cards will be compatible, ClearCube has certified a fiber Ethernet adapter card, a wireless access card, and a dual monitor card for use in XPe-based Eon e100 I/Ports. -
Page 41: Clearcube Grid Center Software
ClearCube Grid Center Software ClearCube Grid Center provides IT administrators with a comprehensive set of features and functionality for managing their I/Port environments. Grid Center can optimize hardware utilization by dynamically allocating I/Ports to a defined pool of PC Blades. - Page 42 This page intentionally left blank. 32 • ClearCube Architecture and Product Overview ClearCube Product Manual and Installation Guide...
-
Page 43: Network Planning And Site Preparation
Preparation Rack and Cabinet Requirements Before installing the components of the ClearCube Architecture it is very important to properly prepare the site where you will install the Cages and PC Blades. This chapter provides important information on how to plan for installation. -
Page 44: Space And Floor Support Requirements
Fully enclosed electrical cabinets are the preferred option for mounting your ClearCube Cages. When using cabinets, make sure that both front and rear panels and doors are vented to provide sufficient airflow for intake and exhaust. If you plan to... -
Page 45: Cooling And Airflow Requirements
Power Requirements Your ClearCube system centralizes all computing components in a single location thereby concentrating the majority of the power needed to this one area. Although the ClearCube solution reduces the overall power required when compared to traditional box PCs, the power demands in the IT center are increased. -
Page 46: Japan-Specific Requirements
48.6 19,890 56.7 23,205 64.8 26,520 72.9 29,835 33,150 89.1 36,465 97.2 39,780 105.3 43,095 113.4 46,410 ClearCube Product Manual and Installation Guide 0.31 0.62 0.93 1.24 1.55 1.86 2.17 2.48 2.79 3.41 3.72 4.03 4.34 0.28 0.56 0.84 1.12 1.68... -
Page 47: Cable Requirements
C/Ports. Network connections follow standard Ethernet guidelines. In practice, identical copper media can be used for C/Ports and for network connections, although ClearCube recommends using different cable colors for C/Port and network connections to simplify installation and maintenance. -
Page 48: Figure 14 Clearcube Fiber C/Port Architecture Cabling Diagram
Admin C/Port and Terminal C/Port Ethernet Cables Cables 3 m or shorter Network Switch ClearCube Fiber Transceiver Figure 14 ClearCube Fiber C/Port Architecture Cabling Diagram User Desktops Data Center with I/Ports Cage Admin C/Port and Terminal Ethernet Cables Network Switch Figure 15 ClearCube I/Port Architecture Cabling Diagram 38 •... -
Page 49: Free Ip Address Requirement
With the R4300 BackPack, the default startup configuration is DHCP (Dynamic Host Configuration Protocol), which automatically requests an IP address from your DHCP server. If you do not have a DHCP server, the R4300 BackPack uses the static IP address of 192.168.1.251, same as a Blade Switching (BSBP) or Direct Connect BackPack (DCBP) with an installed Remote Management Card (RMC). - Page 50 This page intentionally left blank. 40 • Network Planning and Site Preparation ClearCube Product Manual and Installation Guide...
-
Page 51: Cage And Blade Installation
Cage and Blade Installation Installation of ClearCube products is straightforward and can be accomplished in just a few hours. The following instructions are intended for use by IT technicians familiar with computer systems at the hardware configuration level. Tools for Installation... -
Page 52: Cage Installation
Fiber Transceiver. Refer to the Safety Guidelines on page 7 for more information. R4300 modules are packaged individually and shipped in a carton separate from the Cage, with their appropriate patch cables in each package. Installing the Cage CAUTION: To avoid equipment damage and potential personal injury, install the Cage without Blades installed. -
Page 53: Standard Cage Mounting Hardware
Cages using the Chassis Accessory kit can be installed either from the front or from the rear of the rack. Cages using the CRM kit can be installed only from the front of the rack. Begin installing Cages at the bottom of the rack or cabinet. This provides support for each Cage before it is securely mounted, and greatly simplifies getting the Cage square and level in the rack. -
Page 54: Figure 16 Side View Of Cage Centered In A 2-Post Rack
Fiber Transceiver. Refer to the Safety Guidelines on page 7 for more information. At this point, if the installation of a ClearCube system is part of a larger office renovation or build-out, complete the Cage hardware installation and wiring, but delay installation of the PC Blade computers until the rest of the area has been finished and cleaned. -
Page 55: Cage Rapid Mount Kit
3. Determine the location and holes to be used to mount the rack ears on the rack bracket. A guide is provided in the CRM packaging. Insert rack ears on spring-loaded slider to the back side of the back rack post. ClearCube Product Manual and Installation Guide Spring Finger Handle... -
Page 56: Chassis Power Requirements
If only one power cord is connected to the R4300 Chassis, the BackPack is powered only by a single circuit, although both PSUs are active and supply power to the BackPack. -
Page 57: Backpack Configuration And Operation
BackPack Configuration and Operation R4300 BackPack By using a range of hot-swappable modules, the R4300 BackPack provides a wide range of options for C/Port and I/Port connections to Blades and to the network. Modules can be installed either when the Cage is installed, or when the Blades are installed. -
Page 58: R4300 Modules
All modules are hot-swappable, and can be replaced without affecting any existing switching configurations within the BackPack. A small label on each module indicates its position in the R4300, as shown in Figure 20. -
Page 59: Figure 20 Module Designator Labels
(or levers) until the module is released, and pull the module out of its bay. NOTE: When hot-swapping modules from an R4300, remove the module and wait for Figure 21 shows the back apron of the R4300, with the three module bays designated. Figure 22 shows typical R4300 modules. -
Page 60: Figure 21 R4300 Module Bays
Note that some features are color-coded to show that their functions are inter-related. For example, features coded blue are for monitoring the status of the various connection ports on the R4300. 50 • Cage and Blade Installation ClearCube Product Manual and Installation Guide... -
Page 61: Table 6 R4300 Connect Module Features
Table 6 R4300 Connect Module Features Digital Link Spare Daisy Chain Selected LED Connections C/Port Connections Admin Daisy Chain Connections Color Label Code RJ45 connection that links the Admin C/Port into the Admin daisy chain, or passes the Admin connection to another Cage by connecting to that Cage’s ADMIN OUT port. As many... -
Page 62: Table 7 R4300 Status Leds
Mode switch on the Management Bay module. The blue LED over the connections being monitored is lit. The numbers for the LEDs correspond to the Blade slot numbers on the front of the Chassis. - Page 63 • Bi-color LEDs that indicate Ethernet link speed • LINK — • Green ACTIVITY — ClearCube Product Manual and Installation Guide Connectors Description Switches LEDs Green = Primary Yellow = Secondary Off = STandby Green = DHCP Off = fixed IP address...
-
Page 64: Power Modules
Off = no network connection, or no Blade Power Modules The R4300 contains two Power Supply Units (PSUs) and a Dual Input Module (DIM). With the redundancy provided by two PSUs and two power inputs, the R4300 will stay running even if one PSU fails, or a power input fails, or if a PSU and a power input fail together. -
Page 65: Blade Switching Backpacks
A Blade Switching BackPack (BSBP) can be controlled by either an RMC installed in either a BSBP or a DCBP, or an RMM installed in an R4300. The ClearCube BackPacks and Switch Manager software give IT managers and administrators the ability to remotely switch a desktop user from one PC Blade to another in the event that service is required. -
Page 66: Figure 24 Adding Remote Control Over Pc Blade-To-C/Port Connections
8 PC Blades C/Ports Blade Switching Architecture Spare Out RS-485 Out Spare In Figure 25 Cage with Blade Switching BackPack Description Cage with 8 PC Blades Switch Blade Switching Matrix Control C/Ports Ethernet Control In ClearCube Product Manual and Installation Guide... -
Page 67: Direct Connect Backpack
ClearCube Product Manual and Installation Guide desktop employ and terminate all four twisted pairs. Standard Ethernet works with only two of the four pairs connected, but the ClearCube C/Port operates only when all four pairs of wire are used. Cage and Blade Installation • 57... -
Page 68: Spare Allocation Examples
Spare Daisy Chain – The link between a Spare Blade and the Cage or Cages served by that Spare Blade. A Spare Daisy Chain can connect from 1 to 14 Cages within a single Control Chain. The Spare Daisy Chain uses the same ClearCube proprietary data link that connects Blades to C/Ports. -
Page 69: R4300 Backpack
R4300 BackPack To connect cables to R4300-equipped Cages, do the following: 1. Label, identify, or use different color cables to discriminate between desktop and network wiring. This color code is recommended, and matches the jumper cables provided by ClearCube: –... -
Page 70: Blade Switching And Direct Connect Backpacks
Admin C/Port and Terminal CLEARCUBE Figure 27 R4300 Daisy-Chain Cabling Example a Network jack, will not damage the unit, but the system will not operate correctly. This is a common installation error and should be one of the first things checked when troubleshooting a problem with a system’s operation. -
Page 71: Mixed-Mode Backpack Cabling
Spare Blade’s C/PORT port. Mixed-Mode BackPack Cabling Mixed-mode cabling is the attachment of R4300-equipped Cages to Cages with BSBPs or DCBPs. The recommended practice is to use one or more R4300s for Primary and auto-negotiated control. One or more RMMs need to be connected to Ethernet to allow auto-negotiation and control failover. -
Page 72: Remote Management Card Configuration
Primary in the Control Chain. RMCs can be installed only in BCBPs and DCBPs and RMMs can only be installed in R4300 BackPacks. A BSBP without an RMC installed can perform C/Port Switching, Admin Switching, and Sparing under the control of an RMC or an RMM. -
Page 73: Figure 30 Rmm Jp1 Location
• Secondary • Standby The model for auto-negotiation assumes that a given network contains a mix of R4300 BackPacks, and legacy BSBPs and DCBPs. The R4300 Remote Management Module uses the following auto-negotiation rules: • An RMM must be active (i.e., powered up and functioning correctly) to assert its status as Primary or other. -
Page 74: Configuring The Rmm
If your Control Chain contains a mix of R4300s, BSBPs, and/or DCBPs and you have an RMC installed in a BSBP or DCBP, that RMC is always the Primary and it does not provide access to all of the functions of the R4300. •... -
Page 75: Resetting The Rmm Settings To The Factory Defaults
DFLT pinhole switch on the back of the RMM. Table 11 provides the default RMM settings. For information on configuring an RMM with Switch Manager, see the Switch Manager 4.6 Administrator’s Guide. Table 11 R4300 RMM Default Configuration Settings Function IP Mode... -
Page 76: Configuring The Rmc
BSBP or a DCPB. If an RMC is installed in a Control Chain that contains R4300 BackPacks with RMMs, the Primary Cage is always the one that has the RMC installed. The Primary Cage is indicated by a LED on the rear of the Cage next to the control in/out ports that are colored green. - Page 77 • Install and run Switch Manager: The Blade Switching BackPack is controlled by ClearCube’s Switch Manager (part of the ClearCube Management Suite). These intuitive software tools come with help files that describe their operation and functionality. Installation of the tools on the controlling computer is via a CD-ROM drive.
-
Page 78: Changing The Ip Address Of The Rmc
3. Network: 192.168.1.0 4. Netmask: 255.255.255.0 5. Password: clearcube 6. Exit to change the IP address. For example: >1 >1 new ip: >1 new ip: 192.168.1.100 (your desired IP address) RMC Configuration 192.168.1.251 192.168.1.1 192.168.1.0 255.255.255.0 ClearCube Product Manual and Installation Guide... -
Page 79: Resetting The Rmc Ip Settings To The Factory Defaults
2. Remove the AC power cord from the back of the primary Cage. 3. Remove the Ethernet cable from the RS485 OUT port on the back of the primary Cage, if one is connected. ClearCube Product Manual and Installation Guide 1. IP address: 192.168.1.100 2. Gateway: 192.168.1.1 3. - Page 80 The RMC network controller is reset to the factory default settings, with an IP address of 192.168.1.251. Resetting the RMC to its factory defaults and connecting to it with a laptop computer using a crossover cable is a helpful troubleshooting technique. 70 • Cage and Blade Installation ClearCube Product Manual and Installation Guide...
-
Page 81: Fiber Transceiver Installation
Fiber Transceiver Installation The following instructions apply to installations using the ClearCube Fiber Optic Extension System and are intended for technicians familiar with fiber optic cabling. CAUTION: The Fiber Transceiver and Fiber C/Port are Laser Class 1 Products. Please refer to Safety Guidelines on page 7 for additional information. -
Page 82: Connect The Cables
• The Fiber Optic Extension System only works with R4300 BackPacks and Blade Switching BackPacks that are revision “E” or higher. The version can be determined from the label on the side of the BackPack. -
Page 83: Figure 32 Fiber Transceiver/R4300 Connection Diagram (R4300)
Cage Cable Fiber Transceiver Copper C/Port Cables < 10 m Cage Figure 32 Fiber Transceiver/R4300 Connection Diagram (R4300) ClearCube Product Manual and Installation Guide Ethernet Cable 62.5 Micron Fiber to Fiber C/Ports Ethernet Cable Cage and Blade Installation • 73... -
Page 84: Figure 33 Fiber Transceiver/Bsbp Connection Diagram (Bsbp)
Cage Cable Fiber Transceiver Copper C/Port Cables < 10 m Cage Figure 33 Fiber Transceiver/BSBP Connection Diagram (BSBP) 74 • Cage and Blade Installation Ethernet Cable 62.5 Micron Fiber to Fiber C/Ports Ethernet Cable ClearCube Product Manual and Installation Guide... -
Page 85: Pc Blade Installation
PC Blade boxes and remove the PC Blades. Examine each PC Blade for damage as a result of shipping. If you find any damage contact the carrier to file a claim and call the ClearCube Customer Service Department for replacement. -
Page 86: Video Resolution
When a Blade is inserted into a Cage, it takes approximately 30 seconds for the Cage and its RMC to detected the Blade and relay its information to Switch Manager. When hot-swapping modules in an R4300, remove the module and wait for at least 5 seconds before replacing it. -
Page 87: User Port Installation
C/Port power supply and power cord A special tuning tool for adjustments is included with the documentation and software package in your shipment. A mounting adapter is available as an option from ClearCube to conveniently mount a C/Port underneath a desktop. Video Sharpness Adjustment Dial... -
Page 88: Adjusting The C/Port
CAUTION: Do not attach the C/Port to a telephone jack or other powered network connection. This will permanently damage the C/Port. This damage is not covered under the ClearCube Technology limited warranty. 4. Connect the C/Port power supply module to the C/Port power input, and then plug the power supply into the wall power socket. -
Page 89: Adjusting Image Sharpness
LCD monitors to get the best picture. Adjusting Color Open the ClearCube adjustment screen and follow the instructions (See Figure 35). The adjustment screen is a The C/Port color adjustment is made using the three rotary switches located on the bottom of the unit (see Figure 36). -
Page 90: Figure 35 Clearcube C/Port Color And Sharpness Tuning Guide
Figure 35 ClearCube C/Port Color and Sharpness Tuning Guide Figure 36 ClearCube C/Port Bottom View Note that as you adjust the switches the monitor screen goes black momentarily for each click-stop, and then the image returns. This is the correct operation of the adjustment circuit. -
Page 91: Re-Adjusting The C/Port
C/Port unit. Locking out Mass-Storage Devices When using ClearCube’s C/Ports, you have an additional feature that provides increased levels of security. The R Series PC Blades offer a unique Mass Storage Lockout (MSL) security feature that disables the use of any USB mass storage device at the desktop (e.g., key drives, floppy drives, CD-ROM drives, etc.). -
Page 92: Fiber C/Port Installation
During this delay, no video signals are passed through to the monitor and the screen is blank. This delay is present in the product to ensure the Automatic Gain Circuitry (AGC) in the C/Port performs its optimization routines on a consistent video signal. ClearCube Product Manual and Installation Guide... -
Page 93: Adjusting The Fiber C/Port
Use the monitor’s auto-adjust and fine-tuning capabilities (focus, clock, etc.) to get the optimal picture quality. NOTE: The Fiber Optic Extension System only works with “straight-through” fiber ClearCube Product Manual and Installation Guide Figure 39 Fiber C/Port Rear View optic cable. Some cable installations employ “inverted” cable runs. These need to be converted to straight-through cable runs by swapping the positions of the fiber pair at a connector or patch panel. -
Page 94: I/Port Installation
• To ensure regulatory compliance, use only the power supply included in the shipping carton with the I/Port, or a ClearCube-approved equivalent. Also, the noise suppressor (ferrite bead) included in the box with the I/Port must be installed on the network cable as described. -
Page 95: Unpacking The I/Port
The Remote Desktop Protocol (RDP) is used to connect your I/Port to a PC Blade running Windows XP Professional. The I/Port and PC Blade can be located anywhere ClearCube Product Manual and Installation Guide Capio One 1. Power supply connector 2. -
Page 96: Configuring The Xpe Eon E100 I/Port
(> 50 kbps for each I/Port), and you have the appropriate permissions set up on the Blade. ClearCube Grid Center software is used for initiating connections from I/Ports to Blades. Please see the Grid Center Administrator’s Guide for installation and configuration details. -
Page 97: Optimizing Rdp And The I/Port
RDP in the most appropriate fashion, given your infrastructure. ClearCube recommends using the I/Port primarily on a corporate network (100Mbps or faster). However, you may have users who will use I/Ports for remote applications, such as office access from home, offshore development, etc. -
Page 98: Figure 42 Rdp Display Tab
If the user does not require printers or serial ports, it is best to disable re-direction to prevent any potential bandwidth loss caused by the Blade OS carrying out any sort of detection or other processes for these devices. 88 • User Port Installation Figure 42 RDP Display Tab ClearCube Product Manual and Installation Guide... -
Page 99: Adding A Printer
To perform the tasks at the I/Port, do the following: 1. Disable the Write Filter (see Configuring the XPe Eon e100 I/Port on page 86). ClearCube Product Manual and Installation Guide Figure 43 RDP Local Resources Tab Figure 44 RDP Experience Tab... -
Page 100: Configuring The Neolinux Capio One And Eon E100 I/Ports
Configuring the NeoLinux Capio One and Eon e100 I/Ports Your NeoLinux Eon e100 and Capio One I/Ports autostart the ClearCube I/Port client on bootup. The default Administrator ID / Password is user ID or Password is provided. The Write Filter Disable command, which allows... -
Page 101: Updating Software On The Eon E100 And Capio One I/Ports
6. Browse for the image file and click OK. For more information about NeoLinux and the ezConnect client, see the NeoLinux Thin Clients User Manual. ClearCube Product Manual and Installation Guide . To add a local connection, do the following:... - Page 102 This page intentionally left blank. 92 • User Port Installation ClearCube Product Manual and Installation Guide...
-
Page 103: Mvx Installation
Software Installation and Configuration on page 95. NOTE: ClearCube is not responsible for damage caused to either video card ClearCube can provide custom Professional Services upgrade packages. Please contact your Account Manager for details. -
Page 104: Figure 45 Mvx Connection Diagram
For example, in 2x1 mode, at 1280x1024, the resolution is shown as 2560x1024. The ClearCube Multi-Video solution was designed and engineered to work with the Quadro4 video adapter on the PC Blade. If the PC Blade contains a GeForce2 MX graphics adapter, video is displayed only on the monitor connected to the MONITORS 1 &... -
Page 105: Software Installation And Configuration
4. Right-click on the NVIDIA line item matching the video adapter installed on the Blade and select Properties. Verify that the NVIDIA driver installed on the Blade ClearCube Product Manual and Installation Guide Table 13 Blade – C/Port – MVX Support Configuration... -
Page 106: Installing The Nvidia Driver
8. Click OK to restart the computer. A default video driver in Windows provides video support for your monitor. Installing the NVIDIA Driver Download and install the latest NVIDIA-supplied driver from the ClearCube web site at support.clearcube.com. NOTE: DO NOT install any driver obtained directly from the NVIDIA web site, as this 1. -
Page 107: Figure 47 Display Settings Tab
6. Click the Advanced button and then select the Monitor tab, shown in Figure 48. ClearCube recommends that the screen refresh rate be set to 60 Hz for flat-panel monitor use, or 75 Hz for CRT use. Certain monitor models may work optimally at different refresh rates, so these refresh rates should be used as guidelines, not requirements. -
Page 108: Figure 49 Quadro Nvs Tab
9. In the Select Display Configuration menu, select the configuration that matches the physical layout of the monitors and click Apply. The recommended Preferred Display Refresh rate is 3x. 98 • MVX Installation Figure 49 Quadro NVS Tab Figure 50 Default 1x1 Monitor Configuration ClearCube Product Manual and Installation Guide... -
Page 109: Figure 51 Quadro Nvs Tab
Desktop Manager Configuration button. The Desktop Management tab, shown in Figure 52, is displayed. ClearCube Product Manual and Installation Guide Clone Mode functionality. In Clone Mode, all monitors connected to the MVX display the same video image, including the startup BIOS screens. -
Page 110: Important Notes About The Mvx
13. Click Next to display the Profiles screen, shown in Figure 53. Highlight the clrcube profile, select the Yes radio button, and click Next. The clrcube profile contains settings optimized for use with ClearCube Multi-Video equipment. Individual settings can be changed if desired. - Page 111 • The tuning dial on the C/Port is very sensitive. Rapid movements may cause loss of the video signal momentarily. ClearCube Product Manual and Installation Guide MVX Installation • 101...
- Page 112 This page intentionally left blank. 102 • MVX Installation ClearCube Product Manual and Installation Guide...
-
Page 113: Hardware Upgrade And Replacement Procedures
PC Blade from the Cage. Complete service procedures can be found in the ClearCube Service Manual. To maintain your ClearCube warranty and ensure proper operation, only use ClearCube approved commodities when performing upgrades. CAUTION: All upgrades should be performed by a qualified computer technician. -
Page 114: Upgrading Memory
104 • Hardware Upgrade and Replacement Procedures Figure 54 R1200 Memory Layout equal size and speed. Figure 55 R2100 Memory Installation Layout DIMM slots ClearCube Product Manual and Installation Guide... -
Page 115: Replacing Or Upgrading The Hard Drive
• When replacing either drive on an R2100, it may be easier to unscrew both drives from the chassis to gain easier access to the drive cables. • R2100 drives are configured for Cable Select, and the drive at the end of the cable is the master. -
Page 116: Replacing R4300 Modules
6. Replace the cables. Replacing the R4300 Fan Pack To replace the Fan Pack on the R4300 BackPack, do the following: 1. Using a #2 Phillips screwdriver, remove the 5 screws on the back of the Cage that attach the fan pack. -
Page 117: Replacing The Bsbp Or Dcbp Fan Pack
Replacing an R4300 Power Supply Unit (PSU) R4300 PSUs are hot-swappable. To replace a PSU in the R4300 BackPack, do the following: 1. Using a #2 Phillips screwdriver, remove the 5 screws on the back of the Cage that attach the fan pack. -
Page 118: Figure 58 Cage With Fan Pack Removed (Dcbp Shown)
11. Replace all the cables. CAUTION: Use only a 15 amp-rated AC power cord supplied by ClearCube to power the replacement BackPack. Do NOT reuse any existing 10 amp-rated cords that supplied power to the BackPacks you are replacing. Older model BackPacks utilized 10 amp-rated power cords that are NOT approved for use with current model BackPacks. -
Page 119: Troubleshooting
• Check all power strips, UPS, and extension cords to make sure they are in working order. ClearCube Product Manual and Installation Guide Pin 1 and 2 are pairs Pin 3 and 6 are pairs Pin 4 and 5 are pairs Pin 7 and 8 are pairs Troubleshooting •... -
Page 120: Poor Video Quality
Pull Blade out and re-insert. No video or link lights at desktops and no power to Blades • R4300: Have a qualified service technician check the fuse. CAUTION: DOUBLE POLE/NEUTRAL FUSING The DIM employs fuses in both the neutral and hot lines. -
Page 121: The Monitor's Auto-Adjust Does Not Give A Clear, Sharp Image
• Non-commercial cables are frequently the culprits when equipment fails to work properly. For this reason, ClearCube strongly discourages the use of Non-commercial cables. • Check that the power supply brick is the proper one for the Fiber C/port. It should have a rated output of +5 VDC, 7 A;... - Page 122 This page intentionally left blank. 112 • Troubleshooting ClearCube Product Manual and Installation Guide...
-
Page 123: Appendix A - Specifications
DOUBLE POLE/NEUTRAL FUSING • DCBP/BSBP: 36 lbs (Cage + BackPack), 76 lbs (with 8 PC Blades) • R4300: 42 lbs (Cage + BackPack), 85 lbs (with 8 PC Blades) • Rack mounted, 0–35º Celsius (C) Table 15 C/Port Specifications •... -
Page 124: Table 16 Multi-Video Expander Specifications
Total signal attenuation through all patch panels and connectors (excluding cables) must be ≤ 1 dB. • Input 100–250 VAC 47–63 Hz • Output 7 A @ +5 VDC, 1 A @ –5 VDC ClearCube Product Manual and Installation Guide... -
Page 125: Table 18 Fiber Transceiver Specifications
Output Video Operating System Power Adapter Size Weight Environmental ClearCube Product Manual and Installation Guide Table 18 Fiber Transceiver Specifications • 16 RJ-45 copper inputs and 16 MT-RJ dual fiber outputs • 62.5 micron, multi-mode, straight-through connection fiber • 62.5 micron: 500 meters (1640 feet) for each C/Port connection •... -
Page 126: Table 20 Pc Blade Specifications
Supports USB 2.0 • Phoenix BIOS • Supports PXE, Secure Agent, Multiprobe, PnP, Phoenix Phlash & Multikey • Size: 4.7” (H) x 23.5” (L) x 4.7” (W) • Weight: 8 lbs. • Stationary office, 0–35° C ClearCube Product Manual and Installation Guide... -
Page 127: Appendix B - Regulatory Compliance
Cet appareil numérique de la classe A respecte toutes les exigences du Règlement sur le matériel brouilleur du Canada. This equipment exhibits compliance to the Voluntary Control Council for Interference (VCCI) Class A, ITE requirements in Japan. ClearCube Product Manual and Installation Guide Appendix B – Regulatory Compliance • 117... -
Page 128: Electro-Magnetic Interference (Emi) Immunity
Israel, India, Italy, Japan, Korea, Malaysia, Netherlands, Norway, Poland, Portugal, Russia, Sweden, Slovenia, Slovakia, Singapore, Turkey, Ukraine, United States, and South Africa. 118 • Appendix B – Regulatory Compliance Ed., 7-28-95 with revisions through and including 3-1-98, TUV ClearCube Product Manual and Installation Guide... -
Page 129: Ce Marking
This equipment bears the CE marking that indicates compliance to the European Council Directive 89/336/EEC (EMC directive) and the 73/23/EEC (Low Voltage Directive). The following page is ClearCube's official Declaration of Conformity as required for CE compliance. ClearCube Product Manual and Installation Guide... -
Page 130: Declaration Of Conformity
This product is in conformity with the requirements of the Low Voltage Directive (73/23/EEC) and the EMC Directive (89/336/EEC). Signed, Rick Hoffman, VP of Engineering ClearCube Technology, Inc. (512) 652-3500 Austin, TX December 31, 2004 120 • Appendix B – Regulatory Compliance ClearCube Product Manual and Installation Guide... -
Page 131: Appendix C - Technical Support
Automatic notifications will allow you to keep your environment up to date with the latest ClearCube offerings. ClearCube Product Manual and Installation Guide... -
Page 132: Return Merchandise Authorization (Rma)
Return Merchandise Authorization (RMA) ClearCube’s policy for products under warranty is to ship replacement parts to the customer within 24-48 hours after the replacement has been approved by the ClearCube Tech Support department. If an issue arises that may require a warranty replacement part, the customer should places a telephone call to Tech Support (+1-512-652-3400 or +1-866-652-3400), use the RMA form on the CCT Support website (support.clearcube.com), or send an... - Page 133 Therefore, if you place two Cages on a single branch circuit, it must be able to support a peak current of 25 amps at 120 VAC. ClearCube Product Manual and Installation Guide Appendix C – Technical Support • 123...
-
Page 134: Appendix D - Warranty
ROVISIONS Warranty Repair or Replacement. ClearCube warrants to you that for a period of one (1) year [or in the case of an extended warranty purchase, up to three (3) years as applicable] from the date of original purchase of the ClearCube Product or the manufacturer’s date (“Warranty Period”), such ClearCube Product will be free from... - Page 135 The Defective Product must be shipped back to ClearCube within five (5) business days of ClearCube’s issuance of a RMA for such Defective Product. If ClearCube issues a RMA for Defective Product and ships a Replacement Product to customer, customer will be billed in accordance with the prices and payment terms contained in its original invoice for any Defective Product that is not received by ClearCube, the ClearCube Authorized Support Provider, or other ClearCube designate within ten (10) business days of the date of such RMA.
- Page 136 Equipment, and compliance with relevant reporting requirements, shall be in accordance with the provisions of the WEEE Directive and Waste Legislation. The licensee also agrees to defend, indemnify and hold ClearCube Technology, Inc. and its suppliers harmless against any claims arising out of its violation of the above obligations.
-
Page 137: Index
26 Fiber adjusting 83 feature description 28 installing 82 installing 77 cable requirements Fiber Transceiver 71 ClearCube Product Manual and Installation Guide cables connecting to BSBP 60 connecting to R4300 59 mixed-mode connection 61 Cage feature description 22 installing 42... - Page 138 PC Blade feature description 19 installation 75 power requirements Japan 36 overview 35 Proposition 65 Quadro4 video driver 76 R4300 BackPack feature description 23 modules 48 R4300 modules feature description 48 replacing 106 audio 30 ClearCube Product Manual and Installation Guide...
- Page 139 I/Port 115 MVX 114 Switch Manager feature description 23 Symbole – Deutsche Symboles – Français symbols English 6 French 9 ClearCube Product Manual and Installation Guide German 12 Spanish 15 troubleshooting C/Port 109 Fiber C/Port 111 MVX 110 upgrading memory 104...
- Page 140 This page intentionally left blank. 130 • Index ClearCube Product Manual and Installation Guide...
- Page 142 P/N 020009-P Rev. 12/07/2005...
Need help?
Do you have a question about the R4300 and is the answer not in the manual?
Questions and answers