ClearCube R1300 Quick Start Manual
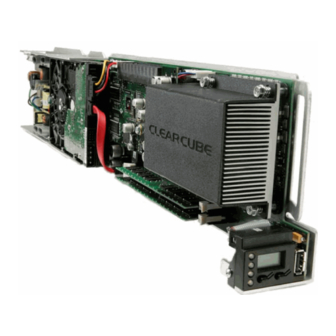
Single-processor blade
Hide thumbs
Also See for R1300:
- Deployment manual (44 pages) ,
- Software update (2 pages) ,
- User manual (100 pages)
Advertisement
Quick Links
Download this manual
See also:
User Manual
R1300
Single-Processor Blade
R1300 LCD Panel
Reset
3 MSL Jumper JP6
USB Mass Storage
devices function
1
normally (default)
MSL Jumper
3
USB Mass Storage
devices do not
1
function
ClearCube Technology
Quick Start Guide
The R1300 single-processor blade offers dual integrated Ethernet con-
trollers and optional NVIDIA-based graphics to deliver a high-density,
high-performance computing solution to the ClearCube Architecture.
INSTALLATION
To install an R1300 blade, do the following:
1. Open the front bezel on the chassis by depressing the latches on
each side. The bezel swings forward and down.
2. Orient each blade right-side up (LCD panel on the bottom) and then
slowly insert the blade into the chassis by lining up the blade edges with
both the top and bottom guides in the chassis. There will be a slight
resistance to insertion when the back connector goes into the back-
plane socket.
3. After inserting all blades, raise the front bezel and snap it into place.
4. Depress the power button on the front of the blade to power it on.
When a blade is inserted into a chassis and powered on, it takes
approximately 30 seconds for the chassis and its RMM to detect the
blade and relay its information to Sentral.
Note: The very first time you insert the R1300 blade, the power does
not turn on automatically. You must depress the power button on the
front of the blade to power it on the first time. After the first power-on,
the blade uses its stored power setting to determine its unattended
power-on behavior.
R1300 FEATURES
Using the USB 2.0 capability of the R1300
The R1300 provides one USB 2.0 port on the rear apron of the R4300
when the blade has a 44-pin interposer installed. The 30-pin interposer
does not bring the USB 2.0 signals into the R4300 signal backplane.
Power
USB Port
3
CMOS Jumper JP1
Dual Ethernet Adapters on the R1300
Normal operation
The R1300 provides two Ethernet adapters. Connecting a network
(default)
1
cable to each of the blade's Ethernet jacks on the chassis will provide
two independent network connections and greater bandwidth. The pri-
CMOS Jumper
3
mary Ethernet controller provides gigabit Ethernet. The secondary
Clears CMOS
Ethernet provides 10/100 Ethernet. The dual Ethernet ports on the
password on
1
restart
R1300 are accessible as follows:
8834 Capital of Texas Hwy N
Jumpers on the R1300
The R1300 provides jumpers that control
CMOS password clearing and Mass Stor-
age Lockout (MSL). The default jumper set-
tings are:
•
JP1, pins 1 and 2 jumpered, CMOS
password is retained on restart.
•
JP6, pins 2 and 3 jumpered, MSL
control is enabled in software.
Austin, Texas 78759
voice 512 652 3500 www.clearcube.com
Advertisement

Subscribe to Our Youtube Channel
Related Manuals for ClearCube R1300


Summary of Contents for ClearCube R1300
- Page 1 R1300 FEATURES Using the USB 2.0 capability of the R1300 The R1300 provides one USB 2.0 port on the rear apron of the R4300 when the blade has a 44-pin interposer installed. The 30-pin interposer does not bring the USB 2.0 signals into the R4300 signal backplane.
- Page 2 R1300 are connected. Upgrading the Memory on an R1300 The R1300 can work with a single DIMM, as well as two DIMMs of different sizes and speeds. When equal size DIMMs are used, the memory control- ler on the R1300 uses interleaved memory to give better performance.
Need help?
Do you have a question about the R1300 and is the answer not in the manual?
Questions and answers