Table of Contents
Advertisement
Quick Links
Thank you for purchasing FrSky XJT telemetry module. In order to fully enjoy the benefits of this system, please read the
instruction manual carefully and set up the device as described below.
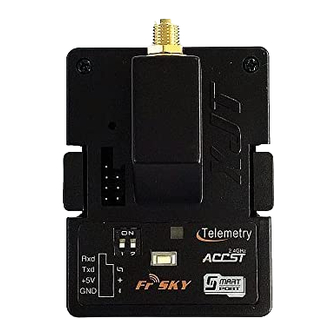
Operating Voltage Range: 3.7~15 V
Operating Current: 180mA (@5V), 120mA (@12V)
Output Power: 100mW
Module Slot: JR/Graupner Type
Two auto detected modulations of PXX (mode selection, bind, model match, range check, failsafe, etc. on radio
side) or CPPM.
Three selectable modes of D8 (existing 8ch two way), D16 (new 16ch two way full duplex transmission) and LR12
(new 12ch one way, approx. three times range of current V8 & D series when pairing with new LR series receivers, such as
L9R).
Smart Port enabled, realizing two way full duplex transmission.
Detect the module antenna's working status and give sound warnings if the module antenna is broken or does not
have intact contact, etc.
Super lower latency (approx. 1/3 of current systems) and higher precision (transmitter's hardware and software
support required, such as FrSky transmitters).
Instruction Manual for FrSky XJT Module
Introduction
Overview
Specifications
What's New!
Modulations: PXX or CPPM (auto detected)
Modes: D8, D16 or LR12 (selectable)
Telemetry Interface: Smart Port, RS232 Serial Port
Upgrade Interface: Smart Port, RS232 Serial Port
1
www.frsky rc.com
05/02/13
Advertisement
Table of Contents

Subscribe to Our Youtube Channel
Related Manuals for FrSky XJT


Summary of Contents for FrSky XJT
- Page 1 Instruction Manual for FrSky XJT Module Introduction Thank you for purchasing FrSky XJT telemetry module. In order to fully enjoy the benefits of this system, please read the instruction manual carefully and set up the device as described below. Overview Specifications Operating Voltage Range: 3.7~15 V...
- Page 2 (please refer to the corresponding receiver’s instruction manual for details). 6. Press the F/S button on the XJT module for 1~4 seconds to exit range check mode, RED LED will be back on, indicating normal operation is back.
- Page 3 05/02/13 FrSky Electronic Co., Ltd. Tel: (86) 510 85187718 Fax: (86) 510 85187728 E mail: frsky@frsky rc.com Technical Support: sales4tech@gmail.com...
- Page 4 Operating Current: 100mA Operating Range: full range (>1.5km) Compatibility: FrSky XJT module in D16 mode (Switch 1 is OFF, Switch 2 is OFF) or D8 mode (Switch 1 is OFF, Switch 2 is ON), DFT/DJT/DHT/DHT U in D_mode Firmware Upgradeable What’s New!
- Page 5 5. Walk away from the model while simultaneously operating the controls on the transmitter to confirm all controls’ normal operation. 6. Press the F/S button on the XJT module for 1~4 seconds to exit range check mode, RED LED will be back on, indicating normal operation is back.
- Page 6 Follow the steps below to finish the binding procedure. 1. Turn on the transmitter while holding the F/S button on the XJT module (set to LR12 mode, Switch 1 is ON while Switch 2 is OFF). Release the button. The RED LED on the XJT module will flash, indicating the transmitter is ready to bind to the receiver.
- Page 7 5. Walk away from the model while simultaneously operating the controls on the transmitter to confirm all controls’ normal operation. 6. Press the F/S button on the XJT module for 1~4 seconds to exit range check mode, RED LED will be back on, indicating normal operation is back.
Need help?
Do you have a question about the XJT and is the answer not in the manual?
Questions and answers