
Related Manuals for djive VACUMATE Ultralight


Summary of Contents for djive VACUMATE Ultralight
- Page 1 Rechargable & bagless handheld vacuum Your handy companion for easy cleaning on the go. English Deutsch Français Español Italiano...
-
Page 2: Table Of Contents
Contents Important safety advice Product overview Prior to first use Operation Cleaning attachments Maintenance and care Troubleshooting Technical specifications... - Page 3 Dear Customer, Your new Vacumate Ultralight is about to be used for the first time to make your living space shine. Please take a moment to read this manual to familiarise yourself with your new Vacumate Ultralight handheld vacuum cleaner.
-
Page 4: Important Safety Advice
IMPORTANT SAFETY ADVICE \\\ Before you use this cordless vacuum cleaner, please read all the instructions and warnings in this manual carefully as well as on the device itself. Please store this manual in a safe place. When using an electrical device, basic safety precautions should always be implemented and followed. - Page 5 10. Do not handle charger, including charger plug, and charger terminals with wet hands. 11. Do not put any object into openings. Do not use with any opening blocked; keep free of dust, lint, hair and anything that may reduce air flow. 12.
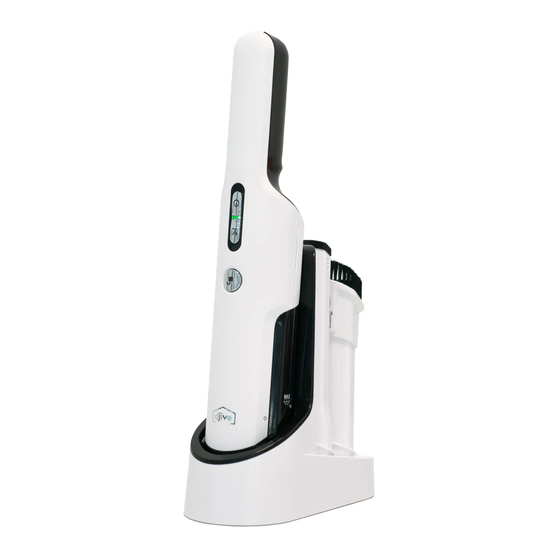
- Page 6 DESCRIPTION OF THE VACUUM PRODUCT OVERVIEW \\\ DESCRIPTION OF THE VACUUM 1 On/Off Button 1. On/Off Button 2 Charging Indicator Light 2. Charging Indicator Light 3 High Speed Button 3. High Speed Button 1 On/Off Button 4 Dust Cup Removal Button 4.
- Page 7 12. Extension 13. Crevice nozzle (thin) 14. Crevize brush 15. Furniture brush 16. Crevice nozzle (thick) 17. Angle adapter 18. Adapter A 19. Adapter B...
-
Page 8: Product Overview
PRODUCT OVERVIEW \\\ Combination examples... -
Page 9: Prior To First Use
PRIOR TO FIRST USE \\\ Charging the Vacuum ATTENTION – The battery charger must be connected to the electrical outlet for the charging process. The vacuum is partially pre-charged and will run for a short time. ASSEMBLING THE VACUUM We recommend fully charging the vacuum before use. Charging the Vacuum 1. -
Page 10: Operation
PRIOR TO FIRST USE \\\ Storing the Vacuum ASSEMBLING THE VACUUM ATTENTION – Unplug the battery charger when the vacuum is in use. Storing the Vacuum The vacuum and the cleaning tools NOTE: Unplug the battery charger can be conveniently stored on the when the vacuum is in use. - Page 11 NOTE: The vacuum has a slow start To turn vacuum cleaner On or Off, push feature and will take a moment to start the power button (Fig. 1). after you push the power button. This is Low Speed normal. The vacuum automatically starts on low On/Off Button speed when turned on.
-
Page 12: Cleaning Attachments
CLEANING ATTACHMENTS \\\ ATTACHMENT CLEANING ATTACHMENT CLEANING ATTACHMENT CLEANING Cleaning Tools Cleaning Tools Cleaning Tools Cleaning Tools The vacuum is equipped with a dus- The vacuum is equipped with a The vacuum is equipped with a The vacuum is equipped with a dusting brush combo tool and a crevice dusting brush combo tool and a crevice ting brush combo tool and a crevice... - Page 13 MAINTENANCE AND CARE \\\ MAINTENANCE AND CARE MAINTENANCE AND CARE ATTENTION – Always turn off NOTE: Always turn off the vacuum before performing any service. the vacuum before performing any Do not fill the dust cup past the service. Do not fill the dust bin past Max Fill Line (Fig.
-
Page 14: Maintenance And Care
NOTE: Always turn off the vacuum the debris will fall into the trash 3. Shake the vacuum to release any debris before performing any service. container (Fig. 3). that might be inside the dust cup. Do not fill the dust cup past the 3. - Page 15 MAINTENANCE AND CARE MAINTENANCE AND CARE ATTENTION – Always turn off the vacuum before performing any service. NOTE: Always turn off the vacuum before performing any service. NOTE: Always turn off the vacuum Replacing the Filters Do not fill the dust cup past the before performing any service.
-
Page 16: Troubleshooting
TROUBLESHOOTING \\\ ATTENTION – To reduce the risk of electrical shock or injury from moving parts, turn off the vacuum and unplug the charger before servicing or cleaning. Additionally, do not handle plug or appliance with wet hands. Problem Possible cause and solution •... -
Page 17: Technical Specifications
TECHNICAL SPECIFICATIONS \\\ VACUMATE Ultralight Model DJ50012 / DJ50013 / DJ50014 / DJ50015 Voltage (Battery) 11,1 V DC Power MAX 120 W Dust capacity ~ 0,2 l Operating time 25 min (low) / 11 min (high) Recharge time ~ 3 hours... - Page 18 Inhalt Wichtige Warnhinweise Produktübersicht Vor dem Erstgebrauch Bedienung Zubehör Pflege & Wartung Problembehandlung Technische Spezifikation...
- Page 19 Sehr geehrter Kunde, Ihr neuer Vacumate Ultralight steht bereits kurz vor seinem ersten Einsatz um Ihre Wohnräume auf Hochglanz zu bringen. Bitte nehmen Sie sich einen Moment Zeit, und lesen diese Anleitung um sich mit Ihrem neuen Vacumate Ultralight Hand-Staubsauger vertraut zu machen.
-
Page 20: Wichtige Warnhinweise
WICHTIGE WARNHINWEISE \\\ Bevor Sie diesen kabellosen Staubsauger benutzen, lesen Sie bitte alle Anweisungen und Warnhinweise in diesem Handbuch sowie auf dem Gerät selbst sorgfältig durch. Bitte bewahren Sie dieses Handbuch an einem sicheren Ort auf. Wenn Sie ein elektrisches Gerät verwenden, sollten immer grundlegende Si- cherheitsvorkehrungen getroffen und befolgt werden. - Page 21 12. Stecken Sie keine Gegenstände in Öffnungen. Verwenden Sie das Gerät nicht mit blockierten Öffnungen; halten Sie es frei von Staub, Fusseln, Haaren und allem, was den Luftstrom beeinträchtigen könnte. 13. Halten Sie Haare, lose Kleidung, Finger und alle Körperteile von Öffnungen und beweglichen Teilen fern.
- Page 22 DESCRIPTION OF THE VACUUM PRODUKTÜBERSICHT \\\ DESCRIPTION OF THE VACUUM 1 On/Off Button 1. An / Aus-Knopf 2 Charging Indicator Light 2. Lade-Indikator 3 High Speed Button 3. Maximale Saugkraft 1 On/Off Button 4 Dust Cup Removal Button 4. Staubtank lösen 2 Charging Indicator Light 5 Charger 5.
- Page 23 12. Verlängerung 13. Fugendüse (fein) 14. Fugenpinsel 15. Möbelpinsel 16. Fugendüse (grob) 17. Winkel - Adapter 18. Adapter A 19. Adapter B...
-
Page 24: Produktübersicht
PRODUKTÜBERSICHT \\\ Kombinations-Beispiele... -
Page 25: Vor Dem Erstgebrauch
VOR DEM ERSTGEBRAUCH \\\ Laden des Handstaubsaugers ACHTUNG – Die Ladestation muss für den Ladevorgang an die Steckdose angeschlossen werden. Der Handstaubsauger ist beim Ausliefern teilweise geladen. ASSEMBLING THE VACUUM Wir empfehlen, ihn vor dem Gebrauch vollständig aufzuladen. Charging the Vacuum 1. -
Page 26: Bedienung
VOR DEM ERSTGEBRAUCH \\\ Lagerung des Handstaubsaugers ASSEMBLING THE VACUUM ACHTUNG– Ziehen Sie den Stecker der Ladestation ab, falls der Sauger benutzt oder nicht geladen wird. Storing the Vacuum Der Staubsauger und das Zubehör NOTE: Unplug the battery charger können bequem auf der Ladestation when the vacuum is in use. - Page 27 NOTE: The vacuum has a slow start To turn vacuum cleaner On or Off, push feature and will take a moment to start the power button (Fig. 1). after you push the power button. This is Low Speed normal. The vacuum automatically starts on low On/Off Button speed when turned on.
-
Page 28: Zubehör
ZUBEHÖR \\\ ATTACHMENT CLEANING ATTACHMENT CLEANING ATTACHMENT CLEANING Reinigungsaufsätze Cleaning Tools Cleaning Tools Cleaning Tools Der Sauger ist mit einem Bürsten- The vacuum is equipped with a The vacuum is equipped with a The vacuum is equipped with a dusting brush combo tool and a crevice dusting brush combo tool and a crevice Kombiaufsatz und einem Ritzen- dusting brush combo tool and a crevice... - Page 29 PFLEGE & WARTUNG \\\ MAINTENANCE AND CARE MAINTENANCE AND CARE ACHTUNG – Schalten Sie das NOTE: Always turn off the vacuum before performing any service. Gerät immer aus, bevor Sie es warten Do not fill the dust cup past the oder reinigen (Fig.
-
Page 30: Pflege & Wartung
the debris will fall into the trash 3. Shake the vacuum to release any debris NOTE: Always turn off the vacuum container (Fig. 3). that might be inside the dust cup. before performing any service. 3. Shake the vacuum to release any debris Do not fill the dust cup past the PFLEGE &... - Page 31 MAINTENANCE AND CARE MAINTENANCE AND CARE ACHTUNG – Schalten Sie das Gerät immer aus, bevor Sie es warten. NOTE: Always turn off the vacuum NOTE: Always turn off the vacuum before performing any service. Filter ersetzen before performing any service. Do not fill the dust cup past the Max Fill Line (Fig.
-
Page 32: Problembehandlung
PROBLEMBEHANDLUNG \\\ ACHTUNG – Um Gefahren und Verletzungen durch Strom - schläge oder bewegliche Teile zu vermeiden, schalten Sie das Gerät aus und ziehen sie den Netzstecker heraus. Berühren Sie das Gerät niemals mit nassen Händen. Problem Mögliche Ursache und Lösung •... -
Page 33: Technische Spezifikation
TECHNISCHE SPEZIFIKATIONEN \\\ VACUMATE Ultralight Modell DJ50012 / DJ50013 / DJ50014 / DJ50015 Spannung (Akku) 11,1 V DC Power MAX 120 W Staubtank ~ 0,2 l Betriebsdauer 25 min (niedrige Stufe) / 11 min (hohe Stufe) Ladezeit ~ 3 Stunden... - Page 34 Contenu Avertissements importants Aperçu des produits Avant la première utilisation Instructions d’utilisation Nettoyage des accessoires Entretien et maintenance Résolution des erreurs Spécifications techniques...
- Page 35 Chère cliente, cher client, Votre nouveau Vacumate Ultralight est surle point d’accomplir sa première mission pour faire briller vos pièces d’habitation. Veuillez prendre un instant pour lire ces instructions et vous familiariser avec votre nouvel aspirateur à main Vacumate Ultralight.
-
Page 36: Avertissements Importants
AVERTISSEMENTS IMPORTANTS \\\ Lors de l’utilisation d’un appareil électrique, il est important de prendre des mesures de précaution de base, notamment les suivantes : Lisez toutes les instructions avant de commencer à utiliser cet appareil. Destiné à l’usage domestique uniquement. ATTENTION Le fabricant ne pourra être tenu responsable en cas de dommage causé... - Page 37 N’insérez pas d’objets dans les ouvertures. N’utilisez pas l’appareil si une ouverture est obstruée; évitez l’accumulation de poussières, de peluches, de cheveux ou de tout autre élément pouvant réduire le flux d’air. Tenez les cheveux, les habits amples, les doigts et toute autre partie du corps à distance des ouvertures et des pièces mobiles.
- Page 38 APERÇU DES PRODUITS \\\ DESCRIPTION OF THE VACUUM DESCRIPTION OF THE VACUUM 1. Bouton marche/arrêt 2. Voyant lumineux de charge 1 On/Off Button 3. Bouton haute vitesse 2 Charging Indicator Light 4. Bouton de retrait du réservoir 3 High Speed Button à...
- Page 39 12. Extension 13. Buse à fente (fin) 14. Brosse à joint 15. Brosses pour meubles 16. Buse à fente (grossière) 17. Adaptateur d'angle 18. Adaptateur A 19. Adaptateur B...
-
Page 40: Aperçu Des Produits
APERÇU DES PRODUITS \\\ Exemples de combinaisons... -
Page 41: Avant La Première Utilisation
AVANT LA PREMIÈRE UTILISATION \\\ Charger l’aspirateur ATTENTION – Le chargeur de batterie doit être connecté à la prise de courant pour la charge. L’aspirateur est partiellement chargé et fonctionnera pendant une courte ASSEMBLING THE VACUUM période. Nous recommandons de charger complètement l’aspirateur avant de l’utiliser. -
Page 42: Instructions D'utilisation
AVANT LA PREMIÈRE UTILISATION \\\ Ranger l’aspirateur ASSEMBLING THE VACUUM ATTENTION – Débranchez le chargeur de batterie lorsque vous utili- sez l’aspirateur Storing the Vacuum L’aspirateur et les outils de nettoya- NOTE: Unplug the battery charger ge peuvent être rangés de manière when the vacuum is in use. - Page 43 NOTE: The vacuum has a slow start To turn vacuum cleaner On or Off, push feature and will take a moment to start the power button (Fig. 1). after you push the power button. This is Low Speed normal. The vacuum automatically starts on low On/Off Button speed when turned on.
-
Page 44: Nettoyage Des Accessoires
NETTOYAGE DES ACCESSOIRES \\\ ATTACHMENT CLEANING ATTACHMENT CLEANING ATTACHMENT CLEANING Outil de nettoyage Cleaning Tools Cleaning Tools L’aspirateur est équipé d’un outil combo The vacuum is equipped with a The vacuum is equipped with a dusting brush combo tool and a crevice pour brosse à... -
Page 45: Entretien Et Maintenance
ENTRETIEN ET MAINTENANCE \\\ MAINTENANCE AND CARE MAINTENANCE AND CARE ATTENTION – Éteignez toujours NOTE: Always turn off the vacuum before performing any service. l’aspirateur avant d’effectuer un ent- Do not fill the dust cup past the retien sur l’appareil. Ne remplissez NOTE: Always turn off the vacuum Max Fill Line (Fig. - Page 46 NOTE: Always turn off the vacuum the debris will fall into the trash 3. Shake the vacuum to release any debris container (Fig. 3). before performing any service. that might be inside the dust cup. Do not fill the dust cup past the 3.
- Page 47 MAINTENANCE AND CARE MAINTENANCE AND CARE ATTENTION – Éteignez toujours l’aspirateur avant d’effectuer un entretien sur l’appareil. NOTE: Always turn off the vacuum before performing any service. NOTE: Always turn off the vacuum Do not fill the dust cup past the before performing any service.
-
Page 48: Résolution Des Erreurs
RÉSOLUTION DES ERREURS \\\ ATTENTION – Afin de diminuer le risque de choc électrique ou de blessure à cause des pièces mobiles, éteignez l’aspirateur et débranchez le chargeur avant tout entretien ou nettoyage de l’ap- pareil. Afin de réduire le risque de décharge électrique, ne manipu- lez pas la fiche ou l’appareil avec les mains mouillées. -
Page 49: Spécifications Techniques
Service de soutien Si jamais l'appareil venait à ne plus fonctionner du tout, veuillez contacter nous par courrier d'abord. (voir page 3) Nous ferons tout notre possible pour réparer votre appareil ou pour vous four- nir une nouvelle Vacumate Ultralight. - Page 50 Contenido Indicaciones de seguridad importantes Resumen del producto Antes del primer uso Manual de instrucciones Los accesorios de limpieza Limpieza y mantenimiento Guía de resolución de problemas Especificaciones técnicas...
- Page 51 Vacumate Ultralight. Si tiene dudas, póngase en contacto con nuestro servicio de atención al cliente. Disfrute cada día de una limpieza fácil de su hogar con su Vacumate Ultralight. Servicio de atención al cliente Teléfono +49 (0) 209 5130340 support@djive.eu www.djive.eu vacumate Robovox Distributions GmbH | Hamburger Straße 11, D - 45889 Gelsenkirchen...
-
Page 52: Indicaciones De Seguridad Importantes
INDICACIONES DE SEGURIDAD IMPORTANTES \\\ Al utilizar un electrodoméstico, siempre deben tomarse las pre- cauciones básicas, incluidas las siguientes: Lea todas las instrucciones antes de utilizar este electrodoméstico. Solo para uso en el hogar. IMPORTANTE - El fabricante no puede aceptar la responsabilidad por los daños causados cuando el electrodoméstico no se utiliza de acuerdo con las instrucciones o cuando se utiliza para otros usos que no son aquellos para los que fue fabricado. - Page 53 12. Mantenga el cabello, la ropa holgada, los dedos y todas las partes del cuerpo lejos de los orificios de ventilación y las piezas móviles. 13. No aspire nada que esté encendido o emita humo, como cigarrillos, fósforos o cenizas calientes. 14.
- Page 54 RESUMEN DEL PRODUCTO \\\ DESCRIPTION OF THE VACUUM DESCRIPTION OF THE VACUUM 1. Botón de Encendido y Apagado 2. Luz Indicadora de Carga 1 On/Off Button 3. Botón de Alta Velocidad 2 Charging Indicator Light 4. Botón de Extracción del Depósito 3 High Speed Button de Polvo 1 On/Off Button...
- Page 55 12. Extensión 13. Boquilla de hendidura (fina) 14. Cepillo de juntas 15. Cepillos para muebles 16. Boquilla de hendidura (gruesa) 17. Adaptador de ángulo 18. Adaptador A 19. Adaptador B...
-
Page 56: Resumen Del Producto
RESUMEN DEL PRODUCTO \\\ Ejemplos de combinación... -
Page 57: Antes Del Primer Uso
ANTES DEL PRIMER USO \\\ Carga de la Aspiradora IMPORTANTE – El cargador de batería debe estar conectado al tomacorriente para cargarla. La aspiradora está parcialmente cargada y funcionará por poco ASSEMBLING THE VACUUM tiempo. Recomendamos cargar completamente la aspiradora antes de usarla. -
Page 58: Manual De Instrucciones
ANTES DEL PRIMER USO \\\ Almacenamiento de la Aspiradora ASSEMBLING THE VACUUM IMPORTANTE – Desenchufe el cargador de batería cuando la aspiradora esté en uso. Storing the Vacuum La aspiradora y las herramientas de NOTE: Unplug the battery charger limpieza se pueden almacenar when the vacuum is in use. - Page 59 NOTE: The vacuum has a slow start To turn vacuum cleaner On or Off, push feature and will take a moment to start the power button (Fig. 1). after you push the power button. This is Low Speed normal. The vacuum automatically starts on low On/Off Button speed when turned on.
-
Page 60: Los Accesorios De Limpieza
LOS ACCESORIOS DE LIMPIEZA \\\ ATTACHMENT CLEANING ATTACHMENT CLEANING ATTACHMENT CLEANING Herramientas de limpieza Cleaning Tools Cleaning Tools Cleaning Tools La aspiradora está equipada con una The vacuum is equipped with a The vacuum is equipped with a The vacuum is equipped with a dusting brush combo tool and a crevice dusting brush combo tool and a crevice herramienta combinada de cepillo para... - Page 61 LIMPIEZA Y MANTENIMIENTO \\\ MAINTENANCE AND CARE MAINTENANCE AND CARE IMPORTANTE – Siempre NOTE: Always turn off the vacuum apague la aspiradora antes before performing any service. Do not fill the dust cup past the de realizar tareas de manteni- Max Fill Line (Fig.
-
Page 62: Limpieza Y Mantenimiento
the debris will fall into the trash NOTE: Always turn off the vacuum 3. Shake the vacuum to release any debris container (Fig. 3). before performing any service. that might be inside the dust cup. Do not fill the dust cup past the 3. - Page 63 MAINTENANCE AND CARE IMPORTANTE – MAINTENANCE AND CARE Siempre apague la aspiradora antes de r ealizar tareas de mantenimiento. NOTE: Always turn off the vacuum NOTE: Always turn off the vacuum before performing any service. Reemplazo de los filtros before performing any service. Do not fill the dust cup past the Replacing the Filters Max Fill Line (Fig.
-
Page 64: Guía De Resolución De Problemas
GUÍA DE RESOLUCIÓN DE PROBLEMAS \\\ IMPORTANTE – Para reducir el riesgo de una descarga eléctri- ca o de una lesión provocada por las partes móviles, apague la aspiradora y desenchufe el cargador antes de realizar tareas de mantenimiento o limpieza. Para reducir el riesgo de una descarga eléctrica, no manipule el enchufe ni el electrodoméstico con las manos mojadas. -
Page 65: Especificaciones Técnicas
ESPECIFICACIONES TÉCNICAS \\\ VACUMATE Ultralight Modelo DJ50012 / DJ50013 / DJ50014 / DJ50015 Voltaje (batería) 11,1 V DC Power MAX 120 W Depósito de polvo ~ 0,2 l 25 min (rendimiento bajo) / 11 min (alto rendimiento) Tiempo de funcionamiento... - Page 66 Contenuti Avvertenze importanti Panoramica dei prodotti Prima della messa in funzione Funzionamento Accessori per la pulizia Cura e manutenzione Risoluzione dei problemi Specifiche tecniche...
- Page 67 Vacumate Ultralight. Per qualsiasi domanda il nostro Servizio Clienti è a tua disposizione. Con il tuo nuovo Vacumate Ultralight fare le pulizie domestiche sarà un gio- co da ragazzi! Servizio Clienti Telefono +49 (0) 209 5130340 support@djive.eu...
-
Page 68: Avvertenze Importanti
AVVERTENZE IMPORTANTI \\\ Quando si utilizza un apparecchio elettrico è necessario osserva- re le fondamentali precauzioni di sicurezza, che includono: Wleggere integralmente le istruzioni prima di usare l’apparecchio. Solo per uso domestico. IMPORTANTE Il produttore non si assume alcuna responsabilità per danni causati da un utilizzo dell’apparecchio non conforme alle istruzioni o diverso da quello previsto. - Page 69 12. Tenere i capelli, i vestiti, le dita e tutte le parti del corpo lontano dalle aperture e dai componenti in movimento. 13. Non aspirare nulla che stia bruciando o fumando, come sigarette, fiammiferi, o ceneri ardenti. 14. Prestare massima attenzione durante la pulizia delle scale. 15.
- Page 70 PANORAMICA DEI PRODOTTI \\\ DESCRIPTION OF THE VACUUM DESCRIPTION OF THE VACUUM 1. Pulsante ON/OFF 2. ndicatore luminoso di ricarica 1 On/Off Button 3. Pulsante Alta velocità 2 Charging Indicator Light 4. Pulsante di rimozione del 3 High Speed Button contenitore per la polvere 1 On/Off Button 4 Dust Cup Removal Button...
- Page 71 12. Estensione 13. Fugendüse (fein) 14. Ugello a fessura (fine) 15. Spazzole per mobili 16. Ugello a fessura (grossolano) 17. Adattatore angolare 18. Adattatore A 19. Adattatore B...
-
Page 72: Panoramica Dei Prodotti
PANORAMICA DEI PRODOTTI \\\ Esempi di combinazioni... -
Page 73: Prima Della Messa In Funzione
PRIMA DELLA MESSA IN FUNZIONE \\\ Come ricaricare l’aspirapolvere IMPORTANTE – Il caricatore deve essere collegato alla presa elettrica per la ricarica. L’aspirapolvere viene spedito parzialmente carico e in grado di funzionare per ASSEMBLING THE VACUUM breve tempo. Si consiglia di ricaricare completamente l’aspirapolvere prima di metterlo in funzione. -
Page 74: Funzionamento
PRIMA DELLA MESSA IN FUNZIONE \\\ Come conservare l’aspirapolvere ASSEMBLING THE VACUUM IMPORTANTE – Scollegare il caricatore mentre l’aspirapolvere è in uso L’aspirapolvere e gli accessori per Storing the Vacuum la pulizia possono essere comoda- NOTE: Unplug the battery charger mente riposti nella stazione home/ when the vacuum is in use. - Page 75 NOTE: The vacuum has a slow start To turn vacuum cleaner On or Off, push feature and will take a moment to start the power button (Fig. 1). after you push the power button. This is Low Speed normal. The vacuum automatically starts on low On/Off Button speed when turned on.
-
Page 76: Accessori Per La Pulizia
ACCESSORI PER LA PULIZIA \\\ ATTACHMENT CLEANING ATTACHMENT CLEANING ATTACHMENT CLEANING Accessori per la pulizia Cleaning Tools Cleaning Tools Cleaning Tools L’aspirapolvere è equipaggiato con The vacuum is equipped with a The vacuum is equipped with a The vacuum is equipped with a dusting brush combo tool and a crevice dusting brush combo tool and a crevice una spazzola combo e un aspiratore... - Page 77 CURA E MANUTENZIONE \\\ MAINTENANCE AND CARE MAINTENANCE AND CARE IMPORTANTE – Spegnere NOTE: Always turn off the vacuum before performing any service. sempre l’aspirapolvere prima di Do not fill the dust cup past the effettuare l’assistenza. Non riempire Max Fill Line (Fig. 1). NOTE: Always turn off the vacuum il contenitore per la polvere oltre il before performing any service.
-
Page 78: Cura E Manutenzione
NOTE: Always turn off the vacuum the debris will fall into the trash 3. Shake the vacuum to release any debris before performing any service. container (Fig. 3). that might be inside the dust cup. Do not fill the dust cup past the 3. - Page 79 MAINTENANCE AND CARE IMPORTANTE – MAINTENANCE AND CARE Spegnere sempre l’aspirapolvere prima di effettuare l’assistenza. NOTE: Always turn off the vacuum NOTE: Always turn off the vacuum Sostituzione dei filtri before performing any service. before performing any service. Replacing the Filters Do not fill the dust cup past the Max Fill Line (Fig.
-
Page 80: Risoluzione Dei Problemi
RISOLUZIONE DEI PROBLEMI \\\ IMPORTANTE – Per ridurre il rischio di scosse elettriche o lesioni provocate dai componenti in movimento, spegnere l’aspirapolvere e scollegare il caricatore prima di effettuare l’assistenza o di utiliz- zarlo. Per ridurre il rischio di scosse elettriche, non toccare la spina o l’apparecchio con le mani bagnate. -
Page 81: Specifiche Tecniche
SPECIFICHE TECNICHE \\\ VACUMATE Ultralight Modello DJ50012 / DJ50013 / DJ50014 / DJ50015 Tensione (batteria) 11,1 V DC Power MAX 120 W Serbatoio polvere ~ 0,2 l 25 min (basso rendimento) / 11 min (alto rendimento) Tempo di funzionamento ~ 3 orari... - Page 82 vacumate...
Need help?
Do you have a question about the VACUMATE Ultralight and is the answer not in the manual?
Questions and answers