Table of Contents
Advertisement
Quick Links
Advertisement
Table of Contents

Related Manuals for Fisher Research Labs GOLD BUG 2


Summary of Contents for Fisher Research Labs GOLD BUG 2
- Page 1 ® GOLD BUG ® P R O S P E C T O R ’ S M E T A L D E T E C T O R OPERATING MANUAL...
-
Page 2: Table Of Contents
TABLE OF CONTENTS About Your GoldBug2 ..............3-5 Setting Up ..................6-7 Hip-Mounting ..................8 Control Panel ................9-10 Mode and Mineralization Controls ..........11-12 Mode and Mineralization Selections .......... 13-14 Power-On Procedure ............... 15 Ground Reject Procedure ............16-17 Searching ................... - Page 3 ABOUT YOUR GOLD BUG 2 Congratulations on your purchase of the Fisher GoldBug2, the standard against which all other gold prospecting detectors are compared. The GoldBug2 is specially designed for finding gold nuggets. The GoldBug2’s high frequency, at 71 kHz, is extremely sensitive to small gold nuggets.
-
Page 4: About Your Goldbug2
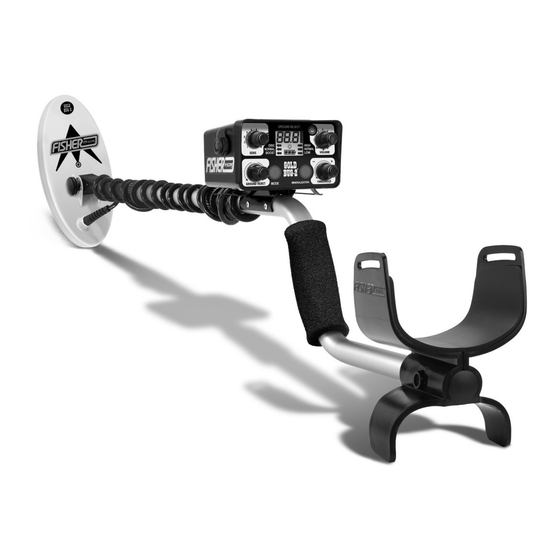
ABOUT YOUR GoldBug2 (continued) Here are some other features of the GoldBug2: • Dust and moisture resistant control box. • Removable control housing for hip-mount and fatigue-free prospecting. • Elliptical searchcoils available in three sizes: 6.5, 10 and 14-inch. • Lightweight design, only 2.9 lbs. - Page 5 ABOUT YOUR GoldBug2 (continued) Padded armrest Detector stand Aluminum upper stem Drop-in battery compartments Foam handgrip 1/4” Headphone jack Removable control housing Cable Locking collar connector Aluminum middle stem Velcro cable attachment Waterproof, electrostatic 7-foot searchcoil cable shielded, Locking collar elliptical searchcoil Fiberglass-reinforced...
-
Page 6: Setting Up
SETTING UP The GoldBug2 requires minimal assembly. To assemble the GoldBug2: connect the upper, middle and lower stems, connect the searchcoil connector to the back of the control housing and then adjust the angle of the searchcoil. Take a look at page 5 and familiarize yourself with the parts of the GoldBug2 before proceeding. - Page 7 SETTING UP (continued) 4. Tighten the locking collars to secure the stems; secure the coil with the bolt and nut. 5. With the stem length properly adjusted, wrap the searchcoil cable tightly around the upper stem and secure it with the two velcro straps.
-
Page 8: Hip-Mounting
HIP-MOUNTING Your GoldBug2 is lightweight and well balanced; however, if you are going to be swinging it for more than a few hours, you may want to “hip-mount” it by removing the control box and strapping it to your waist. Follow this procedure: 1. -
Page 9: Control Panel
CONTROL PANEL Figure 5. 1. SENS: This knob adjusts the GoldBug2’s sensitivity to targets. By increasing the sensitivity, you can detect smaller and deeper targets; however, high sensitivity settings can result in false signals in mineralized soil or in areas with electrical interference. - Page 10 CONTROL PANEL (continued) 5. THRESHOLD: This control sets the volume level of the faint but continuous background tone. 6. VOLUME: This knob turns the power on and adjusts the signal-response volume. If you are wearing headphones with independent volume controls, set your GoldBug2 VOLUME control to 10 and decrease the volume of your headphone controls to a comfortable level.
-
Page 11: Mode And Mineralization Controls
MODE AND MINERALIZATION BUTTONS Figure 6. The two push-buttons on your GoldBug2 enable you to search in just about any kind of ground condition. The trick is learning which combination of settings is right for each ground condition. The MODE button on your GoldBug2 offers three different operating modes: DISC, NORMAL and BOOST. - Page 12 MODE AND MINERALIZATION BUTTONS (continued) your GoldBug2 to automatically retune itself after the searchcoil has passed over a target. A fast retune speed means a quick response to targets. USING THE MINERALIZATION BUTTON: • Quick-press MINERALIZATION in NORMAL or BOOST modes to adjust your detector to the type of ground MINERALIZATION you are hunting: Low, Normal or High.
- Page 13 MODE AND MINERALIZATION BUTTON SELECTION The chart below shows how your GoldBug2’s sensitivity and ability to operate in mineralized soil is affected by each combination of MINERALIZATION and MODE settings. Mineralization setting in NORMAL MODE Figure 7. In either the BOOST or NORMAL mode, the GoldBug2’s sensitivity decreases as you increase MINERALIZATION settings from LOW to HIGH.
- Page 14 MODE AND MINERALIZATION BUTTON SELECTION (continued) DISC MODE Do not search in the DISC mode unless the area is heavily littered with iron trash. In most situations you want to hunt in the NORMAL or BOOST modes and then switch to the DISC mode to identify a strong target response.
-
Page 15: Power-On Procedure
POWER-ON PROCEDURE 1. Set your controls as follows: SENS: 10 VOLUME: CLICK ON MODE: NORMAL GROUND REJECT: 75.0 MINERALIZATION: LOW Figure 8A. NOTE: You will probably find that most of your searching will be done with MODE = Normal, MINERALIZATION = Low and SENS < 10. If you are working in unfamiliar ground, however, we recommend that you try starting at the maximum sensitivity and LOW MINERALIZATION settings. -
Page 16: Ground Reject Procedure
GROUND REJECT PROCEDURE When your GoldBug2 is properly tuned or “ground balanced,” it will have only a minimal response to ground minerals when the searchcoil is raised from or lowered to the ground. Precise adjustment of the GROUND REJECT control is critical to your success. The lower the MINERALIZATION or the higher the SENSITIVITY settings, the more important it is to maintain proper ground rejection. - Page 17 GROUND REJECT PROCEDURE (continued) Your objective now is to adjust the GROUND REJECT control so that there is no change in the sound, a very small change in the threshold hum as you bob the coil up and down. Start by setting Ground Reject to 75.
-
Page 18: Searching
SEARCHING Sweep the searchcoil continuously at a comfortable rate. Remember that the GoldBug2 is a motion detector and responds only when the searchcoil is moving over the ground. 2. Keep the searchcoil parallel to and as close to the ground as possible. T h i s i s i m p o r t a n t f o r maximum coverage and depth. - Page 19 SEARCHING (continued) Try reducing the sensitivity if you hear too much ground chatter and false signals. If you find you must decrease the SENSITIVITY below 5, is probably a good idea to change the MINERALIZATION setting to NORMAL and set the SENSITIVITY back to 10.
- Page 20 SEARCHING (continued) Avoid hunting in the DISC mode unless the area is so littered with ferrous trash that it is impossible to hunt in any other way. The DISC mode will cause your GoldBug2 to ignore ferrous objects and hot rocks, but it may also cause you to miss small gold nuggets.
-
Page 21: Pinpointing
PINPOINTING Always use the same procedure to pinpoint with the GoldBug2, regardless of control settings. With a little practice you will be able to zero in on most targets quickly and accurately. Use this procedure: 1. Once a buried target is indicated by the “beep” of the GoldBug2, continue sweeping the searchcoil from side-to-side, narrowing the search pattern. -
Page 22: Target Recovery
TARGET RECOVERY The moment of truth! But not so fast . . . take your time. You may have pinpointed a target, but that does not mean you can reach down and pick up a nugget. Even if it is lying on top of the ground, you are going to have to determine which of those pebbles really is a gold nugget. - Page 23 TARGET RECOVERY (continued) NOTE: Because of the extreme sensitivity of the GoldBug2 searchcoil, the electrical charge of your hand may be picked up as a target. Sounds incredible, but it is true. Therefore, if you pinpoint a target and it sounds small, do not try to identify it by passing a handful of dirt in front of the searchcoil.
-
Page 24: False Signals
FALSE SIGNALS A false signal occurs when something that should not sound like a good target sounds like one. For example, the GoldBug2 may detect metal in your boots if you swing your searchcoil too close to your feet. Here are some other sources of false signals, and here is what to do about them. - Page 25 FALSE SIGNALS (continued) 4. Junk: Nails, pull-tabs, beer cans, etc. The GoldBug2 was designed for extreme sensitivity to small bits of gold. That means it is also extremely sensitive to small bits of ferrous metal. Solution: Hunt in the NORMAL mode, but use the DISC mode to check targets to see if they are ferrous.
-
Page 26: Operating Tips
OPERATING TIPS 1. We have already said it, but it bears repeating: take your time, overlap your sweeps, keep your coil close to the ground, recheck your ground adjustment often. 2. Use good headphones: Your GoldBug2 will detect small, deep nuggets other detectors have missed. -
Page 27: Batteries
BATTERIES The 3-segment battery status indicator is calibrated to alkaline batteries If using, lithium or nickel metal hydride batteries, your detector may turn off due to insufficient battery voltage before you receive a low-battery indication. Two 9V batteries are located in separate compartments at the rear of the GoldBug2 control housing. -
Page 28: Maintenance
BATTERY REPLACEMENT (continued) 1. To replace the batteries, open the battery compartment by gently pressing down on the battery door latches. The doors are tethered with short, nylon string. Do not attempt to completely remove them. 2. Tilt the housing gently, and the batteries will slide out. 3. -
Page 29: Using Headphones
USING HEADPHONES Using headphones (not included) improves battery life, and allows you to hear subtle changes in the sound more clearly, particularly if searching in a noisy location. For safety reasons, do not use headphones near traffic or where other dangers are present. This device is to be used with interconnecting cables/headphone cables shorter than three meters. -
Page 30: Where To Use Your Goldbug2 In The U.s
Where To Use Your Metal Detector In the U.S. National Forest and Federal Lands—Metal detecting is allowed only by special permit acquired from the federal government. Each area has a district office. Corps of Engineers, Lakes, Shorelines and Lands—Permission has been granted only on pre-disturbed sites, such as beaches and attached swimming areas. -
Page 31: Specifications
SPECIFICATIONS Length ........Extended ..........53” Collapsed ..........40” Weight .......Complete ........2.9 lbs. Control Housing ......1.0 lbs. Handle and Coil ......1.9 lbs. Frequency ......LF Search ......... 71.01 kHz Response ........(V.C.O.) Operating Modes ....1. All Metal Auto-Tune (NORMAL) 2. All Metal Auto-Tune (BOOST) 3. - Page 32 SPECIFICATIONS Shielding ....100% ESI Coverage Interchangeable ........Yes Waterproof...........Yes Cable Length ........7 feet Handle-Mount / Hip-Mount Convertible ..........Yes Built-in Armrest and Detector Stand ..........Yes Batteries ......Type .........(2) 9V Transistor Life-Carbon Zinc ....10-20 hours Life-Alkaline ......25-35 hours NiCads ........5-10 hours Notes: 1.
- Page 33 This page left intentionally blank...
- Page 34 This page left intentionally blank...
-
Page 35: Warranty
5-Year Limited Warranty The GoldBug2 metal detector is warranted against defects in materials and workmanship under normal use for five years from the date of purchase to the original owner. Damage due to neglect, accidental damage or misuse of this product is not covered under this warranty. - Page 36 Copyright© 2021 by Fisher Research Labs,Inc. ® All rights reserved, including the right to reproduce this book, or parts thereof, in any form. Published by Fisher Research Labs, Inc. ® Fisher is a registered trademark of Fisher Research Labs, Inc. ®...
Need help?
Do you have a question about the GOLD BUG 2 and is the answer not in the manual?
Questions and answers