Advertisement
Quick Links
Advertisement

Subscribe to Our Youtube Channel
Related Manuals for Elation ELAR-DRIVER-8-12V


Summary of Contents for Elation ELAR-DRIVER-8-12V
- Page 1 ELAR-DRIVER-8-12V™ user manual ...
- Page 2 Elation Professional USA | 6122 S. Eastern Ave. | Los Angeles, CA. 90040 323-582-3322 | 323-832-9142 fax | www.elationlighting.com | info@elationlighting.com Elation Professional B.V.
-
Page 3: Table Of Contents
C O N T E N T S General Information Warranty Safety Instructions Overview Installation DMX Addressing Stand Alone Mode Technical Specifications www.elationlighting.com... -
Page 4: General Information
Please do not discard the shipping carton in the trash. Please recycle whenever possible. BOX CONTENTS ELAR-DRIVER-8-12V (8) 5-Wire 12-14 AWG Terminal Blocks Small Screw Driver www.elationlighting.com... - Page 5 You may also visit us on the web at www.elationlighting.com any comments or suggestions. For service related issue please contact Elation Professional®. ELATION SERVICE USA - Monday - Friday 8:00am to 5:00pm PST...
-
Page 6: Warranty
No accessories should be shipped with the product. If any accessories are shipped with the product, Elation Professional® shall have no liability what so ever for loss and/or or damage to any such accessories, nor for the safe return thereof. -
Page 7: Safety Instructions
S A F E T Y I N S T R U C T I O N S To guarantee a smooth operation, it is important to follow all instructions and guidelines in this manual. The manufacturer of this device is not responsible for injury and/or damages resulting from the misuse of this device due to the disregard of the information printed in this manual. -
Page 8: Overview
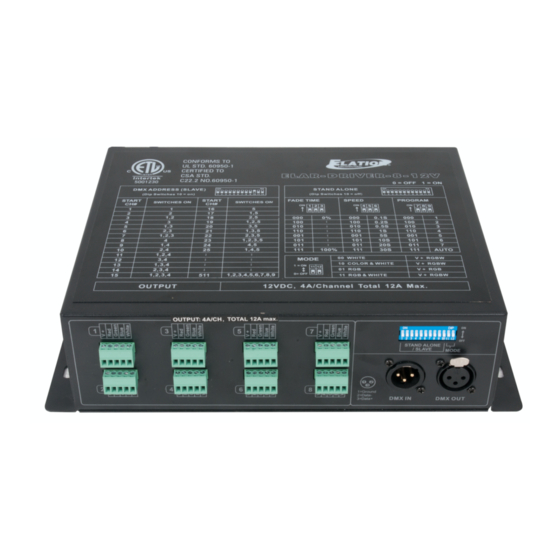
O V E R V I E W 1. 5 Wire (V+, Red, Green, Blue, White) 12-14 AWG Terminal Blocks 2. DMX INPUT / 3pin XLR 3. DMX OUTPUT / 3pin XLR 4. DMX Address / Manual Mode DIP Switches 5. -
Page 9: Installation
I N S T A L L A T I O N 1 . Mount driver on a flat surface with appropriate screws (not included). 2 . Select desired voltage by adjusting Voltage Select switch on backside. 3 . Turn ON desired DMX Address / Manual Mode DIP Switches. (See next sections) 4 . -
Page 10: Dmx Addressing
D M X A D D R E S S I N G 1 . To set driver DMX address, select DMX ADDRESS Mode by turning ON switch #10. 2 . Using the chart below, turn on the switches that equal the desired DMX address. For example to set a DMX address of 250, turn ON switches #2, #4, #5, #6, #7, #8. -
Page 11: Stand Alone Mode
S T A N D A L O N E M O D E 1. To control LEDs manually, set driver to STAND ALONE Mode by turning OFF switch #10. 2 . Using chart below, turn ON switches that equal desired control for each function: Fade Time, Speed, Program, and Mode. -
Page 12: Technical Specifications
T E C H N I C A L S P E C I F I C A T I O N S CONTROL / CONNECTIONS 8 Zone / 32 DMX Channels DMX-512 and Manual Stand Alone Modes 12 Dip Switches DMX IN/OUT via 3pin XLR (8) 5-Wire 12-14 AWG Terminal Blocks (included) SIZE / WEIGHT... - Page 13 DIMENSIONAL DRAWINGS Please Note: Specifications and improvements in the design of this unit and this manual are subject to change without any prior written notice. www.elationlighting.com...
Need help?
Do you have a question about the ELAR-DRIVER-8-12V and is the answer not in the manual?
Questions and answers