Table of Contents
Advertisement
Available languages
Available languages
Quick Links
to win an ISOBAR
21-02-277-933D64-Book.indb 1
21-02-277-933D64-Book.indb 1
Quick Start Guide
IP68-Rated Gigabit
PoE Outdoor In-Line
Surge Protector
Model: B110-SP-CAT-OD2
Español 13 • Français 25
Русский 37 • Deutsch 49
WARRANTY REGISTRATION
Register your product today and be automatically entered
®
tripplite.com/warranty
1111 W. 35th Street, Chicago, IL 60609 USA
tripplite.com/support
Copyright © 2021 Tripp Lite.
All trademarks are the property of their respective owners.
surge protector in our monthly drawing!
1
7/27/2021 11:40:29 AM
7/27/2021 11:40:29 AM
Advertisement
Table of Contents

Related Manuals for Tripp Lite B110-SP-CAT-OD2


Summary of Contents for Tripp Lite B110-SP-CAT-OD2
- Page 1 ® tripplite.com/warranty 1111 W. 35th Street, Chicago, IL 60609 USA tripplite.com/support Copyright © 2021 Tripp Lite. All trademarks are the property of their respective owners. 21-02-277-933D64-Book.indb 1 21-02-277-933D64-Book.indb 1 7/27/2021 11:40:29 AM 7/27/2021 11:40:29 AM...
-
Page 2: Package Includes
Package Includes • B110-SP-CAT-OD2 Outdoor In-Line Surge Protector • 18 AWG Grounding Wire – 1 ft. • Cable Gland, 8.4 mm Diameter (x3) • Surface Screw Anchors (x4) • Surface Mounting Screws (x4) • Unit Cover Screws (x4) • Owner’s Manual Product Features •... -
Page 3: Optional Accessories
Optional Accessories • N224-Series Cat6 Plenum-Rated Solid-Core Bulk Cable • N046-000 Punch Down Installation Tool Mounting Instructions 1. Locate the mounting holes on the bottom of the enclosure, as shown in Figure 1. Figure 1 2. Securely mount the bottom portion of the enclosure to the desired outdoor location. -
Page 4: Installation
328 ft. (100 m). • For best protection performance, the total cable distance in the installation should not exceed 328 ft. (100 m). • The B110-SP-CAT-OD2 must be grounded to function properly. 21-02-277-933D64-Book.indb 4 21-02-277-933D64-Book.indb 4 7/27/2021 11:40:29 AM... - Page 5 Installation Protecting Edge-Of-Network Equipment This installation protects your edge equipment from surge, lightning or ESD damage. To protect both the source and edge equipment, refer to section Protecting Edge-Of-Network Source and Equipment in this guide. Note: Use standard size Cat5e, Cat6 or Cat6a cables that feature a wire gauge of 23/24 AWG.
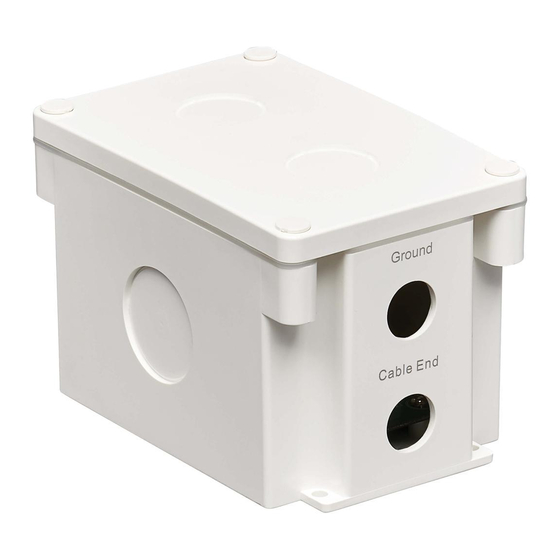
- Page 6 Installation 3. Insert both the grounding wire and the bare-wire end of the category cable in the enclosure, making sure it is inserted on the “cable end” side. 21-02-277-933D64-Book.indb 6 21-02-277-933D64-Book.indb 6 7/27/2021 11:40:29 AM 7/27/2021 11:40:29 AM...
- Page 7 1. Then, tighten the cap securely onto the cable gland. 5. Using a punch down tool (such as Tripp Lite’s N046-000, sold separately), connect the bare wire to the color-coded board inside the enclosure.
- Page 8 Installation 7. Once both bare wires are connected, secure the PCBA board to the enclosure using the included mounting screws. Then, attach the grounding wire to the available screw on the PCBA board. Note: Make sure you connect your source to the cable end and your PoE-compliant device to the equipment end.
- Page 9 B110-SP-CAT-OD2 units in your application. A B110-SP-POE can be installed instead of a second B110-SP-CAT-OD2 to protect the source if the second unit will be installed indoors. Note: Use standard size Cat5e, Cat6 or Cat6a cables that feature a wire gauge of 23/24 AWG.
- Page 10 Installation 2. In order to protect both the source and edge equipment, the two B110-SP-CAT-OD2 units need to be wired cable- end to cable-end as shown below. 328 ft. (100 m) 21-02-277-933D64-Book.indb 10 21-02-277-933D64-Book.indb 10 7/27/2021 11:40:30 AM 7/27/2021 11:40:30 AM...
-
Page 11: Specifications
Specifications Input / Output Connectors RJ45 Female ESD Protection 15kV (Air), 8kV (Contact) Lightning Protection 10kA (8/20μs) / 20kV (8/20μs) Surge Reaction Speed < 1ns Operating Temperature Range -40°F to 158°F (-40°C to 70°C) Storage Temperature Range -40°F to 194°F (-40°C to 90°C) Relative Humidity Range 0 to 95% RH,... -
Page 12: Warranty And Product Registration
Tripp Lite warrants its products to be free from defects in materials and workmanship for a period of two (2) years from the date of initial purchase. Tripp Lite’s obligation under this warranty is limited to repairing or replacing (at its sole option) any such defective products. -
Page 13: Guía De Inicio Rápido
Русский 37 • Deutsch 49 MÁS DE AÑOS 1111 W. 35th Street, Chicago, IL 60609 EE UU tripplite.com/support Copyright © 2021 Tripp Lite. Todas las marcas registradas son propiedad de sus respectivos propietarios. 21-02-277-933D64-Book.indb 13 21-02-277-933D64-Book.indb 13 7/27/2021 11:40:30 AM... -
Page 14: El Paquete Incluye
El Paquete Incluye • Supresor de Sobretensiones En Línea para Exteriores B110-SP-CAT-OD2 • Cable de Conexión a Tierra 18 AWG – 30.5 cm [1 pie] • Pasacables, 8.4 mm de Diámetro (x3) • Tornillos de Anclaje en Superficie (x4) • Tornillos para Instalación en Superficie (x4) •... -
Page 15: Accesorios Opcionales
Accesorios Opcionales • Cable a Granel de Núcleo Sólido Especificación Plenum Cat6 Serie N224 • Herramienta de Instalación por Compresión N046-000 Instrucciones de Instalación 1. Ubique los orificios de instalación en la parte inferior del gabinete, como se muestra en la Figura 1. Figura 1 2. -
Page 16: Instalación
B110-SP-CAT-OD2 entre la fuente y los equipos de la red de vanguardia. Notas: • La distancia máxima del cable entre el B110-SP-CAT-OD2 y la fuente es de 100 m [328 pies]. • La distancia máxima del cable entre el B110-SP-CAT-OD2 y los equipos es de 100 m [328 pies]. - Page 17 Instalación Protección de Equipo de Red Edge Esta instalación protege su equipo Edge contra sobretensiones, rayos o daños por descargas electroestáticas. Para proteger tanto la fuente como el equipo Edge, refiérase a la sección Protección de Fuente y Equipo Edge en esta guía. Nota: Use cables Cat5e, Cat6 o Cat6a de tamaño estándar que tengan un calibre de alambre de 23/24 AWG.
- Page 18 Instalación 3. Inserte el cable de conexión a tierra y el extremo del cable Cat desnudo en el gabinete, asegurándose de que esté insertado en el lado del "extremo de cable". 21-02-277-933D64-Book.indb 18 21-02-277-933D64-Book.indb 18 7/27/2021 11:40:30 AM 7/27/2021 11:40:30 AM...
- Page 19 5. Usando una herramienta de compresión (como la N046- 000 de Tripp Lite, vendida por separado), conecte el cable desnudo al tablero codificado por color dentro del gabinete. 6. Repita los pasos 1 ~ 3 para el lado del equipo (por ej.: cámara PoE) del gabinete sin la adición de un cable de...
- Page 20 Instalación 7. Una vez que ambos cables desnudos estén conectados, asegure la tarjeta PCBA al gabinete con los tornillos de instalación incluidos. Después, conecte el cable de conexión a tierra al tornillo disponible en la tarjeta de a la tarjeta PCBA. Nota: Asegúrese de conectar su fuente al extremo del cable y su dispositivo compatible con PoE al extremo del equipo.
- Page 21 Switch PoE A LAN 1. Instale una segunda unidad B110-SP-CAT-OD2 entre la primera unidad B110-SP-CAT-OD2 y su fuente siguiendo los pasos 1 ~ 3 en la sección de Protección de Equipo de Red Edge. 21-02-277-933D64-Book.indb 21 21-02-277-933D64-Book.indb 21 7/27/2021 11:40:30 AM...
- Page 22 Instalación 2. A fin de proteger tanto la fuente como el equipo edge, las dos unidades B110-SP-CAT-OD2 necesitan ser cableadas de extremo de cable a extremo de cable como se muestra a continuación. 100 m [328 pies] 21-02-277-933D64-Book.indb 22 21-02-277-933D64-Book.indb 22...
-
Page 23: Especificaciones
Especificaciones Conectores de Entrada y RJ45 Hembra Salida Protección contra descargas 15kV (Aire), 8kV (Contacto) electroestáticas Protección contra rayos 10kA (8/20μs) / 20kV (8/20μs) Velocidad de Reacción contra < 1 ns Sobretensiones Rango de Temperatura de -40 °C a 70 °C Operación [-40 °F a 158 °F] Rango de Temperatura de... - Page 24 [RMA] de Tripp Lite o de un centro de servicio autorizado de Tripp Lite. Los productos deben devolverse a Tripp Lite o a un centro de servicio autorizado de Tripp Lite con los cargos de transporte prepagados y deben acompañarse con una breve descripción del problema y un comprobante de la fecha y el lugar de compra.
-
Page 25: Guide De Démarrage Rapide
English 1 • Español 13 Русский 37 • Deutsch 49 1111 W. 35th Street, Chicago, IL 60609 USA tripplite.com/support Droits d'auteur © 2021 Tripp Lite. Toutes les marques de commerce sont la propriété de leurs propriétaires respectifs. 21-02-277-933D64-Book.indb 25 21-02-277-933D64-Book.indb 25... -
Page 26: Caractéristiques Du Produit
L'emballage comprend • Parasurtenseur en ligne extérieur B110-SP-CAT-OD2 • Fil de mise à la masse, 18 AWG – 0,3 m (1 pi) • Goupille de câble, 8,4 mm de diamètre (x3) • Ancres à vis de surface (x4) • Vis de montage en surface (x4) •... -
Page 27: Accessoires En Option
Accessoires en option • Câble au mètre à fils rigides ignifuge Cat6 de la série N224 • Outil d'installation de perforation N046-000 Instructions de montage 1. Localiser les trous de montage dans la partie inférieure du boîtier comme illustré à la Figure 1. Figure 1 2. -
Page 28: Installation
• Pour un meilleur rendement en matière de protection, la distance totale du câble dans l'installation ne devrait pas excéder 100 m (328 pi). • Le B110-SP-CAT-OD2 doit être mis à la masse pour fonctionner correctement. 21-02-277-933D64-Book.indb 28 21-02-277-933D64-Book.indb 28... - Page 29 Installation Protéger l'équipement à la limite du réseau Cette installation protège l'équipement périphérique contre les surtensions, la foudre ou les dommages causés par les décharges électrostatiques (DES). Pour protéger à la fois la source et l'équipement périphérique, consulter la section Protéger la source et l'équipement à...
- Page 30 Installation 3. Insérer le fil de mise à la terre et l'extrémité à fil nu du câble de catégorie dans le boîtier, en s'assurant qu'il est inséré sur le côté « extrémité du câble ». 21-02-277-933D64-Book.indb 30 21-02-277-933D64-Book.indb 30 7/27/2021 11:40:31 AM 7/27/2021 11:40:31 AM...
- Page 31 5. En utilisant un outil de perforation (comme le N046-000 de Tripp Lite, vendu séparément), connecter le fil nu au panneau codé par couleurs à l'intérieur du boîtier. 6. Répéter les étapes 1 à 3 pour le côté de l'équipement (p.
- Page 32 Installation 7. Une fois les deux fils nus connectés, fixer les câbles PCBA nouvellement sertis au boîtier en utilisant les vis de montage incluses. Fixer ensuite le fil de mise à la masse à la vis disponible sur la carte PCBA. Remarque : S'assurer de connecter la source à...
- Page 33 23/24 AWG. Les câbles de catégorie minces ne sont pas pris en charge. La distance maximale du câble entre deux appareils B110-SP-CAT-OD2 est de 100 m (328 pi). Point d'accès sans fil...
- Page 34 Installation 2. Pour protéger à la fois la source et l'équipement périphérique, les deux appareils B110-SP-CAT-OD2 doivent être câblés extrémité du câble à extrémité du câble comme illustré ci-dessous. 100 m (328 pi) 21-02-277-933D64-Book.indb 34 21-02-277-933D64-Book.indb 34 7/27/2021 11:40:31 AM...
-
Page 35: Caractéristiques Techniques
Caractéristiques techniques Connecteurs d'entrée/de sortie RJ45 femelle Protection DES 15 kV (air), 8 kV (contact) Protection contre la foudre 10kA (8/20µs) / 20kV (8/20µs) Vitesse de réaction de la < 1ns surtension Plage de températures de -40 à 70 °C fonctionnement (-40 à... -
Page 36: Garantie
(« RMA ») auprès de Tripp Lite ou d'un centre de réparation autorisé par Tripp Lite. Les produits doivent être retournés à Tripp Lite ou à un centre de réparation autorisé... - Page 37 English 1 • Español 13 Français 25• Deutsch 49 1111 W. 35th Street, Chicago, IL 60609 USA tripplite.com/support Охраняется авторским правом © 2021 Tripp Lite. Все торговые знаки являются собственностью своих соответствующих владельцев. 21-02-277-933D64-Book.indb 37 21-02-277-933D64-Book.indb 37 7/27/2021 11:40:32 AM...
- Page 38 Комплект поставки • Встроенный сетевой фильтр для использования вне помещений мод. B110-SP-CAT-OD2 • Заземляющий провод калибра 18 AWG длиной 0,3 м • Кабельная втулка 8,4 мм (3 шт.) Ø • Анкерные болты (4 шт.) • Крепежные винты (4 шт.) •...
- Page 39 Oпциональные кoмплектующие • Одножильный кабель Cat6 серии N224 класса Plenum в бухте • Монтажный инструмент для концевой заделки N046-000 Указания по монтажу 1. Найдите монтажные отверстия в нижней панели шкафа, как показано на Рис. 1. Рис. 1 2. Прочно закрепляйте дно корпуса в нужном месте на открытом воздухе. Диаметр...
- Page 40 • Максимальная протяженность кабеля между устройством B110-SP-CAT-OD2 и оборудованием составляет 100 м. • Для обеспечения максимально эффективной защиты общая протяженность кабелей в установке не должна превышать 100 м. • Для надлежащего функционирования устройство мод. B110-SP-CAT-OD2 должно быть заземлено. 21-02-277-933D64-Book.indb 40 21-02-277-933D64-Book.indb 40...
- Page 41 Установка Защита источника и оборудования в пограничном сегменте сети Данная установка защищает периферийное оборудование от повреждений, связанных с выбросами напряжения, грозовыми или электростатическими разрядами. Для обеспечения одновременной защиты источника и периферийного оборудования см. раздел Защита источника и оборудования в пограничном сегменте...
- Page 42 Установка 3. Вставьте концы заземляющего провода и сетевого кабеля с неизолированными проводами в корпус со стороны "конца кабеля". 21-02-277-933D64-Book.indb 42 21-02-277-933D64-Book.indb 42 7/27/2021 11:40:32 AM 7/27/2021 11:40:32 AM...
- Page 43 4. Ввинтите кабельную втулку в корпус при помощи торцевой гайки , ранее снятой на шаге 1. Затем плотно насадите колпачок на кабельную втулку. 5. Используя ударный инструмент (например, Tripp Lite N046-000, продается отдельно), подсоедините неизолированный провод к плате с цветовой маркировкой внутри шкафа.
- Page 44 Установка 7. После подсоединения обоих неизолированных проводов прикрепите плату PCBA к корпусу с помощью крепежных винтов из комплекта. Затем подсоедините заземляющий провод к свободному винту платы PCBA. Примечание. Источник должен быть подключен к кабельному торцу, а устройство, питаемое по кабелю Ethernet — к торцу для подключения оборудования. 8.
- Page 45 Описанная выше установка защищает от повреждений, связанных с выбросами напряжения, грозовыми или электростатическими разрядами, только периферийное оборудование. Для защиты источника и периферийного оборудования следует установить два устройства B110-SP-CAT-OD2. В случае установки второго устройства в закрытом помещении для защиты источника вместо второго устройства мод. B110-SP-CAT-OD2 может устанавливаться...
- Page 46 Установка 2. Для обеспечения защиты источника и периферийного оборудования концы кабелей двух устройств B110-SP-CAT-OD2 должны соединяться как показано на рисунке ниже. 328 ft. 100 м 21-02-277-933D64-Book.indb 46 21-02-277-933D64-Book.indb 46 7/27/2021 11:40:32 AM 7/27/2021 11:40:32 AM...
- Page 47 Технические характеристики Входные / выходные разъемы RJ45 (гнездовой) Защита от электростатических 15 кВ (воздух), 8 кВ (контакт) разрядов Молниезащита 10 кА (8/20 мкс) / 20 кВ (8/20 мкс) Скорость реакции на выброс < 1 нс напряжения Диапазон рабочих температур От -40° до 70°C Диапазон...
- Page 48 Гарантийные обязательства Ограниченная гарантия сроком 2 года Компания Tripp Lite гарантирует отсутствие дефектов материалов и изготовления в течение двух (2) лет с момента первоначальной покупки. Обязательства компании Tripp Lite по настоящей гарантии ограничиваются ремонтом или заменой (по ее единоличному усмотрению) любых таких дефектных изделий. Для получения...
- Page 49 Modell: B110-SP-CAT-OD2 English 1 • Español 13 Français 25 • Русский 37 1111 W. 35th Street, Chicago, IL 60609 USA tripplite.com/support Copyright © 2021 Tripp Lite. Alle Marken sind Eigentum des jeweiligen Inhabers. 21-02-277-933D64-Book.indb 49 21-02-277-933D64-Book.indb 49 7/27/2021 11:40:32 AM...
- Page 50 Im Paket enthalten • B110-SP-CAT-OD2 Inline-Überspannungsschutz für den Außenbereich • 18-AWG-Erdungsleitung - 30,48 cm • Kabelverschraubung, 8,4 mm Durchmesser (x3) • Dübel für Oberflächenschrauben (x4) • Schrauben für Oberflächenmontage (x4) • Schrauben für Abdeckung der Einheit (x4) • Benutzerhandbuch Produktmerkmale •...
-
Page 51: Optionales Zubehör
Optionales Zubehör • N224-Serie Cat6 Plenum-eingestuftes Verlegekabel • N046-000 Auflegewerkzeug für die Installation Montageanleitung 1. Suchen Sie die Befestigungsbohrungen an der Unterseite des Gehäuses, wie in Abbildung 1 gezeigt. Abbildung 1 2. Befestigen Sie den unteren Teil des Gehäuses sicher an der gewünschten Außenstelle. - Page 52 • Der maximale Kabelabstand zwischen dem B110-SP-CAT-OD2 und den Geräten beträgt 100 m. • Für eine optimale Schutzleistung sollte der Kabelabstand in der Installation 100 m nicht überschreiten. • Der B110-SP-CAT-OD2 muss geerdet sein, um ordnungsgemäß zu funktionieren. 21-02-277-933D64-Book.indb 52 21-02-277-933D64-Book.indb 52...
- Page 53 Installation Schutz von Edge-Of-Network-Geräten Diese Installation schützt die Edge-Geräte vor Stromstößen, Blitzschlag oder ESD-Schäden. Informationen zum Schutz von Quell- und Edge-Geräten finden Sie in Abschnitt Schutz von Edge-of-Network-Quellen und -Geräten in dieser Anleitung. Hinweis: Verwenden Sie Cat5e-, Cat6- oder Cat6a-Standardkabel mit einer Kabelstärke von 23/24 AWG.
- Page 54 Installation 3. Stecken Sie sowohl den Erdungsdraht als auch das blanke Ende des Kategoriekabels in das Gehäuse und stellen Sie sicher, dass es auf der Seite „Kabelende“ eingesetzt ist. 21-02-277-933D64-Book.indb 54 21-02-277-933D64-Book.indb 54 7/27/2021 11:40:32 AM 7/27/2021 11:40:32 AM...
- Page 55 5. Verbinden Sie den blanken Draht mit der farbcodierten Platine im Gehäuse mit einem Auflegewerkzeug (z. B. N046-000 von Tripp Lite, separat erhältlich). 6. Wiederholen Sie die Schritte 1 bis 3 für die Geräteseite (z. B. PoE-Kamera) des Gehäuses, ohne dass eine Erdungsleitung hinzugefügt wird.
- Page 56 Installation 7. Nachdem beide blanken Drähte angeschlossen wurden, befestigen Sie die PCBA-Platine mit den mitgelieferten Befestigungsschrauben am Gehäuse. Befestigen Sie anschließend die Erdungsleitung an der verfügbaren Schraube auf der PCBA-Platine. Hinweis: Stellen Sie sicher, dass Sie die Quelle an das Kabelende und das PoE-kompatible Gerät an das Geräteende anschließen.
- Page 57 Stromstößen, Blitzschlag oder ESD-Schäden. Um sowohl die Quelle als auch die Geräte zu schützen, installieren Sie zwei B110-SP-CAT-OD2-Einheiten in Ihrer Anwendung. Ein B110-SP- POE kann anstelle eines zweiten B110-SP-CAT-OD2 installiert werden, um die Quelle zu schützen, wenn die zweite Einheit in einem Innenraum installiert wird.
- Page 58 Installation 2. Um sowohl die Quell- als auch die Edge-Geräte zu schützen, müssen die beiden B110-SP-CAT-OD2-Einheiten verdrahtet sein, wie unten gezeigt. 328 Fuß (100 m) 21-02-277-933D64-Book.indb 58 21-02-277-933D64-Book.indb 58 7/27/2021 11:40:33 AM 7/27/2021 11:40:33 AM...
-
Page 59: Technische Daten
Technische Daten Eingangs-/Ausgangsanschlüsse RJ45-Buchse ESD-Schutz 15 kV (Luft), 8 kV (Kontakt) Blitzschutz 10kA (8/20μs) / 20kV (8/20μs) Anstiegsreaktionsgeschwindigkeit < 1ns Betriebstemperaturbereich -40 °C bis 70 °C Lagertemperaturbereich -40 °C bis 90 °C Relative Feuchtigkeit (Bereich) 0 % bis 95 % rF, nicht kondensierend IP-Einstufung IP68 (staub-/... - Page 60 Tripplite garantiert, dass seine Produkte für einen Zeitraum von zwei (2) Jahren ab dem Datum des Erstkaufs frei von Material- und Verarbeitungsfehlern sind. Die Verpflichtung von Tripp Lite im Rahmen dieser Garantie beschränkt sich auf die Reparatur oder den Ersatz (nach eigenem Ermessen) der fehlerhaften Produkte. Um Service im Rahmen dieser Garantie zu erhalten, müssen Sie eine RMA-Nummer...
Need help?
Do you have a question about the B110-SP-CAT-OD2 and is the answer not in the manual?
Questions and answers