Table of Contents
Advertisement
Advertisement
Table of Contents

Related Manuals for Mackie ONYX Series


Summary of Contents for Mackie ONYX Series
- Page 1 PREMIUM ANALOG MIXERS WITH MULTI-TRACK USB O W N E R ’ S M A N U A L LOW CUT...
-
Page 2: Important Safety Instructions
Important Safety Instructions 1. Read these instructions. This apparatus has been designed with Class-I construction and must be connected to a mains socket outlet with a protective 2. Keep these instructions. earthing connection (the third grounding prong). 3. Heed all warnings. 20. -
Page 3: Features
EQ recording and playback from an SD card. Bluetooth® Streaming – Go Wireless Mackie Onyx Premium analog mixers give you the power • Pair your Bluetooth enabled device and stream you need to capture your best performance with pristine audio directly to a channel on the mixer fidelity at home or on the go. -
Page 4: Table Of Contents
Table of Contents Important Safety Instructions ......2 Master Section ........... 18 Features ............... 3 35. Power LED ........18 Introduction ............3 36. 48V Switch and LED ...... 18 Table of Contents ..........4 37. Main Meters ........18 Quick Start ............ -
Page 5: Quick Start
• Set up RTC before continuing on with anything else. speakers. Directions are on the following page. • The USB driver for PC users is available on the Mackie 3. Plug signal sources into the mixer, such as: website (www.mackie.com). Mac OS X contains built-in drivers, so no software installation is required. -
Page 6: Rtc Setup
RTC Setup RTC is short for ‘Real Time Clock’. Recordings require a time 2. Rotate the encoder clockwise until ‘Set Time/Date’ stamp, so if the RTC is not set up correctly (or at all), then is highlighted and press the encoder down to select. your SD recordings could be compromised, ruined or just plain unavailable, lost in the ether . -
Page 7: Hookup Diagrams
Hookup Diagrams 13/14 11/12 9/10 POWER LINE IN 13 LINE IN 11 LINE IN 9 LINE IN 7 LINE IN 5 LINE IN 4 LINE IN 3 LINE IN 2 LINE IN 1 MAIN OUTS (MONO) (MONO) (MONO) (MONO) (MONO) BAL / UNBAL BAL /... - Page 8 Hookup Diagrams Continued... 9/10 11/12 13/14 MIC/LINE MIC/LINE MIC/LINE MIC/LINE LINE ONYX MIC PRE ONYX MIC PRE ONYX MIC PRE ONYX MIC PRE ONYX MIC PRE ONYX MIC PRE ONYX MIC PRE ONYX MIC PRE +60dB +60dB +60dB +60dB -20dB +20dB -20dB +40dB...
-
Page 9: Onyx Rear Panel Features
3. USB Input / Output This is a standard 3-prong IEC power connector. In addition to being a mixer, the Onyx Series also Connect the detachable line cord (included in the box acts as a high-resolution interface that allows audio with your mixer) to the power receptacle, and plug the to stream to and from the mixer via computer. -
Page 10: Mic Ins
4. Mic Ins This is a female XLR connector that accepts a To connect unbalanced lines to these outputs, balanced mic or line level input from almost any type use a 1/4" mono (TS) phone plug, wired as follows: of source. These Onyx mic preamps feature higher 1/4"... -
Page 11: Main Outputs
Insert jacks may be used as channel direct outputs; The male XLR connectors provide a balanced post-gain, and pre-EQ. If you insert a TS (mono) 1/4" line-level signal and is wired as follows, according plug only partially (to the first click) into an insert jack, to standards specified by the AES (Audio Engineering the plug will not activate the jack switch and will not Society):... -
Page 12: Mon Send Jacks
10. Mon Send Jacks 11. FX Send Jack Stage monitors allow the talented musicians This 1/4" TRS line-level output may be used to feed in the band to hear themselves clearly on stage. an external effects processor (FX), such as a nice This can be a good thing! The monitor mix may be sound effect or delay unit. -
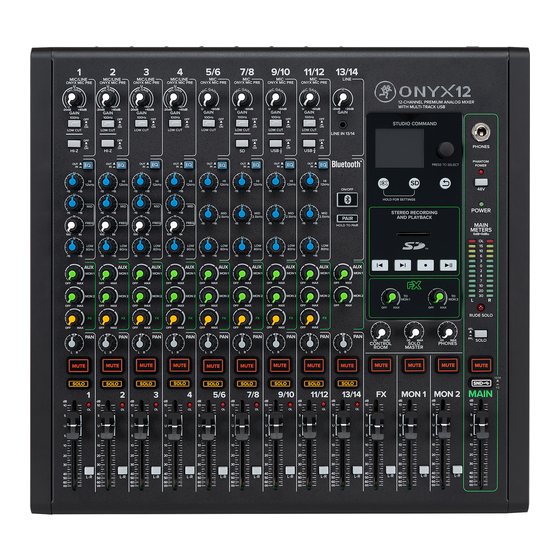
Page 13: Onyx Front Panel Features
2.5kHz 2.5kHz 2.5kHz PAIR “U” like Unity gain FREQ HOLD TO PAIR Onyx Series mixers have a “U” symbol on many level controls. It stands for “unity gain,” meaning no change 80Hz 80Hz 80Hz 80Hz 80Hz in signal level. The labels on the controls are measured in decibels (dB), so you’ll know what you’re doing... -
Page 14: Low Cut Switches
15. Low Cut Switches Channel Equalization (EQ) All channels with a mic input have a low-cut switch All Onyx mixers have 3-band EQ with shelving hi, (often referred to as a high-pass filter) that cuts bass peaking mid with adjustable mid frequency and shelving frequencies below 100 Hz at a rate of 18 dB per octave. -
Page 15: Mid Eq Knobs
19. Mid EQ Knobs 24. Aux FX Knobs 20. Freq Knobs These knobs tap a portion of each channel’s signal to set up a nice FX mix feeding the internal FX processor, Onyx mixers employ and to feed external processors via the FX send. a semi-parametric mid-sweep EQ. -
Page 16: Solo Switches
Mixers can only accept one input per channel switch is engaged. Additionally, the rude solo LED will and the Onyx Series lineup is no different. As indicated flash red. earlier, the last input channel may accept 1/4" TRS or TS connectors, an 1/8"... -
Page 17: Usb 1/2 And 3/4 Switches
32. USB 1/2 and USB 3/4 Switches 33. SD Switch When engaged, these switches override their The SD switch is similar to that of the USB 1/2 and respective inputs and allow the USB return to flow 3/4 switches in that it will “mute” the input and allows through the signal path instead. -
Page 18: Master Section
Onyx Front Panel Features 37. Main Meters These peak meters are made up of two columns Master Section of twelve LEDs, with three colors to indicate different ranges of signal level, traffic light style. They range from –30 at the bottom, to 0 in the middle, to OL at 35. -
Page 19: Phones Out Jack
38. Phones Out Jack 41. Rude Solo LED This 1/4" TRS connector supplies the output to stereo This large LED flashes red when one or more solo headphones. switches are engaged. While this may be the most obnoxious solo LED allowed under international trade The phones volume is controlled with the phones and safety regulations, it also acts as a reminder that knob located above the main mon 2 fader and mute... -
Page 20: Control Room Knob
Additionally, if this switch is not engaged, then the internal effects may be muted or un-muted with a footswitch [on all Onyx Series mixers except the Onyx8]. MUTE MUTE... -
Page 21: Main Mix Fader
50. Main Mix Fader 51. Main Mute Switch This stereo fader allows you to adjust the levels This important “take-a-break” switch quickly mutes of the main mix signals sent to the XLR and 1/4" all the microphones and line-level inputs to the main main line-level outputs. -
Page 22: Preset Display
TFT LCD Display is one of the most vital features the table below and the currently selected effect preset of the Onyx Series mixers. It displays information is shown in the display. Only one preset may be selected including (but not limited to) FX (and FX EQ), presets, at a time. -
Page 23: Fx Section
FX Section The Onyx FX engine is incredibly powerful and packed Note that the effects are presented in four sets with a ton of features. There are 12 effects to choose of three: from, but each one of those may be manipulated and •... -
Page 24: Delay
Delay The LCD screen should now show the current From here, rotate the knob again to tweak parameters of the delay effect: the selected parameter's value to your liking. Once a desired setting has been reached, push the knob in again to confirm. DELAY Time –... - Page 25 From here, rotate the knob again to tweak Before moving on to ‘Presets’ and ‘Reset’, let's the selected parameter's value to your liking. take a quick peek at the parameters of delay, echo Once a desired setting has been reached, push and slapback, as well as their EQ settings.
-
Page 26: Fx Presets
FX Presets FX EQ Reset The presets section allows you to save up to six A couple of pages ago, we were looking at the FX EQ settings to memory that may be recalled at a later section. In addition to the changeable parameters – time. - Page 27 Hi Cut – This applies a low-pass filter to the delayed Now a look at the three modulation effects (Chorus 1, signal and rolls off the higher frequencies on the Chorus 2 and Flanger). output. It ranges from 0 to 100. Hall Reverb Parameters and Values FLANGER Parameter Low Value...
- Page 28 Flanger Parameters and Values Delay + Reverb Parameters and Values Parameter Low Value High Value Default Increments Parameter Low Value High Value Default Increments Rate ±1 Time 20 ms 1000 ms 196 ms ±9-10 ms Depth ±1 Rate ±1 Blend ±1 Depth ±1...
-
Page 29: Sd Stereo Recording And Playback
SD Stereo Recording Granted, you might have a difficult time trying to format the SD Card if these conditions aren’t yet met. and Playback For one, it doesn't easily fit in any other way and for another, the format choice will be grayed out and is not Not only are these great mixers with some pretty available for selection, as seen in the image below. -
Page 30: Transport Controls
Now let's take a look at the SD transport controls. “Onyx” is the parent directory and may not Left to right, they are: be accessed. That said, there are no files that will be needed, anyway. STEREO RECORDING AND PLAYBACK Press the record button and start talking, singing, yodeling, scatting, playing the instrument or playing a track from the phone. -
Page 31: Renaming
The desired track has already been highlighted, Here we decided to check out the files within the so now it's time to hear your masterpiece! You can ‘Demos’ folder and you can see that the audio files either press the transport's Play button or press are listed alpha-numerically. -
Page 32: Settings
Settings Set Time/Date As mentioned previously, pressing and holding the FX and SD buttons simultaneously for one second before In order for the SD Card’s recording and playback releasing will display the ‘Settings’ on the LCD screen. to work correctly, the RTC needs to be set. This is the Let’s take a look... -
Page 33: Appendix A: Service Information
Visit the Support section of our • Try the same source signal in another website (www.mackie.com) where you will find lots of channel, set up exactly like the suspect useful information such as FAQs, documentation and channel. - Page 34 To locate the nearest service center, visit www.mackie.com/support/service-locator. Service for Onyx Series mixers living outside the United States can be obtained through local dealers or distributors. If you do not have access to our website, you can...
-
Page 35: Appendix B: Technical Information
Appendix B: Technical Information Onyx Specifications Impedances Noise Characteristics Mic in 3.3 kΩ Equivalent Input Noise (EIN) (150 Ω Source Impedance, 20 Hz to 20 kHz) Channel Insert Return 10 kΩ Mic in to Insert Send out, max gain –128 dBu All other inputs ≥20 kΩ... - Page 36 Height 5.4 in / 137 mm Please check our website for any updates to this manual: Width 14.8 in / 376 mm www.mackie.com. Depth 14.0 in / 356 mm ©2021 LOUD Audio, LLC. All Rights Reserved. Weight 13.0 lb / 5.9 kg...
-
Page 37: Onyx Dimensions
ONYX8 Dimensions 4.5 in 4 mm 7. lb 3.2 kg .0 in 279 mm 0.5 in / 267 mm ONYX12 Dimensions 5.4 in 37 mm 3.0 lb 4.0 in 5.9 kg 356 mm 4.8 in / 376 mm Owner’s Manual... - Page 38 ONYX16 Dimensions 5.4 in 37 mm 5.6 lb 4.0 in 7. kg 356 mm 8.7 in / 475 mm ONYX24 Dimensions 5.4 in 37 mm LOW CUT WEIGHT 20.3 lb 4.0 in 9.2 kg 356 mm 25.2 in / 640 mm Onyx Premium Analog Mixer with Multi-Track USB...
-
Page 39: Onyx Block Diagrams
Onyx8 Block Diagram Owner’s Manual... - Page 40 Onyx12 Block Diagram Onyx Premium Analog Mixer with Multi-Track USB...
- Page 41 Onyx16 Block Diagram Owner’s Manual...
- Page 42 Onyx24 Block Diagram Onyx Premium Analog Mixer with Multi-Track USB...
-
Page 43: Onyx Track Sheets
Onyx8 Track Sheet MIC/LINE MIC/LINE LINE ONYX MIC PRE ONYX MIC PRE ONYX MIC PRE ONYX MIC PRE +60dB +60dB -20dB +40dB -20dB +40dB -20dB +20dB GAIN GAIN GAIN GAIN GAIN 100Hz 100Hz 100Hz 100Hz STUDIO COMMAND LOW CUT LOW CUT LOW CUT LOW CUT LINE IN 7/8... - Page 44 Onyx12 Track Sheet 9/10 11/12 13/14 MIC/LINE MIC/LINE MIC/LINE MIC/LINE LINE ONYX MIC PRE ONYX MIC PRE ONYX MIC PRE ONYX MIC PRE ONYX MIC PRE ONYX MIC PRE ONYX MIC PRE ONYX MIC PRE -20dB +40dB -20dB +40dB -20dB +40dB -20dB +40dB...
- Page 45 Onyx16 Track Sheet Owner’s Manual...
- Page 46 Onyx24 Track Sheet MIC/LINE MIC/LINE MIC/LINE MIC/LINE MIC/LINE MIC/LINE MIC/LINE MIC/LINE MIC/LINE MIC/LINE MIC/LINE MIC/LINE ONYX MIC PRE ONYX MIC PRE ONYX MIC PRE ONYX MIC PRE ONYX MIC PRE ONYX MIC PRE ONYX MIC PRE ONYX MIC PRE ONYX MIC PRE ONYX MIC PRE ONYX MIC PRE ONYX MIC PRE...
- Page 47 Onyx24 Track Sheet 15/16 17/18 19/20 21/22 23/24 MIC/LINE MIC/LINE MIC/LINE LINE ONYX MIC PRE ONYX MIC PRE ONYX MIC PRE ONYX MIC PRE ONYX MIC PRE ONYX MIC PRE ONYX MIC PRE +60dB +60dB +60dB +60dB -20dB +20dB -20dB +40dB -20dB +40dB...
-
Page 48: Appendix C: Usb 3/4 Return Setup
PC audio through the device connected to the main outputs. Windows 1. Download the USB driver from the Mackie website. 2. Follow the installation instructions to install the driver. 3. Right-click on the speaker icon located on the task bar. -
Page 49: Limited Warranty
For full terms and conditions, as well as the specific duration of the Warranty for this product, please visit www.mackie.com. The Product Warranty, together with your invoice or receipt, and the terms and conditions located at www.mackie.com constitutes the entire agreement, and supersedes any and all prior agreements between LOUD and Customer related to the subject matter hereof. - Page 50 19820 North Creek Parkway #201 Bothell, WA 98011 • USA Phone: 425.487.4333 Toll-free: 800.898.3211 Fax: 425.487.4337 www.mackie.com...
Need help?
Do you have a question about the ONYX Series and is the answer not in the manual?
Questions and answers
https://www.manualslib.com/manual/2224798/Mackie-Onyx-Series.html
Does the inserted SD card retain multiple discrete tracks until stereo mixdown?