
Related Manuals for Ferrofish PULSE16 DX


Summary of Contents for Ferrofish PULSE16 DX
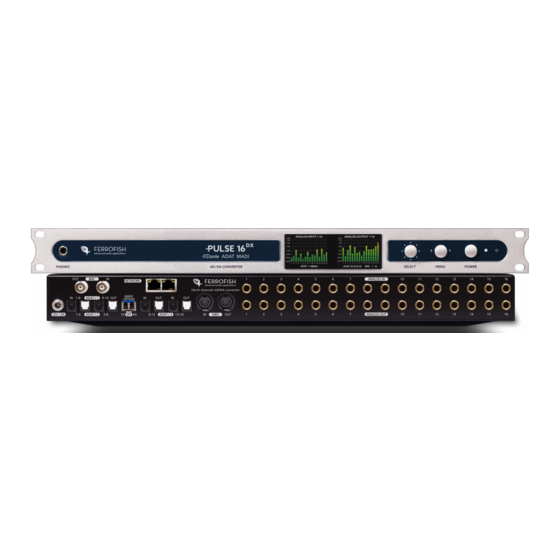
- Page 1 Users Guide Ferrofish PULSE16 DX Professional 16 x 16-channel A/D – D/A converter Ferrofish – Brüderstrasse 10, 53545 Linz am Rhein www.ferrofish.com Version 2.0c...
- Page 2 IMPORTANT SAFETY INSTRUCTIONS Safety symbols used in this manual: This symbol alerts that there are important maintainance and operating instructions in the literature. This symbol warns the user of uninsulated potentially dangerous voltage inside the unit that can cause an electric shock. This symbol warns the user that the output connectors of the power supply contain voltagest hat can cause dangerous potentially lethal shocks.
- Page 3 Two TFT screens show all analog input and output levels at a time. The intuitive one-knob-operation makes using the PULSE16 DX a breeze. We sincerely hope that you will enjoy using your PULSE16 DX as much as we enjoyed developing it. Should you have any suggestions, praise or criticism for us, please visit us on Facebook or at www.ferrofish.com...
-
Page 4: Operation
Operation The PULSE16 DX can be operated completely from the front panel by using the SELECT pot and the MENU button. The POWER button can be used as a “home button” and for switching the unit on and off. For switching it off, keep the button pressed for over 3 seconds. - Page 5 Headphones When turning the SELECT pot inside the main screen the headphone menu is shown. You can select the volume of the headphone output now: Press the MENU key to select: • Source: You can choose between ANALOG IN / OUT, ADAT IN / OUT, MADI IN / OUT and DANTE IN / OUT.
- Page 6 Inside the Main Menu you can choose between: CLOCK Here you select if the PULSE16 DX should generate the wordclock signal by itself (Clock Master/Leader) or if it should listen to an wordclock signal (Slave/Follower) from an external source. If choosing Master (Leader) you can also set the sample rate here.
- Page 7 Wordclock output. The conditioning (jitter reduction) is done via a proprietary circuit. When using an external wordclock on the BNC IN of the PULSE16 DX, the wordclock signal will also be routed thru the jitter reduction stage and sent back to the BNC OUT.
- Page 8 MADI interface all 64 x 64 digital channels are used for 16 analog inputs and 16 analog outputs. In other words: A single PULSE16 DX unit can handle all full 16 inputs and outputs at 192kHz without any limitation of the total channelcount when using MADI or Dante.
- Page 9 Main Menu – GAINS (Inputs) The analog inputs of the PULSE16 DX can be set to different sensitivities in the range from -8dBu up to +20dBu in single steps of 1dB. The number above the fader shows the maximum level in dBu, which the input can handle.
- Page 10 Main Menu – LEVELS (Outputs) The LEVELS screen is similar to the GAINS screen described before. Same as with the inputs also the outputs can be adjusted in 1dB steps between -8dBu to +20dBu. The dB scale on the right side shows the resolution of the metering levels.
- Page 11 Main Menu – ROUTING The PULSE16 DX offers an intuitive routing matrix. This matrix is shown as a grid inside the ROUTING menu. The inputs are shown in the columns, while the rows represent the outputs. A solid square between these lines indicates a connection. The routing is done in channel blocks of eight channels.
- Page 12 Main Menu – MADI SFP Menu The PULSE16 DX is equipped with an optical MADI SFP module for the MADI I/O connection. This module is removable and exchangable by the user to meet changing criteria of demand. So the module can be exchanged for a coaxial module or a optical module in single-mode configuration by the user.
- Page 13 DX’s parameter inside a cave next to a grizzly bear in hibernation. Brightness Here you can set the brightness of the displays. In case the PULSE16 DX is not operated the display will be dimmed after some seconds. MADI 96k frame...
- Page 14 This results in a small delay of the data on the second, third and fourth unit. To compensate this delay you have to tell the PULSE16 DX which order it is inside the MADI chain: •...
- Page 15 The PULSE16 DX’s parameters GAINS, LEVELS and the routing can be permanently stored in one of six preset slots. This lets you pre- configure the PULSE16 DX before the gig and save you time later. Inside the PRESET menu you can choose which preset you want to...
- Page 16 The device is locked now. Follow the same procedure to unlock the device again. The PIN of the PULSE16 DX is fixed and cannot be modified to avoid abusive manipulation in sensitive environments. We strongly recommend saving the PIN of your PULSE16 DX on several safe places, for example as the last six digits of a cellular phone book entry.
- Page 17 PULSE16 DX I/O’s – analog inputs and outputs All analog inputs and output can be found on in balanced ¼” (6.3mm) TRS jacks, and can be set independently to a level/sensivity between -8dBu and +20dBu. All inputs and outputs are fully balanced.
- Page 18 The maximum length of an ADAT connection is limited to 10 meters. The PULSE16 DX has four pairs of ADAT I/O ports. The ports with white doors are the outputs, the black ones are the inputs. Each ADAT interface can transfer eight channels at SMUX/1. When using SMUX/2 the channel count reduces to four.
- Page 19 The output of the second device will be connected to the input of the third device and so on. So, you can daisy-chain up to four units to transmit 64 analog inputs and 64 outputs at 48kHz. The PULSE16 DX features an optical MADI-SFP connector. To connect other MADI devices, you can use a LC –...
- Page 20 BNC IN connector. Please use a coaxial cable with an impedance of 75 ohms. Wether the PULSE16 DX runs in Master or Slave mode can be set inside the CLOCK settings menu. For creating a rock-solid clock signal, the PULSE16 DX uses a proprietary circuit for jitter reduction.
- Page 21 PULSE16 DX I/O‘s – MIDI In addition to MIDI-over-MADI the PULSE16 DX offers a 5pin MIDI I/O port. This can be used for controlling the unit over MIDI or for giving- out MADI signals coming from MIDI-over-MADI data stream or embedding MIDI signals coming from the 5pin MIDI port inside the MIDI-over-MADI data stream –...
-
Page 22: Remote Software
RemoteFish App (available for Mac and PC). To do so you can choose between the following connection methods: MIDI Interface Use a MIDI interface to connect your PULSE16 DX to your computer. Please make sure that the MIDI interface can transmit and receive system exclusice (SysEx) data. -
Page 23: Technical Specifications
Technical specifications ADAT I/O: 4 + 4 optical ports 16 channels @32kHz, 44.1kHz, 48kHz 16 channels @64kHz, 88.2kHz, 96kHz 8 channels @128kHz, 176.4kHz, 192kHz Latency: 2 samples MADI I/O: SFP cage for MADI single-mode or multi-mode SFP module (AES10) 64 channels @32kHz, 44.1kHz, 48kHz 32 channels @64kHz, 88.2kHz, 96kHz 16 channels @128kHz, 176.4kHz, 192kHz MIDI-over-MADI implemented... - Page 24 Headphones: 1 x ¼” (6.3mm) TRS jack, stereo. Selectable mono or stereo source Digitally controlled volume level PLL: Digitally controlled PLL with active jitter reduction Output jitter: 50ps ... 100ps typ. Int. Clock: TCXO (temp. compensated oscillator) with high accuracy Init.
- Page 25 Responsible Party in USA: Synthax United States, 6600 NW 16th Street, Suite 10, Ft Lauderdale, FL 33313 T.:754.206.4220 Trade Name: Ferrofish, Model Number: PULSE16 / PULSE16 DX MX This equipment has been tested and found to comply with the limits for a Class B digital device, pursuant to Part 15 of the FCC Rules. These limits are designed to provide reasonable protection against harmful interference in a residential installation.
-
Page 26: Note On Disposal
In case a disposal of electronic waste is not possible, the recycling can also be done by the manufacturer. For this the device has to be sent free to the door to: Ferrofish GmbH, Brüderstraße 10, D-53545 Linz / Rhein, Germany. Not prepaid shippings will be rejected and returned on the sender’s costs. -
Page 27: Warranty
In no event Ferrofish GmbH will be liable for any kind of data loss or data error caused thru the use of our product or documentation. - Page 28 Copying any part of the manual or any commercial exploitation of these media without prior permission from Ferrofish is strictly prohibited. Ferrofish reserves the right to change specifications at any time without prior notice.
Need help?
Do you have a question about the PULSE16 DX and is the answer not in the manual?
Questions and answers