ASTRO-PHYSICS GTOCP4 Manual
First session with control box
Hide thumbs
Also See for GTOCP4:
- Operating instructions manual (61 pages) ,
- Operating instructions manual (79 pages)
Table of Contents
Advertisement
Quick Links
First Session with Your GTOCP4 Control Box
Table of Contents:
Keypad: software version PRIOR to 4.19.x
Everyone Read This!
PEM Curve
If you are upgrading from a previous version of the control box, you cannot reuse the curve from your
earlier CP1/CP2 or CP3 unit. You MUST use PEMPro, the GTO Keypad or other program to create a
new curve. Until this is done, leave PEM disabled.
Initializing your GTOCP4 for the First Time
Your new GTOCP4 control box must be initialized, but just what do we mean by initialize? Initialization
has three parts:
The initialization process tells the GTOCP4 your location (Latitude and Longitude), time and
time-zone.
Initialization either calculates your current pointing position, or else it allows calibration on a pre-
defined pointing position like an AP Park position.
Initialzation takes the mount out of a parked state and commences tracking at either the default
sidereal, or at a different rate if commanded.
1
Date: 10-28-2016
1
1
1
2
3
4
6
7
8
9
9
10
11
11
12
13
13
Advertisement
Table of Contents

Subscribe to Our Youtube Channel
Related Manuals for ASTRO-PHYSICS GTOCP4


Summary of Contents for ASTRO-PHYSICS GTOCP4
-
Page 1: Table Of Contents
CP1/CP2 or CP3 unit. You MUST use PEMPro, the GTO Keypad or other program to create a new curve. Until this is done, leave PEM disabled. Initializing your GTOCP4 for the First Time Your new GTOCP4 control box must be initialized, but just what do we mean by initialize? Initialization has three parts: ... -
Page 2: Keypad: Software Version 4.19.X
NOTE: If you are using 4.19.2, please update to 4.19.3 to avoid a rather obscure little bug. You can do this after setting up the GTOCP4 because it does not affect this process, but please remember to do it. New Mount Owners Please refer to the “Your First Observing Session &... -
Page 3: Keypad: Software Version Prior To 4.19.X
YES in your Keypad settings, follow the steps in the section below. 2. Remember that Auto-Connect should be set to “NO” prior to your first session with the GTOCP4. To change the setting, select “2=Setup” and then “3=Keypad Options.” Press “1” to toggle Auto- Connect to “NO.”... -
Page 4: Apcc, Version 1.0.3.4 (Latest Release Version)
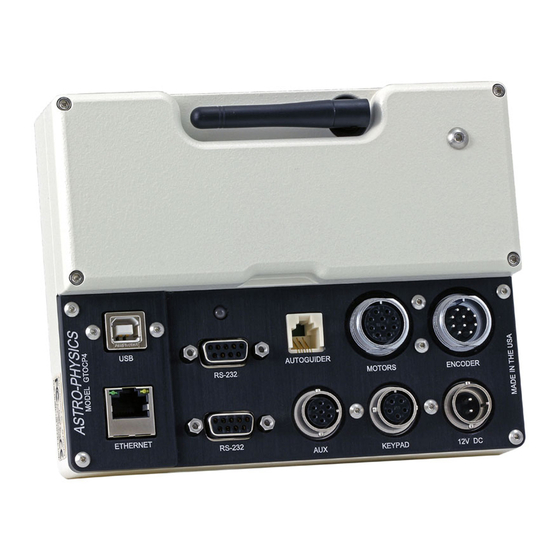
You may use either serial or USB connection for this version. If you wish to use USB, you MUST install the FTDI driver first – before you plug the cable into the GTOCP4’s USB port. Please refer to the relevant section later in this document. - Page 5 Connect on either serial or USB port. The Ethernet and WiFi connections are not available in this release. For previous APCC users upgrading from GTOCP3 to GTOCP4 1. If possible, before disconnecting the GTOCP3, use APCC to park the mount at an AP defined position –...
-
Page 6: Apcc, Version Public Beta 1.5.0.X (Recommended For The Gtocp4)
This information pertains to the RECOMMENDED Public Beta version. You may use either traditional serial or USB (which is effectively serial) to connect to the GTOCP4 for this first initialization session. Later, you will also be able to use Ethernet or WiFi for your connection. -
Page 7: Ap V2 Ascom Driver, Version 5.09.01 (Latest Release Version)
Install FTDI Driver on your PC if you will use USB (see section below). Install the GTOCP4 on to your mount and connect the mount’s cables and power cable. Connect either a USB cable from PC to CP4 or else a serial cable from PC to CP4. -
Page 8: Skysafari
Once your mount is initialized, you can connect SkySafari directly with WiFi. Please read the relevant section later in this manual pertaining to WiFi. There are two methods for directly connecting SkySafari to the GTOCP4 via WiFi after you have initialized the mount by another means. -
Page 9: Mounts Equipped With Absolute Encoders
SkySafari to the assigned IP address, again on port number 23. Mounts Equipped with Absolute Encoders You must use the APAE Utility v.2.x or later with the GTOCP4. If you did not receive the CD with this utility along with your GTOCP4, please contact Astro-Physics. -
Page 10: Usb - You Must Download And Install The Ftdi Driver Before
GTOCP4 does NOT need to be powered up or connected to the mount for this. Allow windows to identify the new device and assign a COM port number to the FTDI unit in the GTOCP4. Find the COM port number for this device in Control Panel. This is the COM port number you will use for USB connections. -
Page 11: Ethernet And Wifi
Connect the GTOCP4 to your home network with an Ethernet cable for this first session. Allow the network router time (a minute or so) to assign an IP address to the GTOCP4. Now you can double- click the utility to start it up. -
Page 12: Getting Started
Getting Started Configure your WiFi from the GTOCP4's built in web pages. If you can open the web page from a browser using an Ethernet connection, please do so. It's probably the fastest and easiest. If you will be configuring from a wireless device, start by joining the GTOCP4's wireless Access Point network. -
Page 13: Updates To The Gtocp4 Software
“new” network.) Go back to the main WiFi page and you should see the GTOCP4 again. Now this time, it should allow you to enter your password and connect. Why, nothing could be simpler! (ahem! cough! cough!)
Need help?
Do you have a question about the GTOCP4 and is the answer not in the manual?
Questions and answers