Table of Contents
Advertisement
Available languages
Available languages
Quick Links
Lindholm
Heizung
Heater
Calefactor
Radiateur
Stufa
10035362 10035362
Hinweis: Dieses Produkt ist nur für gut isolierte Räume
oder für den gelegentlichen Gebrauch geeignet.
Note: This product is only suitable for well insulated
spaces or occasional use.
Advertencia: Este producto está indicado únicamente
en lugares abrigados o para una utilización punctual.
Remarque : Ce produit ne peut être utilisé que dans des
locaux bien isolés ou de manière occasionnelle.
Nota: Questo prodotto è adatto solo per spazi ben
isolati o uso occasionale.
Advertisement
Chapters
Table of Contents

Related Manuals for Klarstein Lindholm


Summary of Contents for Klarstein Lindholm
- Page 1 Lindholm Hinweis: Dieses Produkt ist nur für gut isolierte Räume oder für den gelegentlichen Gebrauch geeignet. Note: This product is only suitable for well insulated Heizung spaces or occasional use. Heater Advertencia: Este producto está indicado únicamente en lugares abrigados o para una utilización punctual.
-
Page 3: Table Of Contents
Sehr geehrter Kunde, wir gratulieren Ihnen zum Erwerb Ihres Gerätes. Lesen Sie die folgenden Hinweise sorgfältig durch und befolgen Sie diese, um möglichen Schäden vorzubeugen. Für Schäden, die durch Missachtung der Hinweise und unsachgemäßen Gebrauch entstehen, übernehmen wir keine Haftung. Scannen Sie den folgenden QR-Code, um Zugriff auf die aktuellste Bedienungsanleitung und weitere Informationen rund um das Produkt zu erhalten. -
Page 4: Sicherheitshinweise
SICHERHEITSHINWEISE • Prüfen Sie vor der Benutzung die Spannung auf der Geräteplakette und schließen Sie das Gerät nur an Steckdosen an, die der Spannung des Geräts entsprechen. • Falls das Netzkabel beschädigt ist, lassen Sie es von einer ausgebildeten Fachkraft ersetzen. •... -
Page 5: Produktdatenblatt
PRODUKTDATENBLATT Modellkennung(en) 10035362, 10035363 Angabe Symbol Wert Einheit Angabe Einheit Wärmeleistung Nur bei elektrischen Speicher-Einzelraumheizgeräten: Art der Regelung der Wärmezufuhr Nennwärmeleistung Manuelle Regelung der Wärmezufuhr mit k.A. integriertem Thermostat Mindestwärmeleistung Manuelle Regelung der Wärmezufuhr k.A. (Richtwert) mit Rückmeldung der Raum- und/oder Außentemperatur Maximale kontinuierliche Elektronische Regelung der Wärmezufuhr... -
Page 6: Wandinstallation
WANDINSTALLATION Hinweis: Das Produkt muss mindestens 15 cm vom Boden und 50 cm von der Decke entfernt installiert werden. • Entfernen Sie die Halterung vom Gehäuse (Bild 1). • Bohren Sie die Löcher an beiden Seiten der Wand und setzen Sie dann die Kunststoffspreizdübel ein. -
Page 7: Bedienung
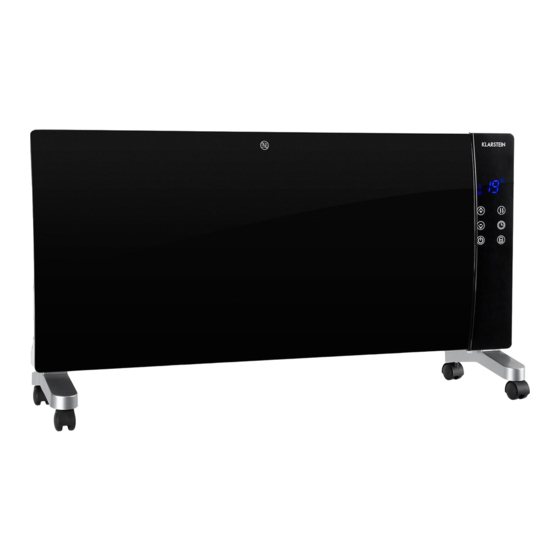
BEDIENUNG Bedienfeld Display MODUS-Taste PLUS-Taste TIMER-Taste MINUS-Taste Fernbedienungs-Empfänger POWER-Taste Taste KINDERSICHERUNG Gerät einschalten Legen Sie vor dem Einschalten den Hauptschalter an der Seite der Heizung um. Drücken Sie dann auf die POWER-Taste. Das Display zeigt die Raumtemperatur an und arbeitet mit niedriger Heizstufe. - Page 8 Heiz-Modus auswählen Drücken Sie auf die MODUS-Taste, um niedrige Heizleistung ( ) oder hohe Heizleistung ( ) auszuwählen. Temperatur einstellen Drücken Sie auf die PLUS-Taste oder MINUS-Taste, um die gewünschte Temperatur zwischen 16-40 °C einzustellen. Ausschalt-Timer einstellen Drücken Sie auf die TIMER-Taste, um den Timer zwischen 1-24 Stunden einzustellen. Wenn der Timer abgelaufen ist, geht das Gerät automatisch aus.
-
Page 9: Reinigung Und Pflege
REINIGUNG UND PFLEGE Hinweis: Schalten Sie das Gerät aus und ziehen Sie den Stecker aus der Steckdose. Warten Sie, bis das Gerät vollständig abgekühlt ist, bevor Sie sie reinigen. • Benutzen Sie zur Reinigung der Lüftungsschlitze und Gitter einen Staubsauger. •... - Page 11 Dear Customer, Congratulations on purchasing this device. Please read the following instructions carefully and follow them to prevent possible damages. We assume no liability for damage caused by disregard of the instructions and improper use. Scan the QR code to get access to the latest user manual and more product information.
-
Page 12: Safety Instructions
SAFETY INSTRUCTIONS • Check that the voltage indicates on the data plate corresponds with that of the local network before connecting the appliance to the mains power supply. • If the supply cord is damaged, it must be replaced by a qualified engineer in order to avoid a hazard. -
Page 13: Product Data Sheet
PRODUCT DATA SHEET Model identifier(s): 10035362, 10035363 Item Symbol Value Unit Item Unit Heat output Type of heat input, for electric storage local space heaters only Nominal heat output manual heat charge control, with integrated thermostat Minimum heat output manual heat charge control with room and/or (indicative) outdoor temperature feedback Maximum continuous heat... -
Page 14: Wall Installation
WALL INSTALLATION Note: The product must be installed at least 15 cm from the floor and 50 cm from the ceiling. • Remove the bracket from the housing (Figure 1). • Drill the holes on both sides of the wall and then insert the plastic expansion plugs. Fasten the bracket to the wall with screws (picture 2). -
Page 15: Operation
OPERATION Control panel Display MODE button PLUS button TIMER button MINUS button Remote control receiver POWER button CHILD LOCK button Switch on the device Before switching on, turn the main switch on the side of the heater. Then press the POWER button. - Page 16 Select heating mode Press the MODE button to select low heat output ( ) or high heat output ( ). Setting the temperature Press the PLUS or MINUS button to set the desired temperature between 16-40 °C. Setting the switch-off timer Press the TIMER button to set the timer between 1-24 hours.
-
Page 17: Cleaning And Care
CLEANING AND CARE Note: Turn off the unit and unplug it from the power outlet. Wait until the unit has completely cooled down before cleaning it. • Use a vacuum cleaner to clean the ventilation slots and grilles. • Remove dust on the outside surfaces with a damp (not wet) cloth. •... - Page 19 Estimado cliente: Le felicitamos por la adquisición de este producto. Lea atentamente el siguiente manual y siga cuidadosamente las instrucciones de uso con el fin de evitar posibles daños. La empresa no se responsabiliza de los daños ocasionados por un uso indebido del producto o por haber desatendido las indicaciones de seguridad.
-
Page 20: Indicaciones De Seguridad
INDICACIONES DE SEGURIDAD • Antes de utilizar el aparato, compruebe la tensión en la placa técnica del mismo y conecte el aparato solamente a tomas de corriente que se adecuen a dicha tensión. • Si el cable de alimentación está dañado, deberá ser sustituido por un servicio técnico. •... -
Page 21: Hoja De Datos Del Producto
HOJA DE DATOS DEL PRODUCTO Denominación del modelo 10035362, 10035363 Dato Símbolo Valor Unidad Dato Unidad Potencia térmica Solo con disposítivos de acumulación de calor eléctricos para abastecimiento local: Tipo de regulación del abastecimiento de calor Potencia térmica nominal Regulación manual del abastecimiento de calor con termostato integrado: Potencia térmica mínima Regulación manual de abastecimiento de calor... -
Page 22: Instalación En La Pared
INSTALACIÓN EN LA PARED Nota: el producto debe instalarse como mínimo a 15 cm del suelo y a 50 cm del techo. • Retire el soporte de la carcasa (imagen 1). • Perfore los orificios a ambos lados de la pared y, a continuación, introduzca los tacos de expansión de plástico. -
Page 23: Manejo
MANEJO Panel de control Pantalla Botón de modo Botón MÁS Botón TIMER-TEMPORIZADOR Botón MENOS Receptor del mando a distancia Botón POWER-ENCENDIDO Botón PROTECCIÓN INFANTIL Encender el aparato Antes de encender el aparato, active el interruptor principal situado en el lateral del calefactor. - Page 24 Seleccionar modo de calefacción Pulse el botón de MODO para seleccionar el nivel de calefacción bajo (X) o el nivel de calefacción alto (X). Ajustar la temperatura Presione los botones MÁS o MENOS para seleccionar la temperatura deseada entre el rango 16-40 °C.
-
Page 25: Limpieza Y Cuidado
LIMPIEZA Y CUIDADO Nota: Apague la unidad y desenchúfela de la toma de corriente. Espere hasta que la unidad se haya enfriado completamente antes de limpiarla. • Use una aspiradora para limpiar las ranuras de ventilación y las rejillas. • Elimine el polvo de las superficies exteriores con un paño húmedo (no mojado). •... - Page 27 Cher client, Toutes nos félicitations pour l’acquisition de ce nouvel appareil. Veuillez lire attentivement les instructions suivantes de branchement et d’utilisation afin d’éviter d’éventuels dommages. Le fabricant ne saurait être tenu pour responsable des dommages dus au non-respect des consignes de sécurité et à la mauvaise utilisation de l’appareil.
-
Page 28: Consignes De Sécurité
CONSIGNES DE SÉCURITÉ • Avant utilisation, vérifiez la tension sur l‘étiquette de l‘appareil et ne branchez l‘appareil que sur des prises correspondant à la tension de l‘appareil. • Si le câble d‘alimentation est endommagé, faites-le remplacer par un professionnel qualifié. •... -
Page 29: Fiche De Données Produit
FICHE DE DONNÉES PRODUIT Référence (s) du produit 10035362, 10035363 Donnée Symbole Valeur Unité Donnée Unité Puissance calorifique Uniquement pour les radiateurs électriques à accumulation : Type de régulation de l'apport de chaleur Puissance calorifique Régulation manuelle de l'apport de chaleur Sans nominale avec thermostat intégré... -
Page 30: Installation Murale
INSTALLATION MURALE Remarque : Le produit doit être installé à au moins 15 cm du sol et 50 cm du plafond. • Retirez le support du boîtier (figure 1). • Percez les trous des deux côtés du mur, puis insérez les chevilles à expansion en plastique. -
Page 31: Utilisation
UTILISATION Panneau de commande Écran Touche MODE PLUS TIMER (MINUTERIE) MOINS Capteur de la télécommande POWER (ALIMENTATION) VERROUILLAGE PARENTAL Pour allumer l‘appareil Avant de mettre en marche, tournez l‘interrupteur principal sur le côté du radiateur. Appuyez ensuite sur POWER. L‘écran affiche la température ambiante et fonctionne avec un niveau de chauffage bas. - Page 32 Choix du mode chauffage Appuyez sur MODE pour sélectionner une faible puissance calorifique ([X]) ou une puissance calorifique élevée ([X]). Réglage de la température Appuyez sur PLUS ou MOINS pour régler la température souhaitée entre 16 et 40 ° C. Réglage de la minuterie d‘arrêt Appuyez sur TIMER pour régler la minuterie entre 1 et 24 heures.
-
Page 33: Nettoyage Et Entretien
NETTOYAGE ET ENTRETIEN Remarque : Mettez l‘appareil hors tension et débranchez-le de la prise de courant. Attendez que l‘appareil soit complètement refroidi avant de le nettoyer. • Utilisez un aspirateur pour nettoyer les fentes d‘aération et les grilles. • Enlever la poussière sur les surfaces extérieures à l‘aide d‘un chiffon umide (non mouillé). - Page 35 Gentile cliente, La ringraziamo per aver acquistato il dispositivo. La preghiamo di leggere attentamente le seguenti istruzioni per l’uso e di seguirle per evitare possibili danni tecnici. Non ci assumiamo alcuna responsabilità per danni scaturiti da una mancata osservazione delle avvertenze di sicurezza e da un uso improprio del dispositivo.
-
Page 36: Avvertenze Di Sicurezza
AVVERTENZE DI SICUREZZA • Prima dell‘uso, controllare la tensione sulla targhetta del dispositivo e collegare il dispositivo solo ad una presa che corrisponde alla tensione indicata. • Se il cavo di alimentazione è danneggiato, farlo sostituire da un tecnico qualificato. •... -
Page 37: Scheda Informativa Del Producto
SCHEDA INFORMATIVA DEL PRODUCTO Identificazione del modello (i) 10035362, 10035363 Indicazione Simbolo Valore Unità Indicazione Unità Potenza termica Solo per gli apparecchi per il riscaldamento d'ambiente locale elettrici ad accumulo: Tipo di controllo dell´apporto termico Potenza termica nominale Controllo manuale del carico termico con N.D. -
Page 38: Installazione A Parete
INSTALLAZIONE A PARETE Nota: il prodotto va installato almeno a 15 cm dal pavimento e a 50 cm dal soffitto. • Rimuovere i supporti dall’alloggiamento (figura 1). • Praticare dei fori su entrambi i lati della parete e inserire i tasselli a espansione di plastica. -
Page 39: Utilizzo
UTILIZZO Pannello di controllo Display Tasto MODALITA’ Tasto PIU’ Tasto TIMER Tasto MENO Ricevitore telecomando Tasto POWER Tasto BLOCCO BAMBINI Accensione del dispositivo Prima dell’accensione sistemare l’interruttore principale sul lato della stufa e premere poi il tasto POWER. Sul display appare la temperatura ambiente e funziona a livello minimo. - Page 40 Selezionare la modalità di riscaldamento Premere il tasto MODALITA’ per selezionare la potenza minima (|) oppure massima (||). Impostare la temperatura Premere il tasto PIU’ o MENO per impostare la temperatura tra 16-40 °C. Impostare il timer di spegnimento Premere il tasto TIMER per impostarlo tra 1 e 24 ore. Quando il timer è scaduto il dispositivo si spegne automaticamente.
-
Page 41: Pulizia E Manutenzione
PULIZIA E MANUTENZIONE Nota: Spegnere l‘unità e scollegarla dalla presa di corrente. Attendere che l‘unità si sia raffreddata completamente prima di pulirla. • Pulire le fessure e le griglie di aerazione con un aspirapolvere. • Rimuovere la polvere dalle superfici esterne con un panno umido (non bagnato). •...
Need help?
Do you have a question about the Lindholm and is the answer not in the manual?
Questions and answers