Advertisement
Quick Links
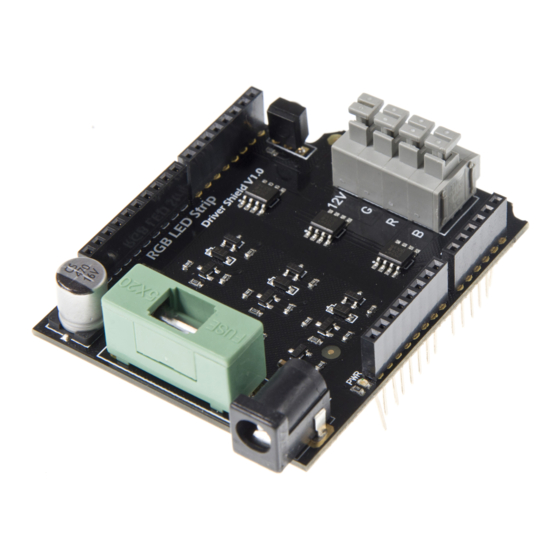
RGB LED Strip Driver Shield SKU:DFR0274
Contents
1 Introduction
2 Specification
3 Pin Out
4 Sample Code
4.1 LED Strip driving code
4.2 IR Receiving Code
4.3 IR Remote control Demo
Introduction
The RGB LED Strip Driver Shield allows an Arduino board to drive the RGB LED Strip. Through
control the 3 MOSFEET on the board,you can turn the RGB LED ON/OFF,and show colors
differently.
You can also control the RGB LED Strip Driver Shield by the IR remote controller.
The RGB LED Strip Driver Shield connects to an Arduino board using long wire-wrap headers which
extend through the shield. This keeps the pin layout intact and allows another shield to be stacked
on top.
Arduino uses digital PWM pins 9, 10, 11 to control the MOSFEET on the RGB LED Strip Driver
Shield. and the digital pin 4 is used to receive the IR signal.These pins cannot be used for general
i/o.
The shield have a fuse,it can limit the current.
Arrow.com.
Downloaded from
Advertisement

Related Manuals for DFRobot DFR0274


Summary of Contents for DFRobot DFR0274
- Page 1 RGB LED Strip Driver Shield SKU:DFR0274 Contents 1 Introduction 2 Specification 3 Pin Out 4 Sample Code 4.1 LED Strip driving code 4.2 IR Receiving Code 4.3 IR Remote control Demo Introduction The RGB LED Strip Driver Shield allows an Arduino board to drive the RGB LED Strip. Through control the 3 MOSFEET on the board,you can turn the RGB LED ON/OFF,and show colors differently.
-
Page 2: Specification
Specification Supply voltage:<=12V Compatible Uno,Mega,Romeo.. Compatible with 12V RGB LED Strip Maximum power is 72W (2A per way) Support IR remote control Pin Out Arduino Driving Pins: D9 -> PWM1 (Blue Output control) D10 -> PWM2 (Red Output control) ... - Page 3 Sample Code LED Strip driving code Here's the basic code for controlling the color of the RGB LED strip. int RedPin = 10; //Arduino driving pin for Red int GreenPin = 11; //Arduino driving pin for Green int BluePin = 9; //Arduino driving pin for Blue void setColor(int red, int green, int blue) analogWrite(RedPin, red);...
- Page 4 setColor(0, i, 0); delay (10); delay(2000); for (int i=0;i<255;i++) //Changing Blue brightness setColor(0, 0, i); delay (10); delay(2000); for (int i=0;i<255;i++) setColor(i, 0, 255-i); delay (10); for (int i=0;i<255;i++) setColor(255-i, i, 0); delay (10); for (int i=0;i<255;i++) setColor(0, 255-i, i); delay (10);...
- Page 5 (irrecv.decode(&results)) { Serial.println(results.value, HEX); irrecv.resume(); // Receive the next value IR Remote control Demo Use IR transmitter from dfrobot for controlling the RGB led strip. // 0.1 by pmalmsten http://www.arduino.cc/cgi- bin/yabb2/YaBB.pl?num=1176098434 // 0.2 by farkinga // 0.3 by farkinga - adds cool behaviors /* 0.4 by pstrobl...
- Page 6 changed the original program to use on IR Kit For Arduino Model: DFR0107 32 bit controller. All keypresses are sent to the serial monitor at 9600 baud. pulseIn is always HIGH. The phototransistor in the kit does not invert the signal.
- Page 7 pinMode(IR_PIN, INPUT); digitalWrite(LED_PIN, LOW); pinMode(RedPin, OUTPUT); pinMode(GreenPin, OUTPUT); pinMode(BluePin, OUTPUT); Serial.begin(9600); void loop() digitalWrite(LED_PIN, HIGH); int key = get_ir_key(); digitalWrite(LED_PIN, LOW); // turn LED off while processing response do_response(key); if (Flash_flag) for (int i=0;i<255;i++) setColor(i, 0, 255-i); delay (10); for (int i=0;i<255;i++) setColor(255-i, i, 0);...
- Page 8 while(pulseIn(IR_PIN, HIGH) < BIT_START); read_pulse(pulse); pulse_to_bits(pulse, bits); RemoteVerify(bits); return bits_to_int(bits); use pulseIn to receive IR pulses from the remote. Record the length of these pulses (in ms) in an array void read_pulse(int pulse[]) for (int i = 0; i < IR_BIT_LENGTH; i++) pulse[i] = pulseIn(IR_PIN, HIGH);...
- Page 9 //Convert bits to integer for(int i = 0 ; i < (FirstLastBit) ; i++) if(bits[i] == 1) result += seed; seed *= 2; if (output_verify) Serial.print("Remote "); Serial.print(result); Serial.println(" verification code"); if (remote_verify != result) {delay (60); get_ir_key();} //verify first group of bits.
- Page 10 switch (key) case 32640: // turns on UUT power (Blue_flag|Red_flag|Green_flag){Blue_flag=false;Red_flag=false;Green_flag=fal se;Flash_flag=false;} else {Blue_flag=true;Red_flag=true;Green_flag==true;} Serial.println("POWER"); break; case 32385: // FUNC/STOP turns off UUT power Serial.println("FUNC/STOP"); break; case 32130: // |<< ReTest failed Test Serial.println("|<<"); break; case 32002: // >|| Test Serial.println(">||"); break;...
- Page 11 case 31110: // 0 Serial.println("0"); break; case 30600: // 1 Red_flag=true; Green_flag=false; Blue_flag=false; Flash_flag=false; Red_Bright=120; Serial.println("1"); break; case 30472: // 2 Green_flag=true; Red_flag=false; Blue_flag=false; Flash_flag=false; Green_Bright=120; Serial.println("2"); break; case 30345: // 3 Blue_flag=true; Green_flag=false; Red_flag=false; Flash_flag=false; Blue_Bright=120; Serial.println("3"); break; case 30090: // 4 Flash_flag=true;...
- Page 12 Serial.print("Key "); Serial.print(key); Serial.println(" not programmed"); break; Powered By DFRobot © 2008-2017 Arrow.com. Arrow.com. Arrow.com. Arrow.com. Arrow.com. Arrow.com. Arrow.com. Arrow.com. Arrow.com. Arrow.com. Arrow.com. Arrow.com. Downloaded from Downloaded from Downloaded from Downloaded from Downloaded from Downloaded from Downloaded from...
Need help?
Do you have a question about the DFR0274 and is the answer not in the manual?
Questions and answers