Table of Contents
Advertisement
Available languages
Available languages
Quick Links
Item # 000-000
Model # 15155
USE AND CARE GUIDE
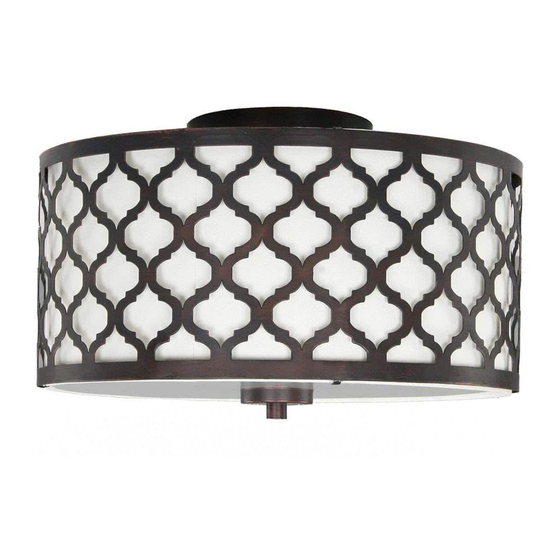
EDGEMOOR 2 LIGHT SEMI FLUSH MOUNT
Questions, problems, missing parts? Before returning to the store call
Hampton Bay Customer Service
8 a.m. - 6 p.m., EST, Monday-Friday
1-877-527-0313
HAMPTONBAY.COM
THANK YOU
We appreciate the trust and confidence you have placed in Hampton Bay through the purchase of this semi flush. We strive to
continually create quality products designed to enhance your home. Visit us online to see our full line of products available for your
home improvement needs. Thank you for choosing Hampton Bay!
Advertisement
Chapters
Table of Contents

Subscribe to Our Youtube Channel
Related Manuals for HAMPTON BAY 15155


Summary of Contents for HAMPTON BAY 15155
- Page 1 THANK YOU We appreciate the trust and confidence you have placed in Hampton Bay through the purchase of this semi flush. We strive to continually create quality products designed to enhance your home. Visit us online to see our full line of products available for your...
-
Page 2: Table Of Contents
Troubleshooting............8 Tool required................4 Features: Thank you for purchasing this Hampton Bay interior flush mount. This product has been manufactured with the highest standards of safety and quality. Easy to install. Two light semi-flush light with oil rubbed bronze finish and white fabric hardback shade with decorative metal design. -
Page 3: Pre-Installation
Pre-Installation PLANNING FOR SUCCESSFUL INSTALLATION Read all instructions before installing. To avoid damaging this product, place it on a soft, non-abrasive surface such as carpet or cardboard. IMPORTANT: Inspect the wire insulation for any DANGER: Before starting installation of this fixture cuts, abrasions, or exposed copper that may have or removal of a previous fixture, disconnect the occurred during shipping. -
Page 4: Hardware Included
Pre-Installation (continued) TOOLS REQUIRED (NOT SUPPLIED) Phillips Wire Pliers Screwdriver Stripper Safety Electrical Goggles Tape HARDWARE INCLUDED NOTE: Hardware is not to scale. Part Description Quantity Mount strip Support screw Green ground screw Outlet box screw Cap nut G5/32” Hex nut Wire connector... -
Page 5: Package Contents
Pre-Installation (continued) PACKAGE CONTENTS Part Description Quantity Canopy assembly with shade Threaded pipe Glass Plate Plastic washer Metal washer G3/8” Hex nut Finial HAMPTONBAY.COM Please contact 1-877-527-0313 for further assistance. -
Page 6: Installation
Installation Preparation for mounting Preparation for mounting □ □ Tighten the support screws (B) full turns into the inside Fasten the mounting strip (A) onto outlet box using two mounting hole of mounting strip (A) (to be fully tightened outlet box screws (D). later), secure by G5/32”... - Page 7 Installation Installing the canopy to outlet box Installing the threaded pipe □ □ Place the canopy assembly (H) over the outlet box, let the Thread the threaded pipe (I) into the bushing near the heads of support screws (B) come through the holes of the sockets located on the canopy assembly (H).
-
Page 8: Care And Cleaning
Care and Cleaning □ To clean the outside of the fixture, use a dry or slightly dampened clean cloth (use clean water, never a solvent) to wipe the surface of the fixture. □ To clean the inside of the fixture, first disconnect power to the fixture by turning off the circuit breaker or by removing the fuse at the fuse box. - Page 9 This page intentionally left blank HAMPTONBAY.COM Please contact 1-877-527-0313 for further assistance.
- Page 10 This page intentionally left blank...
- Page 11 This page intentionally left blank HAMPTONBAY.COM Please contact 1-877-527-0313 for further assistance.
- Page 12 Questions, problems, missing parts? Before returning to the store call Hampton Bay Customer Service 8 a.m. - 6 p.m., EST, Monday-Friday 1-877-527-0313 HAMPTONBAY.COM Retain this manual for future use.
- Page 13 GRACIAS POR TU COMPRA. Apreciamos la confianza que has depositado en Hampton Bay al comprar esta instalación semi al ras. Nos esforzamos para continuamente crear productos de calidad diseñados para mejorar tu hogar. Visítanos por Internet para ver nuestra línea...
-
Page 14: Índice
Solución de problemas ..........8 Outils requis................4 Características: Gracias por comprar esta instalación al ras para interiores de Hampton Bay. Este producto se ha fabricado de acuerdo con las normas de seguridad y calidad más altas. Fácil de instalar. Lámpara de instalación de dos luces, semi al ras, con acabado en bronce lustrado con aceite y pantalla dura de tela blanca con diseño metálico decorativo. -
Page 15: Pre-Instalación
Pre-Instalación: PLANIFICAR UNA INSTALACIÓN EXITOSA Lee todas las instrucciones antes de comenzar la instalación. Para evitar dañar el producto, colócalo sobre una superficie suave, no abrasiva, como por ejemplo una alfombra o cartón. IMPORTANTE: Revisa que el aislamiento de los cables no haya sufrido ningún corte, abrasión ni tenga PELIGRO: Antes de comenzar a instalar esta filamentos de cobre expuestos debidos al envío. -
Page 16: Outils Requis
Pre-Instalación (continuación) SE NECESITAN HERRAMIENTAS (NO INCLUIDAS) Phillips Cable Pinzas Destornillador Removedor de Seguridad Eléctrica Gafas Cinta HERRAJES INCLUIDOS NOTA: Los herrajes no se muestran a escala. Pieza Descripción Cantidad Soporte de Montaje Tornillo de Soporte Tornillo verde a tierra Tornillo de la caja eléctrica Tuerca de tapa Tuerca hexagonal G5/32”... -
Page 17: Contenido Del Paquete
Pre-Instalación (continuación) CONTENIDO DEL PAQUETE Pieza Descripción Cantidad Ensamblaje de la cubierta con pantalla Tubo roscado Placa de Vidrio Arandela plástica Arandela de metal Tuerca hexagonal G3/8” Tapa Remate HAMPTONBAY.COM Para obtener asistencia, llama al 1-877-527-0313. -
Page 18: Instalación
Instalación Preparar el montaje Preparar el montaje □ □ Aprieta los tornillos de soporte (B) en el ori cio lateral de Ajusta el soporte de montaje (A) en la caja eléctrica montaje del soporte de montaje (A) (para luego apretarlos usando dos tornillos de la caja eléctrica (D). - Page 19 Instalación Cómo instalar la cubierta a la caja Cómo instalar el tubo roscado eléctrica □ □ Coloca el ensamblaje de la cubierta (H) sobre la caja Enrosca el tubo roscado (I) en el casquillo cerca de los eléctrica, deja que las cabezas de los tornillos de soporte portabombillas que se encuentra en ensamblaje de la (B) atraviesen los os del ensamblado de la cubierta...
-
Page 20: Mantenimiento Y Limpieza
Mantenimiento y Limpieza □ Para limpiar el exterior de la lámpara, usa un paño seco o ligeramente humedecido (usa agua limpia, nunca un solvente) para limpiar la superficie de la lámpara. □ Para limpiar el interior de la lámpara, primero corta el suministro de electricidad, apagando el cortacircuitos o retirando el fusible correspondiente en la caja de fusibles. - Page 21 Esta página se ha dejado en blanco a propósito. HAMPTONBAY.COM Para obtener asistencia, llama al 1-877-527-0313.
- Page 22 Esta página se ha dejado en blanco a propósito.
- Page 23 Esta página se ha dejado en blanco a propósito. HAMPTONBAY.COM Para obtener asistencia, llama al 1-877-527-0313.
- Page 24 ¿Preguntas, problemas o piezas faltantes? Antes de regresar a la tienda, llama al Servicio al Cliente de Hampton Bay, de 8 a.m. a 6 p.m., hora estándar del Este, de Lunes a Viernes 1-877-527-0313 HAMPTONBAY.COM Conserva este manual para referencias futuras.
- Page 25 HAMPTONBAY.COM MERCI Nous vous remercions d'avoir fait confiance à Hampton Bay en achetant ce semi-plafonnier. Nous nous efforçons en permanence de créer des produits de qualité conçus pour perfectionner votre maison. Vous pouvez visiter notre site en ligne pour consulter...
-
Page 26: Garantie
Dépannage ..............8 Outils requis................4 CARACTÉRISTIQUES : Nous vous remercions d’avoir acheté ce semi-plafonnier d'intérieur Hampton Bay. Cet article a été fabriqué selon les normes de sécurité et de qualité les plus rigoureuses. Facile à installer. Semi-plafonnier à deux ampoules, fini bronze huilé, abat-jour rigide en tissu blanc avec motif décoratif en métal. -
Page 27: Pré-Installation
Pré-Installation PRÉPARATION POUR UNE INSTALLATION RÉUSSIE Lisez toutes les instructions avant de procéder à l’installation. Pour éviter d’endommager ce produit, placez-le sur une surface molle et non abrasive telle qu’un tapis ou un carton. IMPORTANT :Inspectez la gaine isolante du câble à la recherche de tout dommage, coupure, usure ou fil DANGER : Avant d’entreprendre l’installation de ce dénudé, qui aurait pu se produire pendant l'expédition. -
Page 28: Outils Requis
Pré-installation (suite) OUTILS REQUIS (NON COMPRIS) : Tournevis Outil à Pince cruciforme dénuder Lunettes de Ruban protection isolant QUINCAILLERIE FOURNIE REMARQUE : La quincaillerie n'est pas illustrée à l’échelle. Pièce Description Quantité Traverse Vis de support Vis verte de mise à la terre Vis de boîte de sortie de courant Écrou à... -
Page 29: Contenu De L'emballage
Pré-installation (suite) CONTENU DE L'EMBALLAGE Pièce Description Quantité Monture avec abat-jour Tube fileté Plaque de verre Rondelle en plastique Rondelle en métal Écrou hexagonal G3/8 po Capuchon Faîteau HAMPTONBAY.COM Veuillez composer le 1 877 527-0313 pour une assistance supplémentaire. -
Page 30: Installation
Installation Préparation à l'installation Préparation à l'installation □ □ Vissez avec des tours complets les vis de support (B) dans Fixez la traverse (A) à la boîte de sortie de courant à l'aide les trous intérieurs de montage de la traverse (A) (à serrer de deux vis de boîte de sortie de courant (D). - Page 31 Installation Installation de la monture sur la Installation du tube fileté boîte de sortie de courant □ □ Placez la monture (H) par-dessus la boîte de sortie de Vissez le tu leté (I) dans le raccordement conique situé courant, en laissant les têtes des vis de support (B) près des douilles sur la monture (H).
-
Page 32: Entretien Et Nettoyage
Entretien et nettoyage □ Pour nettoyer l’extérieur du luminaire, utilisez un linge propre, sec ou légèrement humide (avec de l’eau, jamais de solvant) pour essuyer la surface du luminaire. □ Pour nettoyer l’intérieur du luminaire, coupez d’abord l’alimentation électrique en déclenchant le disjoncteur ou en retirant le fusible de la boîte à... - Page 33 Cette page a été intentionnellement laissée blanche HAMPTONBAY.COM Veuillez composer le 1 877 527-0313 pour une assistance supplémentaire.
- Page 34 Cette page a été intentionnellement laissée blanche...
- Page 35 Cette page a été intentionnellement laissée blanche HAMPTONBAY.COM Veuillez composer le 1 877 527-0313 pour une assistance supplémentaire.
- Page 36 Questions, problèmes, pièces manquantes? Avant de retourner au magasin, appelez le service à la clientèle Hampton Bay entre 8 h et 18 h (HNE) du lundi au vendredi au 1 877 527-0313 HAMPTONBAY.COM Conservez ce guide pour un usage ultérieur.
Need help?
Do you have a question about the 15155 and is the answer not in the manual?
Questions and answers