Table of Contents
Advertisement
Quick Links
Advertisement
Table of Contents

Related Manuals for Aclam Guitars Windmiller

Summary of Contents for Aclam Guitars Windmiller
- Page 2 Thank you for purchasing The Windmiller Preamp! Push your amp to its raw power! www.aclamguitars.com Disponible en otros idiomas en: www.aclamguitars.com C/ Consell de Cent, 201 - local Available in other languages at: 08011 Barcelona. Spain Llevinac S.L. www.aclamguitars.com CIF: B64412406...
-
Page 3: Table Of Contents
Power Requirements Operating Diagram Controls Where to put The Windmiller Preamp on the effects chain? Eq setting suggestions What impedance is and how it affects The Windmiller Preamp’s tone Setting up on a pedalboard Trouble Shooting Security Instructions Warranty Terms... -
Page 4: Overview
Overview Here it is! The Windmiller Preamp: drive your amp even Even though it was intended as a studio reverb unit, Pete further with Pete Townshend’s secret weapon! used the built-in preamp of the 636 to fatten his tone and boost the guitar signal, bypassing the reverb altogether. - Page 5 Another thing we achieved was to refine its background noise. The vintage Grampian has a remarkable hiss, especially when the Aux Channel was used (Townshend’s choice). Chapter two of the Windmiller designing process was to eliminate that hiss whilst maintaining the character...
-
Page 6: Features
As part of the circuit’s adaptation to a pedal unit, we have We couldn’t resist ourselves to put this cool feature of put an extra effort to make The Windmiller Preamp as quiet the original Grampian 636 thus it will be very useful as a as possible, you almost can’t tell it’s on even at full gain! In... - Page 7 TRUE BYPASS RELAY SWITCHING: We have incorporated a soft touch switch activated relay switching system so, even in the quietest situation you won’t bother the audience and band-members with click or clack noises. And obviously like all our pedals it is true bypass to ensure signal integrity.
-
Page 8: Specs & Material Included
13,6 x 8,7 x 5,5cm (5.4” x 3.4” x 2.2”) with knobs WEIGHT: MADE IN SPAIN 450g. (0.99 lbs) MATERIAL INCLUDED BYPASS: 1 x The Windmiller Preamp pedal Relay True Bypass 1 x Anti-sliding rubber pad 1 x Velcro ® POWER REQUIREMENTS:... -
Page 9: Power Requirements
Power requirements POWER SUPPLY This unit must be powered with a 9VDC negative tip power supply with the standard Boss type 2.1mm connector. Current supply should be a minimum of 100 mA just to leave a safety margin for the DC adapter. Make sure you use a good quality power supply and avoid using generic SMPS type adapters which can induce high pitched noise to the audio. -
Page 10: Operating Diagram
Operating Diagram GUITAR AMP INPUT OUTPUT INPUT... -
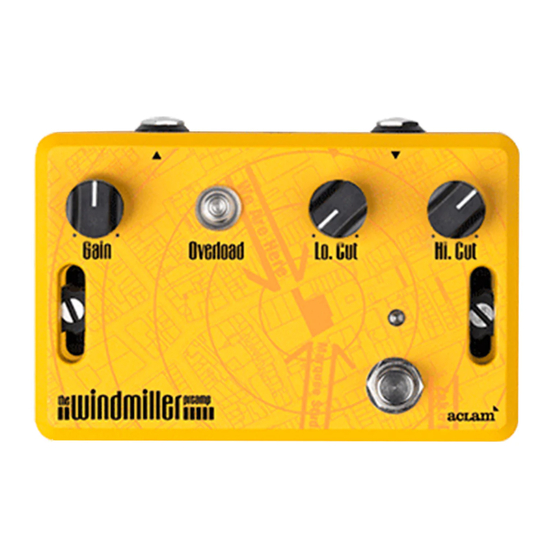
Page 11: Controls
Controls INPUT JACK POWER JACK OUTPUT JACK... - Page 12 BYPASS SWITCH: Engages the unit allowing the LO.CUT: When using The Windmiller Preamp a la signal to flow through The Windmiller Preamp circuit. Townshend style (to saturate your amp) you may It also lights up the LED above it. find the resultant overdrive is a bit fuzzy. This is not...
- Page 13 for darker pickups and as you move the knob it will remove highs until the fully clockwise position where it is enough to tame the brightest pickup.
-
Page 14: Where To Put The Windmiller Preamp On The Effects Chain
Having this in mind here’s some practical examples that Due to its low input impedance, the location of The will help you out to find the best setup for your beloved Windmiller Preamp on the effects chain is crucial to get The Windmiller Preamp. the desired functionality. - Page 15 TOWNSHEND SETUP PREAMP WITH TONE COLORING In this example The Windmiller Preamp receives the signal When placed in a pedalboard, the location of The directly from the guitar output jack, so the scenario is a Windmiller Preamp pedal within the effects chain is crucial high impedance signal into a low input impedance circuit.
- Page 16 PREAMP WITH NO COLORING TRANSPARENT AND LINEAR BOOST When the The Windmiller Preamp pedal gets the signal To use it like a regular booster (louder signal with the less tone from a buffered pedal (like a Boss, Ibanez etc) it changes coloration possible) without overloading the following pedals, its behavior, becoming a transparent preamp.
-
Page 17: Eq Setting Suggestions
EQ Setting suggestions There’s not a particular way to set the The Windmiller Preamp’s controls to get a certain The Who’s song tone. It depends on your amp, guitar and obviously your hands! But since the The Windmiller Preamp has more features... - Page 18 SINGLE COILS HUMBUCKERS...
-
Page 19: What Impedance Is And How It Affects The Windmiller Preamp's Tone
On the other hand, the guitar signal is swinging voltage, So, this is the case of The Windmiller Preamp pedal! more commonly known as alternating current and is a Its low input impedance creates a unique interaction combination of a lot of frequencies. -
Page 20: Setting Up On A Pedalboard
Setting up on a pedalboard HOW TO MOUNT IT ON A SMART TRACK PEDALBOARD: All our effect pedals use a custom light aluminum ® enclosure specially designed to fit our Smart Track ® Add the anti-sliding rubber pad at the bottom of your pedalboards. - Page 21 Loosen the 2 thumb screws to unlock the bottom Move the pedal to its final position. pieces out of the pedal. Place the pedal, inserting the bottom pieces inside the grooves.
- Page 22 Tighten the two thumb screws with your hands or USING OTHER PEDALBOARDS: with a screwdriver. Hook and Loop: Take the included super strong Velcro ® pad and stick it on the base plate. Again, make sure the base is clean of dirt and dust. Pre-drilled pedalboard: Fix it with a bolt and a nut you could find at any hardware store or instead of passing the zip tie over the pedal you can take advantage of the Smart...
-
Page 23: Trouble Shooting
The Windmiller Preamp pedal unable to interact with the pickups. 2. Make sure there’s no pedal between the guitar and The Windmiller Preamp. Even though a pedal is true bypass, when it’s on it isolates the pickups and changes the signal impedance. -
Page 24: Security Instructions
- Heed all warnings. small parts that represent a choking hazard if swallowed. - Aclam Guitars shall not be held liable for any damage - If you do not understand these safety instructions, or if to persons or property caused by incorrect operation or you have any queries regarding the safety of the installation, installation. -
Page 25: Warranty Terms
Warranty Terms This product is covered by a two-year warranty from · Unsuitable use the purchase date, under the conditions and supporting · Incorrect storage evidence regulated by current Spanish Legislation. · Explosions or burns caused by incorrect power supplies. The product warranty will only be applicable by presenting ·... -
Page 26: Your Own Settings
Your own settings Use this space to save your best setting samples and share them on your social media using #aclamguitars...
Need help?
Do you have a question about the Windmiller and is the answer not in the manual?
Questions and answers