Celestron FirstScope 114EQ Instruction Manual
3" newtonian equatorial telescope; 4.5" newtonian telescope; 4.5" newtonian equatorial telescope
Hide thumbs
Also See for FirstScope 114EQ:
- Quick setup manual (2 pages) ,
- Instruction manual (16 pages) ,
- User manual (16 pages)
Advertisement
Table of Contents
F
I
R
S
T
F
I
R
S
T
E
Q
E
Q
F
I
R
S
T
S
C
F
I
R
S
T
S
C
F
I
R
S
T
S
C
O
F
I
R
S
T
S
C
O
E
Q
E
Q
I
N
S
T
I
N
S
T
M
o
d
e
l
M
o
d
e
l
S
C
O
P
E
7
6
S
C
O
P
E
7
6
U
A
T
O
R
I
A
U
A
T
O
R
I
A
M
o
d
e
l
M
o
d
e
l
O
P
E
1
1
4
E
Q
O
P
E
1
1
4
E
Q
T
E
L
E
T
E
L
E
M
o
d
e
l
M
o
d
e
l
P
E
1
1
4
S
H
O
P
E
1
1
4
S
H
O
U
A
T
O
R
I
A
U
A
T
O
R
I
A
R
U
C
T
I
O
R
U
C
T
I
O
#
3
1
0
3
2
#
3
1
0
3
2
3
"
N
E
W
T
3
"
N
E
W
T
L
T
E
L
E
S
C
L
T
E
L
E
S
C
#
3
1
0
4
4
#
3
1
0
4
4
4
.
5
"
N
E
4
.
5
"
N
E
S
C
O
P
E
S
C
O
P
E
#
3
1
0
4
1
#
3
1
0
4
1
R
T
4
.
5
"
N
R
T
4
.
5
"
N
L
T
E
L
E
S
C
L
T
E
L
E
S
C
N
M
A
N
M
A
O
N
I
A
N
O
N
I
A
N
O
P
E
O
P
E
W
T
O
N
I
A
N
W
T
O
N
I
A
N
E
W
T
O
N
I
A
E
W
T
O
N
I
A
O
P
E
O
P
E
N
U
A
L
N
U
A
L
N
N
Advertisement
Table of Contents

Related Manuals for Celestron FirstScope 114EQ


Summary of Contents for Celestron FirstScope 114EQ
- Page 1 " " " " " "...
- Page 2 Figure 1...
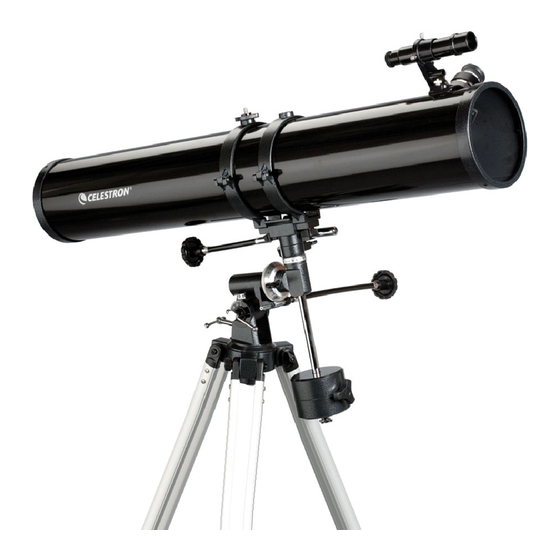
- Page 3 Star Pointer Adjustment Knob (Azimuth) Eyepiece Eyepiece Adapter Focusing Knob 10. Focusing Tube 11. Telescope Optical Tube 12. Telescope Tube Mounting Hardware 13. Declination Cable Holder 14. Primary Mirror Cell (inside) 15. Collimation Adjustment Screws 16. Polar Axis Knob 17. Latitude Scale 18.
-
Page 4: T E L E S C O P E A S S E M B Ly
Thank you for purchasing this Celestron Newtonian Telescope. This telescope is a precision scientific instrument. With it you will enjoy numerous objects in the sky—planets, nebulae, star clusters, galaxies and other astronomical objects. This manual covers both the 76mm equatorial mount model and the 114mm models. The equatorial mount contains setting circles and slow motion cables to make it easier to locate and track astronomical objects. - Page 5 2. Slide the rings apart so that each is at the same distance as the holes in the mounting platform. Place the telescope tube on the mount so that the flat portion of the tube rings rest on the mounting platform.
-
Page 6: G E T T I N G S E T Up
Look at the latitude scale (#17) and move the mount to the latitude of your location and then tighten the polar axis knob. This only has to be done once unless you take the telescope to a different location. For example, Los Angeles, California is located at about 34º. If you do not know your latitude, it can be found on most road atlases of your area. - Page 7 F. To align the Star Pointer finderscope: The Star Pointer is the quickest and easiest way to point your telescope exactly at a desired object in the sky. It's like having a laser pointer that you can shine directly onto the night sky. The Star Pointer is a zero magnification pointing tool that uses a coated glass window to superimpose the image of a small red dot onto the night sky.
-
Page 8: The Celestial - Coordinate System
The Celestial - Coordinate System. The celestial-coordinate system is an imaginary projection of the Earth's geographical coordinate system onto the celestial sphere which seems to turn overhead at night. This celestial grid is complete with equator, latitudes, longitudes and poles. The Earth is in constant motion as it rotates on its axis. -
Page 9: Polar Alignment
Given the celestial coordinate system, it now becomes possible to find celestial objects by translating their celestial coordinates using telescope pointing positions. For this you use setting circles (if you have the Firstscope EQ - equatorial mount models) for R.A. and Dec. to find celestial coordinates for stellar objects which are given in star charts and reference books. -
Page 10: Using The Setting Circles
To track objects continuously, adjustments will be made with the right ascension cable. When using the telescope, all objects in the sky will slowly drift out of the field of view unless you manually make corrections with the right ascension cable. - Page 11 Now, rotate the right ascension circle to match the coordinates of the star with the indicator mark. The right ascension setting circle does not move as the telescope moves in right ascension and thus it must by aligned each time you want to use it to find a new object. However, you do not need to use a bright star each time but you can use the object you are currently observing.
-
Page 12: Telescope Maintenance
After you have read and followed the instruction manual to this point, the telescope is set up and you are ready to begin your observing adventure. To enable you to find objects you should have a set of Star Charts or a Planisphere. The location of the planets may appear in local newspapers. -
Page 13: Specifications
(#15) located at the rear of the optical tube. 3. If your telescope is out of collimation, the best way to re-collimate it is with a good collimation tool. Celestron offers a Newtonian Collimation Tool (#94183) with detailed instructions that make it an easy chore. -
Page 14: Optional Accessories
T-Adapter (#94177) - T-Adapter (with additional T-Ring) allows you to attach your SLR camera to the rear cell of telescope your Celestron This turns your photography and short exposure lunar A full description of all Celestron accessories can be found in the Celestron Accessory Catalog (#93685). In the 1-1/4" barrel 32mm 25mm, and 40mm. -
Page 15: Celestron Two Year Warranty
Celestron, is found to be defective in materials or workmanship. As a condition to the obligation of Celestron to repair or replace such product, the product must be returned to Celestron together with proof-of-purchase satisfactory to Celestron.
Need help?
Do you have a question about the FirstScope 114EQ and is the answer not in the manual?
Questions and answers