
Related Manuals for JF JF 2D


Summary of Contents for JF JF 2D
- Page 1 OPERATION TECHNICAL MANUAL MANUAL TÉCNICO DE OPERACIÓN Í C O I N A M Á JF 2D MILL - MOLINO Rev. 00...
-
Page 3: 1- Introduction
OPERATION TECHNICAL MANUAL - MILL JF 2D 1 - Introduction Congratulations! You have just purchased an excellent grain chopper JF 2D, easy to operate and maintain. Besides grain chopper, this machine can be configured to work as forage chopper. We thank you for choice of a machine really suitable to your needs, which is made by a company that continuously searches for the improvement of its products. -
Page 4: Table Of Contents
4.3- Motor installation 4.4- Assembly of the detached parts 5- Operation adjustments 5.1- To operate the JF 2D as grain chopper 5.2- To operate the JF 2D as forage chopper 5.3- Machine work speed adjustment 6- Step by step operation 6.1- Starting the machine on/off... - Page 5 2 - Illustrations in this Manual are merely illustrative. 3- JF offers one free operation training at the factory. Contact JF Training Department and ask for further information or go to the website...
-
Page 6: 2- Safety Recommendations
2- Safety Recommendations Observe the recommendations of your Tractor's Manual, for a safe and efficient operation. 2.1- While Reading the Manual Note: It means that a detail will be presented and it may concerns operation or security. Attention: It means that your life or parts of your body may be in danger. You must pay attention to this sign! Warning Labels Note:... -
Page 7: When Operating The Machine
OPERATION TECHNICAL MANUAL - MILL JF 2D 2.2- When operating the machine 1- The JF 2D is designed exclusively to disintegrate grains and chop forage. 2- When supply the machine, never introduce the hands into the feeding chute (1). 3- In order to obtain the maximum efficiency and quality of chopped or designed material, maintain a constant and uniform feeding. -
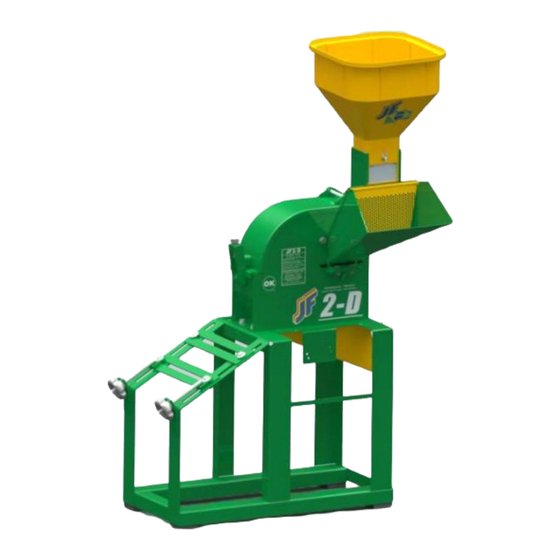
Page 8: 3- Machine Presentation
3- Machine presentation 3.1- Parts identification 1- Grain chopper 2- Feeding nozzle 3- Protection screen 4- Upper product output 5- Deflector 6- Counteknife 7- Inferior product outlet (desintegrated grains) 8- Driving electric motors (Refer to page 10 about power requirements) 9- On-Off control (machine equipped with original electric motor only) 10- Forage chopper knifes (2 units) -
Page 9: Operation
OPERATION TECHNICAL MANUAL - MILL JF 2D 3.2- Operation The JF 2D Mill machine is a simple, strong and versatible machine, designed to help you on diary animal feed. The machine offers two operation types: A- Cereals mill: corn, sorghum, soybean etc. -
Page 10: Technical Specifications
3.3- Technical specifications Model: JF 2D Mill Machine Drive Electric motor Power of the motor 2 to 3 hp (1,5 to 2,5 kW) Work speed 4.000 to 5.000 RPM Cutting knives 2 units Grinder hammers 16 units Driving belt Pulley* diameter which follow the machine: - To 60 Hz motor (03.100100) -
Page 11: 4- Machine Setup
OPERATION TECHNICAL MANUAL - MILL JF 2D 4- Machine setup 4.1- Machine leveling and positioning The machine must be installed on even, leveled as rigid ground to a good performance. Don`t forget to install the rubber shims “anti-vibration” (1) that come along with the machine. -
Page 12: Electric Fitting: Machine With Motor
20 Amperes 110 Volts 30 Amperes NOTE: JF 2D can be equipped with 2 or 3 hp (IP 21, IP 55). The motor leaves the factory set up to operate in 220 volts, according the label (2) attached to the cord. -
Page 13: Motor Installation
OPERATION TECHNICAL MANUAL - MILL JF 2D 4.3- Motor installation a) Draw out the pulley (3) of the machine. b) Attach the protection (4) with the screws (5). I M P O R TA N T: C h e c k t h e p o w e r requirements of the motor on page 10. -
Page 14: Assembly Of The Detached Parts
4.4- Assembly of the detached parts Feeding nozzle (1) It drive the grains to the disintegrator, as well as to introduce the maize plants, sugar cane, grass etc. Fasten the chute (1) according picture aside, using tree bolts (1a) that you find on machine. If you have difficulty in the assemble of the feeding nozzle, remove the counter-knife and set it with the feeding nozzle. - Page 15 OPERATION TECHNICAL MANUAL - MILL JF 2D “Vibra Stop” system (4) It soften the vibration, avoiding that the machine move itself during operation. Insert the four rubber shims “anti-vibration” (4) under the machine base according the arrows on picture aside.
-
Page 16: 5- Operation Adjustments
5- Operation adjustments 5.1- To operate the JF 2D as grain chopper a) Loosen latch (1) and rising cover (2). b) Remove the countercover (3). c) Select one of the sieves (4, 5, 6 or 7), according desired product chips size and install it under the impeller according picture aside. - Page 17 To recolect the desintegrated product that flow through lower nozzle (10), hang a bag on the hooks (11). Sieve chart - JF 2D on grain disintegrator configuration Sieve Holes diameter Usage 10 mm...
-
Page 18: To Operate The Jf 2D As Forage Chopper
5.2- To operate the JF 2D as forage chopper a) Loosen latch (1) and rising cover (2). b) Remove the countercover (3). c) Install lower sealing (12) under mill rotor, according picture below. d) IMPORTANT: Maintain bent plate (3) out, leaving upper outlet open. -
Page 19: Machine Work Speed Adjustment
OPERATION TECHNICAL MANUAL - MILL JF 2D 5.3- Machine work speed adjustment See on page 10 the speed ratio to operate the JF 2D. To have different speeds in this zone. Its necessary change the pulleys combination, that is, use different diameters. -
Page 20: 6- Step By Step Operation
6- Step by step operation 6.1- Starting the machine on/off Attention: Before start the operation, have the assurance that electric fittings, assembly o f d e t a c h e d p a r t s a n d o p e r a t i o n adjustments have been done correctly. -
Page 21: Operating The Machine In Forage Chopper Mode
Manioc flour production For the manioc flour (manioc meal) production it is necessary to use JF 2D in the two work configuration, as it proceeds: a) Cut the manioc roots using the machine in the forage configuration;... -
Page 22: 7- Maintenance Instructions
7- Maintenance instructions 7.1- Grease lubricating points Lubricate each 8 work hours or daily the bearing of the chopper (see picture below), using a grease pump. Recommended grease Lithium soap base grease Grade 2. Note: Lubricate after a work period, because the grease flows better when the machine is still warm. -
Page 23: Chopper Knives Sharpening
OPERATION TECHNICAL MANUAL - MILL JF 2D 7.2- Chopper knives sharpening This operation is more important on machine maintenance, because aim at good performance and durability of the knives (1). The sharpening should be made in such a way to preserve the characteristics of the knives and the tempering of the steel. -
Page 24: Gap Adjustments Between Knife And Counterknife
(6). IMPORTANT: It cannot have interference between the knives and counter-knife during the operation. Therefore, JF recommends a minimum gap 0,05 to 0,15 d) Check the gap through feeding nozzle, turning the impeller (4) manually and slowly. -
Page 25: Counterknife Replacement
OPERATION TECHNICAL MANUAL - MILL JF 2D g) Replace the countercover (7). h) Close cover (8), rising and tighten latch (9). 7.4- Counter knife replacement If the counterknife (1) is worn, with the edge rounded, invert it to use the other side. -
Page 26: Change Of Grinder Hammers
7.5- Change of grinder hammers The grinder hammers (1) will wear along the time of use, overchanging the machine. If the machine is losing efficiency, in the mill configuration, check the hammer status and change them of position if necessary, according order on picture below. Mill impeller Notes: 1- The hammers have 4 positions of assembly, or either, 4 mill faces (A, B, C and... - Page 27 OPERATION TECHNICAL MANUAL - MILL JF 2D Procedure: a) Remove the feeding chute (2) loosing the bolts (3). b) Loosen latch (4) and raise the cover (5). c) Remove the countercover (6). d) Remove destructively the cotter pin (7) of each one of the pins (8).
-
Page 28: Pulley Alignment
7.6- Pulley alignment The correct alignment between the motor pulley (1) and machine pulley (2) is fundamental for the good performance and the long useful life of the belt (3). a) Remove the cover (4) loosing the two nuts (5). b) Loose (don`t remove) the four nuts (6) of the motor fastening. -
Page 29: Belt Tension Adjustment And Replacement
OPERATION TECHNICAL MANUAL - MILL JF 2D 7.7- Belt tension adjustment and replacement The motor is fixed on a movable base that can be adjusted by tightening or loosening the sticks (2). NOTE: Before adjusting the tensioning across the sticks, must loosen the nuts (B) for the supports (A) can move easily. -
Page 30: Machine Conservation
7.8- Machine conservation Protect the machine against bad weather and the corrosive effect of some products. After the use, adopt the cares below: Remove all product waste that remained inside the machine. Always if necessary, wash the machine and let it dry at the sun. Check the bolts tightener of the impeller knifes. -
Page 31: 9- Detached Items That Come Along With The Machine
OPERATION TECHNICAL MANUAL - MILL JF 2D 9- Detached items that come along with the machine 1- Feeding nozzle 2- Grain chopper 3- Sieve assembly 4- Cutting fund 5- Protection screen 6- Rubber shims “anti-vibration” (4 units) 7- Motor pulley * A polia (7) do motor varia entre 50 e 60 Hz de acordo com o pedido no momento da compra da máquina. - Page 32 10- Troubleshooting Problem Causes Solution Excessive machine vibration The machine is not on a Put the machine on a proper base leveled and rigid base The anti-vibration rubbers Install it according were not installed instructions in this manual The impeller is unbalanced Check the quantity, assembled position knifes and hammers...
- Page 33 OPERATION TECHNICAL MANUAL - MILL JF 2D 11 - Technical assistance 11.1- Machine serial number The JF 2D is identified with a serial number located on plate (1) fastened in front of the machine. Write down here the serial number of your machine:...
- Page 35 OPERATION TECHNICAL MANUAL - MILL JF 2D Warranty Term The Agricultural Equipment described in this manual is guaranteed by JF Máquinas Agrícolas Ltda. for a period of 01 (one) year from the puchase bill issue date to the first owner/consumer of this product, confirmed through the Technical Delivery Voucher.
- Page 37 6 – Has a step-by-step description of the operation been explained? ( ) Yes ( ) No ( ) Yes ( ) No Technical Delivery Responsible Signature Customer/Owner Signature Delivery Date Technical Delivery Receipt Second Copy: JF Factory Owner: Telephone: Address: City: State: Owner E-mail Address: Equipment Type: Serial Number:...
- Page 38 If the retailer has not done the Technical Delivery, just fill in the header. After filling in (partially or totally), the customer must keep this copy. If the retailer has not done the Technical Delivery, just fill in the header. After filling in (partially or totally), forward this second copy of the Report to the After Sales Department to the address that is on the back cover of this Manual.
-
Page 39: 1- Introducción
MANUAL TÉCNICO DE OPERACIÓN - MOLINO JF 2D 1 - Introducción Felicitaciones! Usted ha adquirido el desintegrador de granos (molino) JF 2D, una máquina de operación y mantenimiento muy sencillo, ideal para picar maíz y/o hacer harinas. Además de las aplicaciones mencionadas, esta máquina puede ser adaptada como forrajera. - Page 40 4.3- Instalación del motor 4.4- Montaje de piezas sueltas 5- Ajuste de operación 5.1- Para emplear la JF 2D como molino 5.2- Para emplear la JF 2D como forrajera 5.3- Ajuste de la rotación de trabajo de la máquina 6- Operación paso a paso 6.1- Prender y apagar la máquina...
- Page 41 2- Las ilustraciones contenidas en este manual son meramente ilustrativas. 3- JF pone a su disposición un entrenamiento gratuito de operación en la fábrica. Entre en contacto con el departamento de entrenamiento de JF y solicite informaciones o visite www.jfmaquinas.com y obtenga acceso al calendario de...
-
Page 42: 2- Recomendaciones De Seguridad
2- Recomendaciones de Seguridad Observa también las recomendaciones del Manual de su tractor, para una operación segura y eficiente. 2.1- Al leer el Manual de Instrucciones Notas: Significa que será presentado un detalle, que podrá ser operacional o de seguridad. Atención: Significa que su vida o partes de su cuerpo podrán estar en peligro. -
Page 43: Al Operar La Máquina
MANUAL TÉCNICO DE OPERACIÓN - MOLINO JF 2D 2.2- Al operar la máquina 1- La máquina JF 2D ha sido desarrollada exclusivamente para desintegrar granos y picar forrajes. 2- Al alimentar la máquina, nunca introduzca las manos en la boquilla de alimentación (1). -
Page 44: 3- Presentación De La Máquina
3- Presentación de la máquina 3.1- Identificación de los componentes 1- Molienda de granos 2- Boquilla de alimentación 3- Rejilla de protección 4- Salida superior del producto 5- Deflector 6- Contracuchilla 7- Salida inferior del producto (para granos desintegrados) 8- Motor eléctrico de accionamiento (vea la potencia necesaria en la página 10) 9- Botones de mando (acompaña la máquina que sale de fábrica equipada con... -
Page 45: Princípio De Funcionamiento
MANUAL TÉCNICO DE OPERACIÓN - MOLINO JF 2D 3.2- Principio de funcionamiento El Molino JF 2D es una máquina simple, recla y versátil, indispensable para el cuidado diario de animales. La máquina ofrece dos tipos de operación: A- Desintegrador de granos como maíz, sorgo, soya etc. -
Page 46: Especificaciones Técnicas
3.3- Especificaciones técnicas Modelo: Molino JF 2D Accionamiento Motor eléctrico Potencia necesaria del motor 2 hasta 3 cv (1,5 hasta 2,5 kW) Rotación de trabajo 4.000 hasta 5.000 RPM Cuchillas de corte 2 unidades Martillos desintegradores 16 unidades Correa de accionamiento Diámetro de la polea* que acompaña la máquina:... -
Page 47: 4- Preparación De La Máquina
MANUAL TÉCNICO DE OPERACIÓN - MOLINO JF 2D 4- Preparación de la máquina 4.1- Fijación y nivelación de la máquina La máquina debe ser colocada sobre piso llano, nivelado y firme para proporcionar mayor estabilidad a la máquina. No olvide de instalar los tacos de goma antivibración (1) que acompañan la máquina. -
Page 48: Instalación Eléctrica: Máquina Con Motor
20 Amperios 110 Voltios 30 Amperios OBS.: La JF 2D puede salir de fábrica equipada con motor de 2 ó 3 cv (IP 21, IP 55). Ambos son preparados para funcionar con 220 voltios, según datos de la etiqueta (2) fijada al cable de alimentación (1). -
Page 49: Instalación Del Motor
MANUAL TÉCNICO DE OPERACIÓN - MOLINO JF 2D 4.3- Instalación del motor a) Retire la polea (3) de la máquina. b) Coloque la protección (4) con los tornillos (5). IMPORTANTE: Verifique la potencia necesaria del motor en las páginas anteriores. Ali también se encuentra el valor de la rotación ideal de trabajo de la... -
Page 50: Montaje De Piezas Sueltas
4.4- Montaje de piezas sueltas Boquilla de alimentación (1) Sirve para conducir los granos hasta el rotor, así como introducir las plantas de maíz, caña de azucar, gramíneas etc. Fije la boquilla (1) según figura al lado usando los 3 tornillos (1a) que ya se encuentran junto a la máquina. - Page 51 MANUAL TÉCNICO DE OPERACIÓN - MOLINO JF 2D Sistema ¨vibra stop¨ (4) Sirve para amortiguar las vibraciones, evitando que la máquina se desplace durante la operación. Encaje los cuatro tacos de goma “antivibración” (4) por debajo de la base de la máquina, en...
-
Page 52: 5- Ajuste De Operación
5- Ajuste de operación 5.1- Para emplear la JF 2D como molino a) Afloje la cerradura (1) y levante la tapa (2). b) Quite la tapa (3). c) Elija una de las cribas (4, 5, 6 ó 7), según el tamaño deseado para las partículas del producto y encájela por... - Page 53 Para recoger el producto desintegrado que sale por la salida inferior (10), cuelgue una bolsa en los ganchos (11). Tabla de cribas - JF 2D en la condición de desintegrador de granos Criba Diámetro de los agujeros Aplicación 10 mm Maíz picado grueso y similares...
-
Page 54: Para Emplear La Jf 2D Como Forrajera
5.2- Para emplear la JF 2D como forrajera a) Afloje la cerradura (1) y levante la tapa (2). b) Quite la tapa (3). c) Introduzca el fondo de corte (12- página anterior) por debajo del rotor desintegrador, según la figura a continuación... -
Page 55: Ajuste De La Rotación De Trabajo De La Máquina
5.3- Ajuste de la rotación de trabajo de la máquina Vea en la página 10 la gama de rotación ideal para operar la JF 2D. Para obtener diferentes rotaciones dentro de ésta gama, es necesario alterar la combinación de poleas, o sea, usar diámetros diferentes. -
Page 56: 6- Operación Paso A Paso
6- Operación paso a paso 6.1- Prender y apagar la máquina Atención: Antes de dar inicio a la operación, asegúrese que la instalación eléctrica, montaje de las piezas sueltas y ajustes de o p e r a c i ó n h a y a n s i d o h e c h o s correctamente. -
Page 57: Operando La Máquina En La Condición De Forrajera
Fabricación de polvillo Para la fabricación de polvillo (almidón) es necesario usar la JF 2D en dos condiciones de trabajo, según se describe a seguir: a) Pique las raices de mandioca usando la máquina como forrajera. -
Page 58: 7- Instrucciones De Mantenimiento
7- Instrucciones de mantenimiento 7.1- Puntos de lubricación con grasa Lubrique a cada 8 horas de trabajo o diariamente el cojinete del rotor picador (vea las figuras abajo), usando una engrasadora. Grasa recomendada Grasa GMA2 Petrobras BR (o equivalente) o grasa a base de jabón de Litio Clase 2. Nota: Realice la lubricación tras un período de trabajo, pues la grasa penetra mejor cuando la... -
Page 59: Afilado De Las Cuchillas Del Rotor Picador
MANUAL TÉCNICO DE OPERACIÓN - MOLINO JF 2D 7.2- Afilado de las cuchillas del rotor picador Esta es una de las operaciones más importantes en el mantenimiento de la máquina, pues mantiene el buen desempeño y durabilidad de las cuchillas (1). -
Page 60: Ajuste De La Distancia Entre Las Cuchillas Y Contracuchillas
(5) de la contracuchilla (6). IMPORTANTE: No puede haber roce entre las cuchillas y la contracuchilla durante la operación. Por eso, JF recomienda una luz mínima de 0,05 a 0,15 mm (espesor de una loja de papel) entre ellas. -
Page 61: Cambio De La Contracuchilla
MANUAL TÉCNICO DE OPERACIÓN - MOLINO JF 2D g) Vuelva a instalar la tapa (7). h) Cierre la tapa (8) y trábela con la cerradura (9). 7.4- Cambio de la contracuchilla Si la contracuchilla (1) está con desgaste, con el borde redondo, reemplácela por una nueva. -
Page 62: Reemplazamiento De Los Martillos Desintegradores
7.5- Reemplazamiento de los martillos desintegradores Los martillos desintegradores (1) pierden su capacidad (sufren desgaste) con el tiempo, sobrecargando la máquina. Si la máquina comienza a perder rendimiento, en la calidad de desintegrador, verifique el estado de los martillos y cámbielos de posición si necesario, observando el orden de montaje en la figura abajo. - Page 63 MANUAL TÉCNICO DE OPERACIÓN - MOLINO JF 2D Procedimiento: a) Quite la boquilla de alimentación (2) aflojando los tres tornillos (3). b) Afloje la cerradura (4) y levante la tapa (5). c) Quite la tapa (6). d) Quite el pasador (7) de cada uno de los pernos (8).
-
Page 64: Alineación Entre Las Poleas
7.6- Alineación entre las poleas La correcta alineación entre la polea del motor (1) y polea de la máquina (2) es fundamental para el buen funcionamiento de la máquina y la larga vida útil de la correa (3). a) Quite la cubierta (4) aflojando las 2 tuercas (5). b) Afloje (no quite) las cuatro tuercas (6) de fijación del motor. -
Page 65: Ajuste De La Tensión Y Cambio De La Correa
MANUAL TÉCNICO DE OPERACIÓN - MOLINO JF 2D 7.7- Ajuste de la tensión y cambio de la correa El motor es fijado en una base móvil que se puede ajustar apretando o aflojando los manípulos (2). OBS.: Antes de ajustar la tensión a través del manípulo, debe aflojar las tuercas (B) para que los soportes (A) pueden moverse con facilidad. -
Page 66: Conservación De La Máquina
7.8- Conservación de la máquina Proteja siempre la máquina de la intemperie y de los efectos corrosivos de algunos productos. Tras el uso, adote los cuidados a continuación: Quite todos los residuos de producto que restaron en el interior de la máquina. Siempre que sea necesario, limpie bien limpia la máquina por dentro y por fuera. -
Page 67: 9- Piezas Sueltas Que Acompañan La Máquina
MANUAL TÉCNICO DE OPERACIÓN - MOLINO JF 2D 9- Piezas sueltas que acompañan la máquina 1- Boquilla de alimentación 2- Molienda de granos 3- Conjunto de cribas 4- Fondo de corte 5- Rejilla de protección 6- Tacos de goma “antivibración” (4 unidades) - Page 68 10- Diagnóstico de anormalidades y soluciones Anormalidad Causas Solución Máquina con vibración La máquina no está sobre Coloque la máquina sobre excesiva una base adecuada una base nivelada y firme Los tacos de goma no han Instalar según instrucciones sido instalados en este manual El rotor no está...
- Page 69 11 - Asistencia técnica 11.1- Número de série de la máquina La JF 2D es identificada con un número de serie, el cual consta en la placa (1) fijada en el frente de la máquina. Anote aqui el número de serie de la máquina:...
- Page 71 MANUAL TÉCNICO DE OPERACIÓN - MOLINO JF 2D Término de Garantía El equipo agrícola descrito en este manual es garantizado por JF Máquinas Agrícolas LTDA. por un período de 01 (un) año a partir de la fecha de emisión de la nota fiscal de venta al primer propietario / consumidor de este producto, confirmado a través del Comprobante de Entrega Técnica.
- Page 73 ( ) No ( ) Si ( ) No Firma del responsable por la Entrega Técnica Firma del propietario / Cliente Fecha de entrega Comprobante de Entrega Técnica 2 Copia: Fábrica JF Propietario: Teléfono: Dirección: Ciudad: E-mail Propietario: Mod. Equipo: Nº...
- Page 74 Caso el no haya realizado la Entrega Técnica, llenar apenas el encabezado. Después del llenado (parcial o total), el cliente debe guardar esa copia. Caso el revendedor no haya realizado la Entrega Técnica llenar apenas el encabezado. Después del llenado (parcial o total), encamine esa copia del Formulario al Departamento de Postventas, conforme la dirección en la contraportada de este manual.
- Page 76 THE SOLUTION FOR THE PRODUCER LA SOLUCIÓN PARA EL PRODUCTOR JF Máquinas Agrícolas Ltda CNPJ: 46.127.635/0001-55 Address / Dirección ............. Rua Santa Terezinha, Nº921. Jd. Guarujá - Itapira - SP - Brasil Cep: 13973-900 Post Sale Department Caixa Postal: 114.
Need help?
Do you have a question about the JF 2D and is the answer not in the manual?
Questions and answers