Furuno RC-1800T Installation Manual
Gmdss radio station
Hide thumbs
Also See for RC-1800T:
- Operator's manual (33 pages) ,
- Service manual (150 pages) ,
- Operator's manual (20 pages)
Table of Contents
Advertisement
SYSTEM CONFIGURATION ........................................................................................... ii
EQUIPMENT LISTS........................................................................................................ iii
1. INSTALLATION.......................................................................................................1-1
1.1 Installation Considerations.................................................................................................1-1
1.2 Rack Console Installation ..................................................................................................1-2
1.3 Terminal Unit (IC-218/IB-585)............................................................................................1-3
1.4 SSB Radiotelephone (FS-1575/FS-2575)..........................................................................1-4
1.5 Printer (PP-520) .................................................................................................................1-7
1.6 Fuse Box (SB-180) ............................................................................................................1-8
1.7 Distress Alert/Received Call Unit (IC-305)/Alarm Unit (IC-350).........................................1-8
1.8 Alarm Unit (IC-306) ............................................................................................................1-8
1.9 SSAS Alert Unit (IC-307) ...................................................................................................1-9
1.10 AC/DC Power Supply Units (PR-300/PR-850)...................................................................1-9
1.11 Other Equipment................................................................................................................1-9
2. WIRING....................................................................................................................2-1
2.1 Wiring Diagram ..................................................................................................................2-1
2.2 Location of Terminal Blocks Inside the Rack Console.......................................................2-2
2.3 Connection of Equipment Installed in the Console ............................................................2-2
2.4 Connection of External Equipment ....................................................................................2-3
2.5 Fuse Box (SB-180) ............................................................................................................2-6
2.6 Charger Unit (BC-6158-SS/6200) ......................................................................................2-7
2.7 Power Supply Unit (PR-300/PR-850A) ..............................................................................2-9
3. CHECKING OPERATION........................................................................................3-1
3.1 Checking Operation of Equipment .....................................................................................3-1
3.2 General Check ...................................................................................................................3-1
APPENDIX 1 JIS CABLE GUIDE .............................................................................AP-1
PACKING LISTS ......................................................................................................... A-1
OUTLINE DRAWINGS ................................................................................................ D-1
INTERCONNECTION DIAGRAM ................................................................................ S-1
All brand and product names are trademarks, registered trademarks or service marks of their respective holders.
Installation Manual
GMDSS Radio Station
www.furuno.com
RC-1800T
Model
Advertisement
Table of Contents

Related Manuals for Furuno RC-1800T


Summary of Contents for Furuno RC-1800T
-
Page 1: Table Of Contents
Installation Manual GMDSS Radio Station RC-1800T Model (FS-1575/FS-2575 installation-in-field specification) SAFETY INSTRUCTIONS ....................i SYSTEM CONFIGURATION ................... ii EQUIPMENT LISTS......................iii 1. INSTALLATION.......................1-1 1.1 Installation Considerations....................1-1 1.2 Rack Console Installation ....................1-2 1.3 Terminal Unit (IC-218/IB-585)....................1-3 1.4 SSB Radiotelephone (FS-1575/FS-2575)................1-4 1.5 Printer (PP-520) .........................1-7 1.6 Fuse Box (SB-180) ......................1-8... - Page 2 ・FURUNO Authorized Distributor/Dealer 9-52 Ashihara-cho, Nishinomiya, 662-8580, JAPAN A : APR 2015 Printed in Japan All rights reserved. B1 : JAN . 07, 2021 Pub. No. IME-56331-B1 (TAYA ) RC-1800T-75 0 0 0 1 9 0 4 8 6 1 1...
-
Page 3: (Fs-1575/Fs-2575 Installation-In-Field Specification) Safety Instructions
Fire or damage to the equipment can magnetic compass: result if a different cable is used. Standard Steering compass compass Use the correct fuse. RC-1800T 4.75 m 3.15 m Use of a wrong fuse can result in damage to the equipment. -
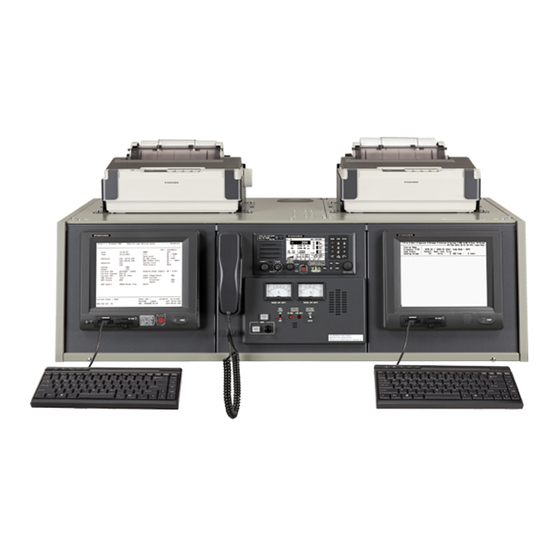
Page 4: System Configuration
NLFL-03W-WB Printer* Printer* • SSAS Alert Unit IC-307 (max. 2) (max. 2) PP-520 PP-520 (max. 3) GMDSS Radio Station RC-1800T Terminal Unit Terminal Unit Terminal Unit Terminal Unit Rectifier Fuse Box* 24 VDC PR-850A SB-180 : Equipment installed in the console •... -
Page 5: Equipment Lists
EQUIPMENT LISTS Standard Supply Name Type Code No. Remarks Main Frame MA-1800T-75-Y — Select Standard color, w/ IF-8500 one. MA-1800T-75-T — Specified color, w/ IF-8500 Spare Parts SP05-06401* 001-380-060 Installation Materials CP05-13400 000-027-521 CP05-13401* (for main frame) CP05-13402* (for SSB transceiv- er unit) *: See the list for the installation materials at the back of this manual. - Page 6 EQUIPMENT LISTS This page is intentionally left blank.
-
Page 7: Installation
INSTALLATION NOTICE Do not apply paint, anti-corrosive sealant or contact spray to coating or plastic parts of the equipment. Those items contain organic solvents that can damage coating and plastic parts, especially plastic connectors. Installation Considerations Install the rack console where the equipment in the console can be easily operated, checked and serviced. -
Page 8: Rack Console Installation
1. INSTALLATION Rack Console Installation Leave at least 100 mm of service space on the sides and at the rear of the console. Determine cable coming position and size referring to the illustration below. See "How to fasten the earth plate" on page 1-3 for the ground location. Determine size of the cable coming considering both cable size and cable bends. -
Page 9: Terminal Unit (Ic-218/Ib-585)
1. INSTALLATION How to fasten the earth plate Weld a steel plate with earth plate, and connect it to the rack console. CAUTION Solder the point where the earth plate connects to the grounding lo- Ground the equipment to prevent cation, to prevent corrosion and to electrical shock and mutual ensure tight connection.The earth... -
Page 10: Ssb Radiotelephone (Fs-1575/Fs-2575)
1. INSTALLATION 1. Remove the front panels, referring to step 6 on page 1-2. 2. Put the terminal units in the front panels from the front side. 3. Fasten the four M4 screws (supplied) on the rear of each front panel. Screw, 4 pcs. - Page 11 1. INSTALLATION 2. Remove six bolts (M4) on the hanger cover of the handset. Hanger cover (side view) Hanger cover (front view) Handset Handset Hanger Cover Hanger Cover Hanger Plate Six screws to remove 3. From the front side of the front panel, fasten the hanger plate to the fixing holes with the two bolts (M4) which are attached on the panel.
- Page 12 1. INSTALLATION 2) Attach the stopper support (supplied) to the upper side of the transceiver unit with the two screws (M3 8, supplied). Then attach the rod guides to the stop- per support. Top view Upper side Two screws (M3×8, supplied) Rod guide Rod guide Stopper support supplied...
-
Page 13: Printer (Pp-520)
1. INSTALLATION 4) Set the transceiver unit such that the cable entrance of the transceiver unit faces to the right, then set the transceiver unit to the console. 5) Put the transceiver unit on the fixing plates (right and left), then push the trans- ceiver unit into the console until the unit contacts the stoppers. -
Page 14: Fuse Box (Sb-180)
1. INSTALLATION Top cover (left) Grommet Grommet Signal cable Signal cable Power cable Remove the grommet. Attach the grommet. Attach the grommet. Cable (No.1 printer) Cable (No.1 printer) Cable (No.2 printer) Cable (No.2 printer) Fuse Box (SB-180) The fuse box must be installed to protect the equipment installed in the console from overcurrent. -
Page 15: Ssas Alert Unit (Ic-307)
1. INSTALLATION SSAS Alert Unit (IC-307) Select the installation location where the buttons on the IC-307 can be operated easily in an emergency and is difficult to find by an intruder. Let the captain and the qualified persons only know the installation location of the unit. For how to install the unit, see the installation manual of IC-307. - Page 16 1. INSTALLATION 3. Fasten the light from the top with the screws removed at step 1. 1.11.2 Charger Unit (BC-6158-SS/6200) Fasten the charger unit (option) considering the following points. • Select a location where vibration is minimal. • The location should be moderate and stable in both temperature and humidity. •...
-
Page 17: Wiring
WIRING Wiring Diagram AM radio No.1 VHF ANT WR RG-10/UY RG-10/UY No.1 VHF ANT No.2 VHF ANT RG-10/UY RC-1800T RC-1800T DSC ANT RG-10/U-Y FAX-5 Inmarsat-C 8D-FB-CV 50 m MF/HF... -
Page 18: Location Of Terminal Blocks Inside The Rack Console
2. WIRING Location of Terminal Blocks Inside the Rack Console The figure below shows the location of the terminal blocks inside the console. Terminal Block (TB1 - TB4) Terminal Block (TB1 - TB4) Terminal blocks (Top view) The locations for terminal blocks are shown in the figure below. TB1: For power cable TB2 - TB4: For signal cable Connection of Equipment Installed in the Con-... -
Page 19: Connection Of External Equipment
2. WIRING Connection of External Equipment Pass the cables of external equipment through the cable entrance at the bottom of the console. Connect the cable to terminal blocks TB1 to TB4, referring to this section and the interconnection diagram. Connect the cables of external equipment to the terminal blocks (TB1 to TB4) through the cable entrance at the bottom of the console. - Page 20 Before wiring an external radiotelephone, confirm that the BK DC- is not connected to RF ground, referring to the circuit diagram. The SSB radiotelephone may become damaged if the BK DC- is connected to RF ground. RC-1800T Receivers BK DC+ NOTE: BK control BK RELAY current Max.
- Page 21 2. WIRING AF LINE OUT Connection RC-1800T FS-1575 FS-2575 REMOTE No.1 AF LINE OUT (H) No.1 FAX AF LINE No.1 AF LINE OUT (C) – No.2 AF LINE OUT (H) No.2 FAX AF LINE No.2 AF LINE OUT (C) –...
-
Page 22: Fuse Box (Sb-180)
2. WIRING 2.4.4 Terminal block TB4 (For No.2 Inmarsat-C) Insert cores (Either entrance is available). 9 10 11 12 13 14 15 16 #1 to #5 IC-305/IC-306 Terminal Destination Signal line IC-305/IC-306 Vcc (ALM) TD/RD-A TD/RD-B Fuse Box (SB-180) The connection on SB-180 is as shown in the table below. Terminal no. -
Page 23: Charger Unit (Bc-6158-Ss/6200)
2. WIRING Charger Unit (BC-6158-SS/6200) According to the battery used, set the output voltage of the charger unit to 26.7 VDC (default setting, for a valve-regulated lead-acid battery) or 28 VDC. For a flooded lead- acid battery, change the output voltage from 26.7 VDC to 28 VDC. Battery Output voltage Valve-regulated lead-acid battery, maintenance free... - Page 24 2. WIRING 6. Remove the screw on the SW panel of the control panel to remove the SW panel and fixing plate, referring to the figure below. Removing the SW panel Removing the fixing plate Control Panel (Front view) Control Panel (Rear view) TEST TEST Remove...
-
Page 25: Power Supply Unit (Pr-300/Pr-850A)
2. WIRING Power Supply Unit (PR-300/PR-850A) Input voltage is available from 100/110//220 VAC (default voltage 220 V). Open the top cover of the power supply unit and change wiring on the power trans- former according to input voltage, referring to the figure below. Further change the la- bel on the front panel to show input voltage used. - Page 26 2. WIRING This page is intentionally left blank. 2-10...
-
Page 27: Checking Operation
CHECKING OPERATION Checking Operation of Equipment This section covers checking of the equipment for proper operation. Refer to the re- spective Installation Manuals shown below. A password is required to do the initial set- ting. Under no circumstances shall the operator do the initial setting. •... - Page 28 3. CHECKING OPERATION This page is intentionally left blank.
- Page 29 EX: TTYCYSLA - 4 MPYC - 4 TTYCSLA-4 # of cores Designation type Designation type # of twisted pairs The following reference table lists gives the measurements of JIS cables commonly used with Furuno products: Cable Core Cable Core Diameter Type...
- Page 32 13/A pr/2015 H . M A KI...
- Page 33 13/Apr/2015 H.MAKI 13/A pr/2015 H . M A KI...
- Page 35 11/Jan/2018 H.MAKI 11/Jan/2018 H.MAKI...
Need help?
Do you have a question about the RC-1800T and is the answer not in the manual?
Questions and answers