Advertisement
Quick Links
REFERENCE GUIDE: DUSSTDSP3
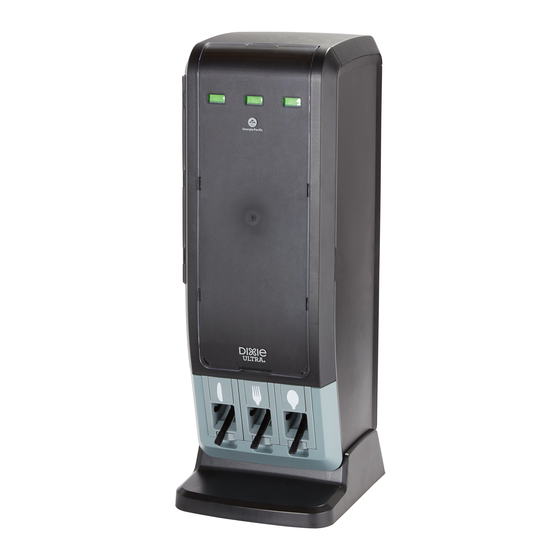
GP PRO Dixie Ultra™ SmartStock® Tri-Tower Cutlery Dispenser
1x
Registration/Warranty
registro/garantía
inscription/garantie
1x
Reference Guide
guía de referencia
guide de référence
12x
Utensil Indicators
llave de pulsador
clé à bouton-poussoir
Welcome | Bienvenidos | Bienvenue
This touchless cutlery dispenser has
advanced features that improve
dependability, enhance user experience,
make refilling more convenient, and helps to
reduce cutlery waste. The refill indicators
ensure that your dispenser is never out of
cutlery. Additionally, each of the internal
cutlery chambers can accept any of the
Series-T types of cutlery, allowing the user to
customize their dispenser to what is most
e ective for their restaurant.
For questions about this dispenser or for
replacement components, please call:
(1-866-435-5647).
Replacement Parts & Refills | Repuestos y recargas | Recharges et pièces de rechange
1-866-HELLOGP (1-866-435-5647)
Clear Window
Ventana transparente
Fenêtre transparente
#SSTWINDOW
12x Utensil Indicators
12x indicadores de utensilios
12x indicateurs d'ustensiles
#SSTBDG
Wall Mounting Bracket
Soporte de montaje en pared
Support de montage mural
#SSDSPWALLB
D-100384 REV B
1x
Wall Mounting Bracket
registro/garantía
inscription/garantie
3x
Cutlery Chamber
registro/garantía
inscription/garantie
Este dispensador de cubiertos sin contacto
tiene funciones avanzadas que mejoran la
confiabilidad y la experiencia del usuario, y
hacen más sencilla la recarga para reducir los
desechos de cubiertos. Los indicadores de
relleno aseguran que el dispensador nunca se
quede sin cubiertos. Además, cada una de las
cámaras de cubiertos internas puede aceptar
cualquiera de los tipos de cubiertos de la
Serie-T, permitiendo que el usuario
personalice el dispensador de la manera más
efectiva para su restaurante.
Para preguntas acerca de este dispensador o
de los componentes de reemplazo, llame al:
(1-866-435-5647).
www.gppro.com
Dispenser Door
Puerta del dispensador
Porte distributrice
#SSTDOOR
Cutlery Chamber
Cámara de cubiertos
Compartiment à couverts
#SSTCHASSIS
P1
Ce distributeur automatique de couverts
comporte des réglages avancés qui améliorent
la fiabilité et l'expérience de l'utilisateur, qui
facilitent la recharge et qui contribuent à
réduire les pertes. Les indicateurs de recharge
font en sorte que votre distributeur ne manque
jamais de couverts. De plus, chacun des
compartiments à couverts internes peut
accepter tous les types de couverts de la
Série-T, ce qui permet à l'utilisateur de
personnaliser son distributeur en fonction de
ce qui est le plus e cace pour son restaurant.
Pour toute question concernant ce distributeur
ou les pièces de rechange, veuillez composer le
(1 866 435-5647).
Polystyrene forks
Tenedores de poliestireno
Fourchettes en polystyrène
#DUSSF5
Polystyrene knives
Cuchillos de poliestireno
Couteaux en polystyrène
#DUSSK5
Polystyrene teaspoons
Cucharitas de poliestireno
Cuillères à thé en polystyrène
#DUSST5
Polystyrene soup spoons
Cucharas soperas de poliestireno
Cuillères à soupe en polystyrène
#DUSSS5
©2019 GP PRO. All rights reserved.
1x
Dispenser
dispensador
distributeur
Polypropylene forks
Tenedores de polipropileno
Fourchettes en polypropylène
#DUSSPF5
Polypropylene knives
Cuchillos de polipropileno
Couteaux en polypropylène
#DUSSPK5
Polypropylene teaspoons
Cucharitas de polipropileno
Cuillères à thé en polypropylène
#DUSSPT5
Polypropylene soup spoons
Cucharas soperas de polipropileno
Cuillères à soupe en polypropylène
#DUSSPS5
Advertisement

Related Manuals for Georgia Pacific GP PRO Dixie Ultra SmartStock DUSSTDSP3


Summary of Contents for Georgia Pacific GP PRO Dixie Ultra SmartStock DUSSTDSP3
- Page 1 REFERENCE GUIDE: DUSSTDSP3 GP PRO Dixie Ultra™ SmartStock® Tri-Tower Cutlery Dispenser Registration/Warranty Wall Mounting Bracket registro/garantía registro/garantía inscription/garantie inscription/garantie Reference Guide guía de referencia guide de référence Utensil Indicators Cutlery Chamber Dispenser llave de pulsador registro/garantía dispensador clé à bouton-poussoir inscription/garantie distributeur Welcome | Bienvenidos | Bienvenue...
- Page 2 Dispenser Setup | Configuración del dispensador | Préparation du distributeur Upon receiving the touchless cutlery dispenser, remove the retaining cords from the back of the dispenser by grabbing the handle and pulling the cord away from the dispenser. Después de recibir el dispensador de cubiertos sin contacto, quite los cordones de retención de la parte trasera del dispensador sujetando la manija y tirando del cordón en dirección opuesta al dispensador.
- Page 3 Loading Instructions | Instrucciones de carga | Instructions de chargement Press the button on right side of Grab handle on cutlery chamber Pull cutlery chamber firmly out into the dispenser and pull open. and pull outward. open position. Load one chamber at a time.
- Page 4 Priming the Dispenser | Cebado del dispensador | Préparation du distributeur After loading dispenser pull the prime lever to dispense first piece of cutlery. After first prime cutlery should automatically dispense between pulls. However, if cutlery does not automatically dispense pull lever to re-prime dispenser. Después de cargar el dispensador, tire de la palanca de cebado para dispensar el primer cubierto.
- Page 5 Stand & Cutlery Chamber Removal For Wall Mount Extracción de la base y de la cámara de cubiertos para el montaje en pared Retrait du support et du compartiment à couverts pour le montage mural Remove Cutlery Chambers Quite las cámaras de cubiertos Retrait des compartiments à couverts To wall mount the dispenser remove and Para montar el dispensador en la pared, quite Pour fixer le distributeur au mur, enlevez et...
- Page 6 Wall Installation | Instalación en pared | Installation murale Position unit on wall so that the top is level. Open front cover and mark screw locations where indicated with circles. If using a mounting bracket, mark locations of shaded areas shown, then skip to step 3. 9.60”...
- Page 7 Cutlery Chamber Reinstall | Reinstalación de la cámara de cubiertos | Remise en place des compartiments à couverts Align the bottom four (4) knobs with the openings in the rails pictured to the right. Push back and rotate the front of the cutlery chamber downwards.
Need help?
Do you have a question about the GP PRO Dixie Ultra SmartStock DUSSTDSP3 and is the answer not in the manual?
Questions and answers
The cutlery chamber will not pull out
The cutlery chamber may not pull out because it is not properly unlocked or disengaged from the dispenser. Ensure that all four knobs are aligned in the rails and push the chamber back until it clicks into place. If it does not release, check that it is not jammed or obstructed.
This answer is automatically generated