
Related Manuals for Avigilon ACC VMA-RPA-RGD-8P2


Summary of Contents for Avigilon ACC VMA-RPA-RGD-8P2
- Page 1 User Guide Avigilon ACC™ ES Rugged 8-Port Appliance VMA-RPA-RGD-8P2 and VMA-RPA-RGD-8P4...
- Page 2 (2) is responsible for your use of, or reliance on, the information. Avigilon Corporation shall not be responsible for any losses or damages (including consequential damages) caused by reliance on the information presented herein.
-
Page 3: Table Of Contents
Connect the Device to Cameras and ACC Client Users Assigning a PoE Power Budget Providing Device Logs for Support Installing the ACC Client Activate the ACC Software and Connect to Avigilon Cloud Services Activate ACC Software and Feature Licenses Connect to Avigilon Cloud Services Activating a License... - Page 4 Offline Activation Deactivating a License Reactivating a License Connecting to External Devices LED Indicators Budgeting PoE Power Manage Certificates Replace the Web Certificate Upload a Trusted CA Certificate Upgrade the Firmware Using the Software Reset Button Restoring Factory Default Settings Replacing the Storage SSD Troubleshooting Accessing the Server Management page from a Web Browser Cannot Discover the Device...
-
Page 5: Introduction
Introduction The Avigilon ACC ES Rugged 8-Port Appliance is an all-in-one solution for network video recording incorporating server side video analytics, ruggedly built for installation and use in harsh environments and remote locations. The appliance features: A PoE switch to connect and power IP cameras. -
Page 6: Package Contents
Important: For compliance to UL 62368-1, if the ACC ES Rugged 8-Port Appliance is powered by an external power adapter, it must be a UL Listed power adapter suitable for use at Tma is 70C whose output meets ES1 (or SELV) and is rated 9-32Vdc, 100W minimum. Please contact Avigilon for further information. -
Page 7: Overview
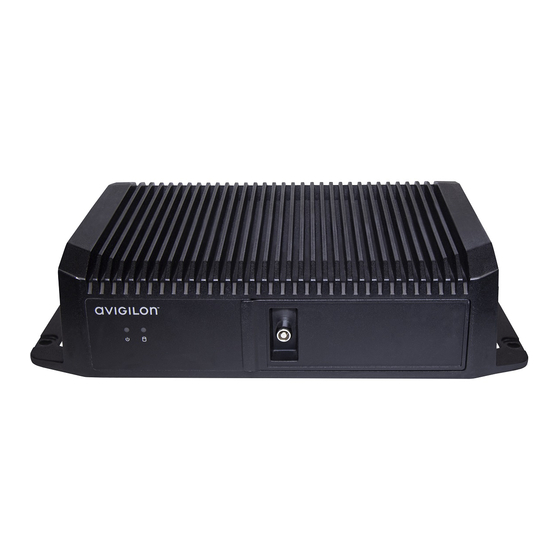
Overview Front View 1. Power LED Indicator 2. Disk Activity LED Indicator LED Indicators on page 33 3. Lock (locked position) The front panel is normally locked to protect and prevent access to internal components, as shown above. 4. Lock (unlocked position) Use the key to unlock the front panel and open it to access the internal components, as shown below. -
Page 8: Rear View
7. Reset button Use this button to physically restart the appliance. 8. USB 3.0 port Rear View 1. Power connector 2. Corporate network uplink port Accepts a 1GbE Ethernet connection to the general network to allow users access to the web interface and connected camera video. -
Page 9: System Requirements
System Requirements Camera Frame Rate The ACC ES Rugged 8-Port Appliance can provide analytics for non-analytics cameras. For optimal analytics performance, the source camera should stream a minimum of 10 images per second (ips). Web Browser Administrative settings for the appliance are managed through a web interface, accessed from any Windows, Mac or mobile device using any of the following web browsers: Mozilla Firefox browser version 3.6 or later Google Chrome browser 8.0 or later... -
Page 10: Supported Network Configurations
Supported Network Configurations Note: The Camera Uplink Port does not support dynamically switching DHCP servers. Network Supported IP Configurations Camera Web Connections Interface Notes Corporate LAN Camera LAN Access Uplink Uplink Corporate Static or DHCP Unconnected Camera LAN Uplink and LAN Uplink assigned (leave as DHCP) -
Page 11: Mounting An Acc Es Rugged 8-Port Appliance
Mounting an ACC ES Rugged 8-Port Appliance You can mount the ACC ES Rugged 8-Port Appliance to almost any flat surface capable of bearing its weight in any orientation, or to a DIN rail in any of four orientations. With the exception of mounting to a DIN rail using the provided mounting plate and DIN rail bracket and screws, you must provide screws and anchors, or nuts and bolts suitable for the surface on which you are mounting the appliance. - Page 12 1. Determine the position you want the DIN rail bracket attached to the mounting plate. 2. Align the DIN rail bracket to the pre-drilled threaded holes at the correct orientation on the mounting plate and attach using the 4 (four) flat-head screws provided in the plastic bag labeled DIN rail#1. The tabs on the back of the of the appliance fit into the slots on one side of the bracket only.
- Page 13 3. Mount the appliance on the mounting plate with the front and rear correctly oriented with the DIN rail bracket using the 4 (four) round-head screws provided in the plastic bag labeled DIN rail#2, as shown below. Indicates the slots on the rear of the appliance into which the tabs on the mounting plate fit. 4.
-
Page 14: Connecting An Acc Es Rugged 8-Port Appliance To A Power Supply
Connecting an ACC ES Rugged 8-Port Appliance to a Power Supply The ACC ES Rugged 8-Port Appliance can be powered by any suitable 9–32 volt DC 100W (min) power supply using the provided power cable. The provided power cable has a connector at one end that plugs into the power connector on the rear of the appliance, and three wires at the tail end labeled ACC (accessory), VCC, and GND. -
Page 15: Starting The Acc Es Rugged 8-Port Appliance For The First Time
Starting the ACC ES Rugged 8-Port Appliance for the First Time 1. Connect a port on the appliance to the local network with an Ethernet cable. 2. On a network workstation, discover the appliance. Use File Explorer on a Windows computer or Finder®... -
Page 16: Using Server Management
For more information on backing up the site and server configurations, see the Help files provided with the ACC Client software, or the Avigilon ACC Client User Guide available from the Avigilon website. -
Page 17: Viewing Poe Port Status
a. Open a web browser from a network workstation with network access to the device. b. Enter its IP address or hostname into the web browser to open the device sign-in page: https://<Device IP address >|<Device hostname>/ For example: https://169.254.100.100/ where 169.254.100.100 is the IP address configured in the Device panel. -
Page 18: Manage Acc Services
Manage ACC Services On the Server panel use the: General pane: To... Do this... Shut down all the services before you shut Click Stop. down the device. Start up all the services after they have been Click Start. shut down. Reset the ACC ES Rugged 8-Port Appliance Click Reset Format the storage drive. -
Page 19: Provide Server Logs And System Logs For Support
Typically, Avigilon Technical Support assists you to access and filter the logs on this panel to isolate the logs that they require. You then copy and paste the logs into a text file, save it and send it to Avigilon Technical Support. -
Page 20: Change The Acc Es Rugged 8-Port Appliance Administrator Password
To... On the Setting Device panel card... Hostname Replace the default server name with Change the Hostname. The default hostname is the same as the server a user-friendly hostname name. The server name is in the form <Model>- <Serial Number>. Time Set the time zone Specify the Time Zone and identify the time source... -
Page 21: Manage Time Settings
2. Select whether you want to keep synchronized time through a Network Time Protocol (NTP) server (recommended) in the NTP field. Tip: To synchronize time with ONVIF devices (that is, non-Avigilon cameras), you can connect to port 123 on the ACC ES Rugged 8-Port Appliance to use it as an NTP server. -
Page 22: Connect The Device To Cameras And Acc Client Users
in the pane in the Storage panel: To... Do this... View the On the Physical Disks panel, information about each physical disk, including its model and capacity and serial number is listed. status of the When the SSD is: SSD. Correctly working, Ready is displayed. -
Page 23: Assigning A Poe Power Budget
To... Do this... Set how the In each of the panes in the Network panel, toggle Automatic IP on to discover device obtains an connected networks automatically (the default setting), or off to manually specify the IP address for connections. Enter the appropriate values in the following fields if you are manually each network. -
Page 24: Providing Device Logs For Support
Typically, Avigilon Technical Support assists you to access and filter the logs on this panel to isolate the logs that they require. You then copy and paste the logs into a text file, save it and send it to Avigilon Technical Support. - Page 25 time. 3. Enter text in the Filter field to apply a filter to the log listings. 4. Click the Sync button to display the updated logs. Providing Device Logs for Support...
-
Page 26: Installing The Acc Client
Installing the ACC Client If you are installing the first Avigilon appliance in your security network, you can install the ACC Client software on a network workstation or on the computer you are using to access the Server Management page. Otherwise, add the appliance as a new site in your security network, or merge it into an existing site, using the ACC Client software on a network workstation. -
Page 27: Activate The Acc Software And Connect To Avigilon Cloud Services
You can start to back up the system settings for your new site in the ACC Client software after it is configured. These settings include the ACC password, and the settings for the camera connections. For more information on backing up the site and server configurations, see the Avigilon ACC Client User Guide. Activating a License Once your license is activated, you can immediately use the new licensed features. -
Page 28: Online Activation
Tip: Finish organizing your multi-server site before activating a new license to avoid reactivating the site license each time a new server is added. Online Activation If you have internet access, use online activation. However, if your site is large and contains hundreds of licenses, the server may time out. -
Page 29: Deactivating A License
Deactivating a License Note: A license can be deactivated a limited number of times. If you encounter an error while activating a previously deactivated license, this may be the issue. Contact Avigilon Technical Support for help. You can deactivate individual licenses and activate them on a different site. For example if you are upgrading your server hardware, you can deactivate the license on the older server then activate the same license on the new server. -
Page 30: Reactivating A License
3. Click Upload. A capabilityResponse.bin file should download automatically. If not, allow the download to occur when you are prompted. 4. Complete the product registration page to receive product updates from Avigilon. 5. Copy the .bin file to a computer running the ACC Client software. - Page 31 4. In the License Management dialog box, click Apply…. 5. Select the .bin file and click Open. 6. Click OK to confirm your changes. Reactivating a License...
-
Page 32: Connecting To External Devices
Connecting to External Devices External devices are connected to the ACC ES Rugged 8-Port Appliance using the digital I/O cable inserted into the digital I/O connector on the rear side of the appliance. Details for the 8 labeled input wires and the 8 labeled output wires is shown below. -
Page 33: Led Indicators
LED Indicators The following list describes what the LEDs on the ACC ES Rugged 8-Port Appliance indicate. Icons LED Status Description Front Status Device is powered LEDs and running Yellow Storage drive activity Back PoE Swich Left On: Port is delivering LEDs PoE power Off: Port is not delivering PoE power... -
Page 34: Budgeting Poe Power
Budgeting PoE Power The PoE switch component in the Avigilon ACC ES Rugged 8-Port Appliance can output a total of 64 W of power to the connected devices. Each PoE port is capable of outputting 16 W to standard PoE devices, and 30 W to PoE+ devices. -
Page 35: Manage Certificates
Trusted certificates are used by the device to authenticate other servers and clients to which it needs to connect, and to secure those connections. Avigilon provides a self-signed Web Certificate to secure the connection to Server Management and to the WebEndpoint service, and a set of system-level signed certificates from well-known trusted Certificate Authorities (CAs) to ensure secure connections to any needed servers. - Page 36 Important: When you reset the device to its factory settings (also known as a factory reset), you need to reload your custom certificate. Obtaining a new Web Certificate is a three-step process: 1. Send the certificate issuer used by your organization a Certificate Signing Request (CSR) and the issuer will return you a new certificate file and private key file (typically by email).
-
Page 37: Upload A Trusted Ca Certificate
4. On the Web Certificate tab, click on the name of the uploaded certificate to enable it. This also disables the previous certificate. Upload a Trusted CA Certificate Manage signed certificates from internal CAs deployed in your organization's internal servers from the User Certificate Authorities tab of the Certificates. -
Page 38: Upgrade The Firmware
Refer to the procedure for upgrading servers in a site in the Help files provided with Avigilon Cloud Services. You can use Remote Site Upgrade from an ACC Client connected to all of the ACC ES Rugged 8-Port Appliances in a site at the same time. - Page 39 Important: You can cancel a firmware upgrade that is in progress only during the upload and verification phase. Click Cancel upload before the file has uploaded. After the file is verified, the firmware upgrade automatically starts. The device will reboot several times during the upgrade.
-
Page 40: Using The Software Reset Button
Using the Software Reset Button If the ACC ES Rugged 8-Port Appliance encounters a system error, and you cannot disconnect it from the power source or power-cycle the appliance, use the reset button while the appliance is still powered on to restart it. - Page 41 3. Confirm that the appliance has fully restarted and recording has resumed: a. Access the Server Management page sign in page and log in. For more information, see Starting and Stopping Server Management on page 16. b. On the Storage panel of the web interface launch page, check that the Status is Using the Software Reset Button...
-
Page 42: Restoring Factory Default Settings
Restoring Factory Default Settings If the ACC Server software no longer functions as expected or if you've forgotten your administrator password, you can restore the ACC ES Rugged 8-Port Appliance to its factory default settings. A USB memory drive is required to complete the restoration process. Note: Restoring to the factory default settings will delete all configuration settings, including any custom certificate you have installed, and recorded video. - Page 43 9. If the appliance is part of a Site cluster or parent-child Site family configuration: a. Access the WebUI and reenter the correct IP address via its web UI. It is highly recommended to be in the same IP subnet as the other servers in the ACC Site. b.
-
Page 44: Replacing The Storage Ssd
Replacing the Storage SSD You can replace the storage SSD of the ACC ES Rugged 8-Port Appliance that has failed or is still functioning. It can be removed and replaced without powering down the appliance. It sits in a tray behind the locked front panel of the appliance. The tray slides in and out of the appliance. Important: The storage SSD must be replaced with an SSD of the same capacity (2TB for the VMA- RPA-8P2 model, or 4TB for the VMA-RPA-8P4 model. - Page 45 1. Deactivate all the licenses associated with the ACC ES Rugged 8-Port Appliance. For more information on deactivation of site licenses, see the ACC Help or the Avigilon ACC Client User Guide. 2. Initiate the Eject status for the SSD: Important: Before you can physically disconnect and remove the SSD from the appliance, you must initiate the Eject status on the Storage panel of the web interface launch page.
- Page 46 9. Reactivate all the licenses used on the ACC ES Rugged 8-Port Appliance. For more information on activation of site licenses, see the ACC Help or the Avigilon ACC Client User Guide. Important: If you cannot reactivate the licenses, contact Avigilon Technical Support at avigilon.com/contact.
-
Page 47: Troubleshooting
Troubleshooting Accessing the Server Management page from a Web Browser There may be cases where you want to access the Server Management page without using the ACC Client. You can access the Server Management page from any Windows®, Apple, or mobile device using most popular web browsers. -
Page 48: Network Configuration
You can monitor the health of the system components in the Site Health in the ACC Client software. See the Help files provided with the ACC Client software, or the Avigilon ACC Client User Guide available from the Avigilon website for more information. -
Page 49: For More Information
For More Information For additional product documentation and software and firmware upgrades, visit avigilon.com/support. Technical Support Contact Avigilon Technical Support at avigilon.com/contact. Limited Warranty Avigilon warranty terms for this product are provided at avigilon.com/warranty. For More Information...
Need help?
Do you have a question about the ACC VMA-RPA-RGD-8P2 and is the answer not in the manual?
Questions and answers