Table of Contents
Advertisement
Quick Links
Advertisement
Chapters
Table of Contents

Related Manuals for Philips VTR9800


Summary of Contents for Philips VTR9800
- Page 1 使用手册 User manual...
-
Page 3: Table Of Contents
目录 1 欢迎 1.1 产品功能 2 重要须知 2.1 特别声明 2.2 免责说明 2.3 注意事项 3 您的会务通 3.1 供货范围 3.2 概览 4 开始使用 4.1 主界面 4.2 网络配置 4.3 遥控器使用方法 5 功能介绍 5.1 文件管理 5.2 视频会议 5.3 商务翻译 5.4 扩音器 5.5 开始会议 5.6 会议录音 5.7 手机投屏... - Page 4 5.8 云文件 5.9 浏览器 5.10 应用商店 5.11 我的账号 5.12 我的设置 5.13 关于麦克风 6 常见问题 6.1 如何快速开启视频会议 6.2 如何在视频会议中讨论 PPT 或者 PDF 等文档内容 6.3 视频会议最多支持多少方参加以及对网络要求 6.4 视频会议的时候突然退出 6.5 在 PPT 演讲时如何进入全屏 6.6 进入扩音器功能没有反应以及如何更换背景 6.7 商务翻译中如何说话自动识别不同的语种 6.8 邮件分享发件人如何改成我自己的邮箱 7 技术参数 7.1 硬件 7.2 操作系统...
-
Page 5: 产品功能
1 欢迎 欢迎来到飞利浦世界!您能选择和购买飞利浦的产品,我们非常高兴。您可在我 们的官方网站上获得飞利浦公司的全方位技术支持,如:使用手册、软件下载、 保修信息等。 www.philips.com 1.1 产品功能 • 文件整理:根据会议情况可按照 PPT、PDF、WORD、EXCEL、音频、视频、图片 以及全部进行文件归档,点击对应文件可直接打开文件,支持外接投影仪和 大屏显示设备(同时支持 VGA 和 HDMI 接口)。 • 视频会议: ① 多方高清视频通话:噪声、回声抑制,混响消除,360°全向拾音,展现 1080P 高清画质,可支持多方同时在线。 ② 数据共享:通过共享桌面的方式将桌面显示内容进行实时共享,也可以 通过电子白板进行会议讨论。 ③ 交流互动:会议过程中可以通过对话框进行文字交流,也可以跟参会者 进行私聊等。 ④ 会议管理:主持人权限可以有效管理会议进程;包括指定视频窗口轮巡, 设置会议管理员,取消参会人员发言权,全场静音,踢出参会人员等。 • 商务翻译:支持实时面对面同声传译功能,支持 60 种语言;支持多种声音录 入方式,强大的语音识别能力,反应迅速,翻译准确。 • 扩音功能:高保真专业扬声器,对高音进行了防爆音处理,对低音进行了适 当的增强;完美平衡音质的同时,释放出超乎想象的声音。... -
Page 6: 重要须知
2 重要须知 2.1 特别声明 使用本产品之前请仔细阅读本产品说明书,注意将重要资料另外备份 , 如遇到数 据丢失,因人为操作或非不可抗力元素而导致机器损坏 , 本公司概不负责 , 特别 提醒。另外,说明书中提及到“会务通”即是本产品的名称。 2.2 免责说明 本使用手册没有任何形式的担保,立场表达或其他暗示。若有任何因本使用手册 或其所提到的产品的所有咨询,所引起直接或间接的数据流失、利益损失或事业 终止,本公司恕不为其担负任何责任。除此之外,本公司保留改进产品的权利, 产品规格及设计如有变更,恕不另行通知。本手册所列到的产品规格、图片及文 字说明仅供参考,以实际操作效果为准。本公司不负责本使用手册的任何错误或 疏失。 本产品应用界面中推荐使用的应用程序,本公司只是提供了服务链接,若使用者 选择下载使用,应按照提示操作,如需要有偿使用,请使用者自己决定是否继续 下载。 当下列两种情况发生时,本产品将不再受到本公司之保修及服务: (1)该产品曾经非本公司授权之维修、规格更改、零件替换、自行拆卸设备。 (2)产品序号模糊不清或丧失。 2.3 注意事项 • 本设备使用时,请将两边摄像头位置用清洁剂清洁干净。 • 使用端口连接外部设备时, 请注意插头方向, 如:TF 卡 (接触面朝上) 、 U 盘等。 避免将设备端口损坏。... - Page 7 • 在下列情况下请及时充电: 1. 设备电量过低而自动关机。 2. 设备出现低电量提示时请尽快给设备充电...
-
Page 8: 您的会务通
3 您的会务通 3.1 供货范围 3.2 概览... - Page 9 OTG 插座 遥控器2 麦克风插座 1 摄像头 麦克风插座 2 显示屏 TF 卡插座 1 TF 卡插座 2 音频输出插座 VGA 插座 HOST 插座 HDMI 插座 返回键 有线网络插座 电源键 电源插座 复位键 录音键 遥控器 1 ① 激光笔键 ④ 返回键 ② 话筒键 ⑤ 确认键 ③ 方向键 ⑥...
-
Page 10: 开始使用
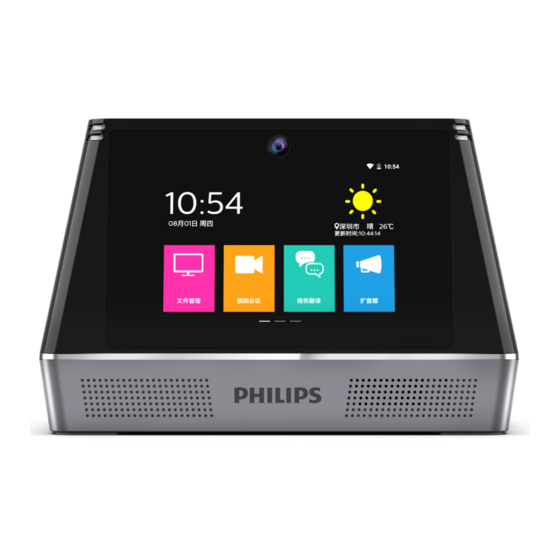
4 开始使用 4.1 主界面 4.1.1 产品开机 长按电源键,屏幕出现飞利浦盾牌标志则成功开机。 4.1.2 产品休眠 设备正常工作时,短按电源键马上进入休眠状态,设备无人为操作时间达到设置 的休眠时间时,也会进入休眠状态;设备处于休眠状态时,短按电源键即可激活。 4.1.3 产品关机 长按电源键将弹出对话框,点击“关机”,设备关机。也可以点击“重新启动” 把设备重启。 4.1.4 主界面 请点击对应按钮进行相应的操作,虚拟按钮可以从显示屏顶部或者右侧拉出,主 界面如以下两图所示: ① 返回键 ⑤ 音量减键 ② 主菜单键 ⑥ WIFI ③ 任务键 ⑦ 电量 ④ 音量加键 ⑧ 时间... -
Page 11: 网络配置
4.2 网络配置 会务通设备支持两种网络连接模式:无线网络(WLAN)或有线网络。 4.2.1 WLAN 配置 第一次使用会务通时,请点击页面主菜单“我的设置”图标进入下一页面,再点 击“WLAN”进入下一页面,选择网络并输入密码进行连接网络,网络连接好后顶 部状态栏会显示 图标。下次在同一个 WLAN 无线局域网下使用时将会自动连接。... -
Page 12: 遥控器使用方法
4.2.2 连接有线网络 将网线插到设备内置的有线网络插座内, 会务通顶部状态栏将显示 “ ” 标志, 表示联网成功。 4.3 遥控器使用方法 4.3.1 激光笔按键 在任何界面按下此键,将会有荧光射出,松开荧光熄灭。 4.3.2 话筒按键 在主界面,按住此键对着麦克风说话,可实现无线麦克风功能,并且显示屏会显 示 “麦克风” 图标和文字, 实现智能语音指令方式打开文件夹, 如说 “文件管理” 、 “视频会议、”、“商务翻译”、“音频”等即可打开对应的功能。 4.3.3 上、下、左、右按键 1. 在主菜单(主界面)时,按“>”键,选择前一个,按“<”键,选择后一个。 按“∧”键,音量增加,按“∨”键,音量减少。 2. 在文件管理中, 打开了指定类型的文件后, 按 “∧” 键, 选择上一个 / 上一页, 按“∨”键,选择下一个 / 下一页;按“>”键,音量增加,按“<”键,音量减少。 3. - Page 13 4.3.4 返回按键 在操作界面上,按一下返回上一级界面。 4.3.5 OK 按键 在操作界面上,按一下此键,确定选定内容。...
-
Page 14: 功能介绍
5 功能介绍 5.1 文件管理 会务通文件管理中文档按照 PPT、PDF、WORD、EXCEL、音频、视频、图片以及其 他进行归档,点击对应文件可直接打开文件。为了更好的显示文件内容,您可以 连接投影仪或大屏显示设备。 5.1.1 连接投影仪 会务通设备支持两种接口(VGA 和 HDMI)的视频输出,方便连接投影仪或大屏显 示设备。请连接到专用的接口处,如下图所示: 5.1.2 文件管理 PPT,PDF,WORD, EXCEL,音频,视频,图片,“全部”功能,分别列出本机或 USB 存储设备的相关类型文件,打开文件的同时,可以同时使用遥控器麦克风或 有线麦克风进行扩音演讲。如图所示:... -
Page 15: 视频会议
注意 1、USB 存储设备打开方法,点击主菜单“文件管理”,点击“全部”, 再点击 “USB” 即可打开。 在显示屏顶部往下拉, 在弹出的菜单上点击 “弹 出”即可关闭 USB 存储设备。 2、 当有 U 盘插入时, 正常识别到 U 盘后, 在屏幕左上角会显示 “ ” 图标, 将会检索 U 盘中所有对应格式的文件,若文件没有显示出来可以点击 屏幕刷新或者重新进入文件列表。 3、音频、视频、图片当没有外置 USB 插入时,只会查找本地储存固定目 录(音频、视频、图片)下格式的文件。 4、系统会对 U 盘中的所有文件进行分类,为了保证能快速完成,并方便 你更容易地找到所需文件,给您最好的体验感,请 U 盘里只存放开会 所需的文件。因为 U 盘里的文件数量太多,会导致系统加载文件的时 间较长甚至出错。... - Page 16 如下图所示: 账号绑定后返回上一个界面再点击: “添加联系人” 按钮, 进入 “添加好友” 对话框, 输入对方账号(会务通用户可以直接添加,手机端用户需要下载视频会议 APP 并 注册账号),然后选择需要参加视频会议的账号,再点击“开始会议”按钮即可。 5.2.3、会议设置:点击“会议设置”,进入会议设置界面。 如下图所示: 1)会议时免打扰:设置“按键”开启时,视频会议过程中将会自动拒绝新的邀请, “按键”默认为关闭。 2)会议后台悬浮小窗口显示:设置“按键”开启时,视频会议过程中,点击主 菜单键回到桌面时显示浮动视频小窗口,默认为关闭。 3)多人会议画面轮询显示:设置“按键”开启时,视频会议过程中,超过 4 人 以上参会人员时自动轮询显示右侧参会人员小窗口,“按键”默认为关闭。 4)声控自动切换摄像头:设置“按键”开启时,视频会议过程中镜头自动切换 到离使用者说话近的一端,“按键”打开后,手动切换前后镜头按钮消失,“按 键”关闭后方可使用手动切换前后镜头,“按键”默认为打开。 5.2.4、手机 APP 下载:请扫描二维码下载会务通视频会议 APP,如下图所示:...
- Page 17 5.2.5、视频会议支持两方和多方两种模式: 1)两方会议模式:在联系人界面,选择联系人,选择“√”,点击“开始会议” 进入一对一视频通话,请在联系人在线的状态下发起视频。如图中标记所示: 2) 多方会议模式:在“会议”界面,请选择“创建会议室”或者“加入会议室”。 (第一次使用需要根据提示设置视频会议时显示的名称)点击“创建会议室”, 会议室创建成功,可以邀请联系人加入本次会议;点击“加入会议室”,输入会 议发起方已创建的房间 ID 号,点击“完成”按钮,即可加入会议室;手机端用 户需下载 APP ,输入会议发起方已创建的房间 ID 号,点击“完成”按钮,即...
- Page 18 可加入会议室,如下图所示 : 5.2.6、会议室创建成功,效果图如上,当下显示 、 时,说明打开了媒体 声音和摄像头;如果下方显示 、 时,说明关闭了摄像头和媒体声音;点 击右侧视频窗口时,可以放大对应视频界面。点触显示屏,弹出对话框时,点击 左上方“照相”图标可切换显示画面,还可以点击“共享”、“参会人员”、“邀 请好友”进行操作。 5.2.7、会议结束,点击右上角的“离开”或返回键即可退出本次视频会议。 注意 1、会务通视频会议支持不限制时间的两方视频会议,以及限时 40 分 钟的多方视频会议(超时将自动退出,可重新发起会议),使用专 业账号,多方视频会议不限时长,申请升级专业账号,请联系当地 代理商,或拨打售后服务电话 400-800-7890。 2、 手机端 APP 登录的用户, 输入房间 ID 号, 直接加入会务通创建的会议, 也可以由会务通发起邀请加入会议。 3、主持人离开会议将解散当前会议。...
-
Page 19: 商务翻译
5.3 商务翻译 商务翻译支持面对面同声传译,支持 60 种语言实时翻译。具备三种使用模式: 1)系统自带的内置麦克风; 2)外接有线麦克风; 3)遥控器的内置麦克风。 用户可以选择需要识别与翻译的语种和拾音模式进行商务翻译,如下图所示: 5.3.1 使用系统自带的内置麦克风 在没有接入有线麦克风和没有使用遥控器麦克风时,使用本地麦克风拾音(在界 面右上打开本机麦克风拾音), 切换翻译的语种请手动点击屏幕下方语言栏。 5.3.2 使用有线麦克风 1) 请将有线麦克风插头插到会务通麦克风插座处。 2) 两个麦克风可同时使用, 可以分别设置一种语言, 当对话时会自动识别并翻译。 5.3.3 使用遥控器的内置麦克风 1)摇控器与会务通出厂时已经配对好,如用户更换新遥控器或者出错时需要重 新配对,在主菜单界面点击“我的设置”进入“遥控器配对”中进行对码, 详细对码方法请见 5.12“我的设置”中 5.12.2。 2)遥控器分为遥控器 1 和遥控器 2,可以分别设置一种语言,说话时自动识别 并翻译。说话前请按住遥控器上的话筒键,结束说话时松开话筒键。当选择 使用外接有线麦克风或遥控器的内置麦克风时,商务翻译界面会根据不同的 麦克风输入的声音进行自动识别。原文和译文的自动切换。... -
Page 20: 扩音器
如下图所示 : 注意 1、商务翻译有放音模式和静音模式,在放音模式下根据翻译的内容进 行语音播报,在静音模式下只在屏幕上显示翻译的内容。 2、在遥控器的麦克风模式下,例如:把识别的语种设置成中文, 翻 译的语种设置成英文,按住遥控器 1 的话筒键,对着它说中文,即 会自动切换到中文;同样,按住遥控器 2 的话筒键,对着它说英文, 即会自动切换到英文,无需点击屏幕进行操作。 5.4 扩音器 会务通有扩音器功能,在扩音器界面可以实现扩音同时显示文字。如下图所示: 5.4.1 设置背景 点击屏幕任意处,屏幕下面会弹出菜单,点击“设置背景”按钮进入到设置背景... - Page 21 界面。系统提供无背景添加(默认为白色背景)和自带主题背景以及用户自定义 背景(图片尺寸要求 1024x600 像素)。如下图所示: 5.4.2 智能识别助手 点击屏幕任意处,屏幕下面会弹出菜单,点击智能识别助手按钮以弹出框的形式 呈现。用户可以选择是否开启语音转文字功能并选择转写语种,同时,也可以选 择是否开启智能翻译功能并切换翻译识别语种,如下图所示: 5.4.3 历史文本 点击屏幕任意处,屏幕下面会弹出菜单,点击“历史文本”,用户可以对保存的 文本进行编辑、分享和删除操作。如下图所示:...
-
Page 22: 开始会议
注意 设备内置麦克风不支持扩音器功能!使用扩音器时必须使用有线麦克 风或遥控器麦克风。 5.5 开始会议 5.5.1 会议签到 点击“开始会议”图标,页面出现二维码图标,您可以通过手机微信扫描二维码 进行签到或者再点击“新增签到人员” 手动输入姓名和邮箱地址内容签到。会 议结束后将会议纪要和录音文件可以分享到参会人员的邮箱。 5.5.2 会议中 点击“进入会议”图标,再点击“确认”可以选择打开会议录音。会议过程中可 发起视频会议、音频会议、实时商务翻译以及文件整理。... - Page 23 当录音开启成功右上角会显示 图标,当录音未开启右上角会显示 图标。 点击“上一步会议签到”图标会返回到签到界面。 点击“下一步文案整理”图标,将会结束本次会议并进行文案整理,同时会将录 音关闭。 5.5.3 会议文案整理 1)请按如下步骤进行操作: 一、点击录音转文本; 二、点击确定; 三、进入录音转文本界面,开始转写,转写完成点击保存按钮。 四、返回到文案整理界面就会自动生成会议纪要文件。这时点击会议纪要可以查 看或编辑会议纪要文件内容,步骤图如下:...
- Page 24 2)当会议纪要处显示出文件大小和名称说明会议纪要生成成功,再点击“分享 给参会人员”图标,就可以保存到 U 盘或者进行邮件分享,保存 U 盘:把文件保 存到外置 U 盘;邮件分享:把文件通过邮件的形式发送给参会人员;云文件分享: 把文件上传到云盘,然后生成一个云文件二维码,其他人可以通过扫描二维码查 看或下载文件。如下图所示: 3)最后可以点击“退出会议”图标后再点击“确认”或者菜单返回键就可以退 出本次会议。...
-
Page 25: 会议录音
注意 如果本次会议未开开启录音,将无法生成会议纪要文档,同样无法分 享给参会成员,请不要关闭会议录音,为确保录音内容的完整性,请 不要重复开或关会议录音。 5.6 会议录音 会议录音具有录音、录音保存、录音转文本等功能。 5.6.1 录音 在主界面点击“会议录音”进入会议录音界面,如图所示: 1) 点击“开始录音”图标,当右上角出现录音标志时,设备开始录音。同时进 行文字转写。 2) 在录音过程中,点击“停止录音”图标,右上角的录音标志将会消失,当前... - Page 26 录音结束;录音文件自动保存,点击“录音文件”按钮,可以查询保存的录音文 件和已转写的文本。如图所示: 5.6.2 录音文件和转写文本结果 1)通过读取录音存储中所有音频文件,分别显示出文件名称、录音时间和转写 状态。 2)当录音文件显示已完成字样,说明该音频已经转写完成,同样也可以点击进 去查看或者重新转写文本。 3)点击“分享”或“删除”图标,分别可以批量分享或删除音频文件。如图所示: 5.6.3 已转写文本 点击对应某一行可以查看已转写文本内容和编辑内容,同样也可以分享和删除文 本。...
-
Page 27: 手机投屏
注意 1、 当出现录音标志时, 才说明已经开始录音, 这时才可以进行录音操作。 2、正在录音时,不能播放录音和编辑文本。 5.7 手机投屏 通过局域网的方式将手机屏幕内容投屏到产品上。首先在本产品的主界面“应用 商店”下载“乐播投屏”软件。在产品主界面点击“手机投屏”进入投屏界面, 点击屏幕上方的 “手机投屏” , 然后选择屏幕左侧的 “苹果手机” 或者 “安卓手机” 。 5.7.1 安卓手机投屏 1)将产品和手机都连接在同一个 WLAN 无线局域网下,将手机打开已经安装好的 “乐播投屏”APP,然后选择局域网投屏设备。如图所示: 2)选择需要投屏的设备,然后进入局域网投屏界面,将镜像的开关打开,就完 成了手机投屏。如图所示:... -
Page 28: 云文件
5.7.2 苹果手机投屏 1)将会务通和手机都连接在同一个 WLAN 无线局域网下。 2)连接成功后,从屏幕底部向上滑出控制中心,点击“屏幕镜像”按钮(如下 面左图标记所示),然后选择您的设备名称就可以发起投屏(如下面右图标记所 示)。 5.8 云文件 点击主界面“云文件”图标,打开云文件功能,云文件功能是实现会务通和手机 或电脑之间文件互传查看的功能。 5.8.1 分享文件 在会务通上面分享文件,就是把会务通上面的文件上传到云盘,上传到云盘的文 件都会拥有一个云盘链接,用户通过手机扫描会务通上云文件链接的二维码,或 者登陆网址即可以再用手机查看文件或下载文件。上传文件和查看文件步骤: 1)点击分享文件按钮,等待文件上传成功; 2)文件上传成功会打开文件分享界面;... - Page 29 3)用手机扫描二维码查看或下载文件(也可以在电脑浏览器输入网址和提取码 查看文件);如下图所示: 5.8.2 接收文件 接收文件就是用户通过手机扫描会务通上面的文件接收二维码。手机浏览器打开 文件上传网页,用户在手机网页上传文件,文件上传成功,会务通会显示用户上 传的文件。如图所示:...
-
Page 30: 浏览器
5.9 浏览器 点击主界面“浏览器”图标,进入谷歌浏览器,可直接搜索要查找的内容和信息。 5.10 应用商店 点击主界面“应用商店”图标,提供了一些适合本设备使用的应用,用户可以根 据需要自行点击下载后使用。 5.11 我的账号 点击主界面“我的设置”图标,然后点击账号进入我的账号界面,在“我的账 号”界面,可以查看账号的详细信息(账号、设备码、账号类型)。如图所示: 5.11.1 升级账号 升级专业账号,请联系代理商,或拨打售后服务电话 400-800-7890。升级专业 账号成功,可以查看账号详细信息(账号、设备码、账号类型、账号有效期、有 效天数)。如图所示:... -
Page 31: 我的设置
5.12 我的设置 我的设置可以配置帐户、WLAN、时间日期、显示、遥控器配对、应用、语言等设 置,如下图所示: 5.12.1 首次配置建议 第一次使用会务通,建议首先去设置 WLAN 网络或者直接接入有线网络,然后通 过手机号码或者邮箱完成账号注册。 5.12.2 遥控器配对 设置菜单界面,点击“遥控器配对”选项进入配对界面,可以查看遥控器是否配 对, 或者进行遥控器配对。 在遥控器已经配对的情况下, 下面的状态栏会显示 “已 连接”;没配对或者遥控器处于休眠状态下,状态栏显示“未连接”。 如下图所示: 遥控器配对方法: 1. 将遥控器从机器上取出,同时长按遥控器“返回”和“OK”按键,待指示灯... - Page 32 变成蓝色快闪状态松开,遥控器进入配对模式。 2. 点击界面的“遥控器 1”或“遥控器 2”,进行配对,会弹出配对状态框。 3. 配对成功后状态框自动消失,在“遥控器 1”或 “遥控器 2”下面的状态栏 会显示“已连接”,遥控器指示灯变成慢闪。 5.12.3 录音黑匣子 本机支持录音黑匣子功能:把 TF 卡(FAT32)插到录音黑匣子的 TF 卡插座 2 内, 当会务通设备正常开机后,录音黑匣子将自动进行循环录音,每 30 分钟自动保 存一个文件,当 TF 卡存储空间已满时,将替换最早的录音文件。 可以点击主菜单“我的设置”界面,再点击“录音黑匣子”,进入查询界面:1、 是否插卡,2、是否录音,3、剩余内存等状态信息。如图所示: 注意 1.TF 卡要格式化成 FAT32 的文件系统,TF 卡接触面朝下插入卡座,最 大支持 128G 的 TF 卡。 2. 录音黑匣子的 TF 卡内容本机不能直接播放,需要把 TF 卡取出后再 用设备播放。...
- Page 33 永不休眠。 5.12.6 应用 点击“应用”,在应用界面可以看到每个 UI 功能的操作使用情况,可查看流量 使用情况、存储功能等,如下图所示: 5.12.7 安全 为确保操作安全,管理员自行设置相关密码进行保护,每次启动屏幕需要输入 管理员密码方可启动会务通系统,如图所示: 5.12.8 检查更新 可查看每个软件的日期以及版本号;有更新的情况下可根据实际情况更新。 如图所示:...
- Page 34 5.12.9 恢复出厂设置 根据实际使用情况可以点击恢复出厂更新。 5.12.10 法律信息 可点击查看相关开源软件 / 开源概述 / 代码许可等相关信息。 5.12.11 关于会务通 可查看本机的系统信息版本号 / 内核版本 / 设备序列号等相关信息。如图所示 : 注意 会务通以标贴形式显示型号核准代码。...
-
Page 35: 关于麦克风
5.13 关于麦克风 5.13.1 麦克风声道 1、遥控器声道: 在遥控器配对界面查看 : 遥控器 1 是右声道 ; 遥控器 2 是左声道; 2、有线麦克风声道: 查看机器的 MIC 口标注 :MIC1 是右声道;MIC2 是左声道; 注意 商务翻译界面左侧是左声道录音,右侧是右声道录音。 5.13.2 麦克风拾音方式 麦克风拾音方式: 1、会务通支持三种拾音方式,本机麦克风、有线麦克风、遥控器麦克风; 2、三种拾音方式优先级:遥控器麦克风 > 有线麦克风 > 本机麦克风。 注意 无论在何种场景下,当遥控器麦克风和有线麦克风有接入在录音时,本 地麦克风是不可录音的,音频会从遥控器或有线麦克风录音;当有线麦 克风未接入或遥控器未录音时,本地麦克风才可以录音。... -
Page 36: 常见问题
6 常见问题 此处列举了常见问题的解答,可帮助解决会务通出现的简单问题。如果故障仍无 法排除,请咨询经销商或访问我们的官方网站:www.philips.com/support 6.1 如何快速开启视频会议 立即召集视频会议有两种方式 : 1)发起人建立会议室房间(在会务通 - 视频会议 - 创建会议室),然后将房间 号发给相关与会人员,大家输入相同的房间号即可加入会议; 2)发起人需要添加联系人(在会务通 - 视频会议 - 联系人 ),然后勾选要加入 会议的人员,点开始会议即可自动呼叫相关人员;参与会议的人员如果也使用会 务通可直接加入会议,手机端用户需要下载会务通手机 APP( 支持安卓和 IOS)。 6.2 如何在视频会议中讨论 PPT 或者 PDF 等文档内容 视频会议中,任何参会方均可随时发起共享文档或共享白板给其他参会方,所有 参会方可以看到与发起方屏幕相同的内容,包括 PPT,PDF,WORD,EXCEL,图片 等常见类型文档。所有参会方可以在文档上面标注提示,方便讨论。 6.3 视频会议最多支持多少方参加以及对网络要求 视频会议支持多方参加;视频会议采用的是行业领先的网络优化算法,两方视频 会议和多方视频会议,对您的网络环境要求并没有太大变化,不会因为参与方增 加而影响视频会议流畅度,为保证流畅画面和声音,网络带宽建议不低于 2Mbps 即可。... -
Page 37: 进入扩音器功能没有反应以及如何更换背景
PPT 演讲的时候,按下遥控器的 OK 键,即可让 PPT 自动进入全屏模式,遥控器 上下键控制翻页、配备光标笔功能,可以使用遥控器麦克风作为扩音器,左右键 可以调整音量。 6.6 进入扩音器功能没有反应以及如何更换背景 扩音器功能应用于一些特定的会议场景,扩音器功能需要外接有线麦克风,或者 使用遥控器麦克风(按住说话);扩音器界面的背景是可以更换的,您可以自定 义背景,图片尺寸是 1024x600 像素,请在图片中预留好动态文本显示框的位置, 通过 U 盘拷贝到设备里面,然后在扩音器界面 - 设置背景 - 点击 “+” 号, 选择对应的背景即可。 6.7 商务翻译中如何说话自动识别不同的语种 商务翻译默认语言为中文和英文,当您使用遥控器或者外接麦克风时,一个对应 中文,另外一个对应英文,自动识别语种并翻译。若使用本机麦克风拾音,则需 要手动点击屏幕切换识别语种。 6.8 邮件分享发件人如何改成我自己的邮箱 在使用邮件分享文件功能时, 发送邮件的发送人是会务通的默认发件人 (vtr9800_ Service@139.com),您可以将发件人修改成自己的邮箱。 修改方法: 方法 1、在设置 -- 账户 -- 设置发件人进入修改界面,修改完成点击保存; 方法... -
Page 38: 技术参数
7 技术参数 7.1 硬件 • 充电器:12V/2.5A • DDR:2G • Flash:16G • Wifi:2.4/5.0G 双频 WIFI, 支持 WIFI 802.11ac/b/n/g • 显示屏:7 寸(1024*600IPS)*2 • 摄像头:双 500 万工业级摄像头 • 喇叭:4Ω/5W*2 立体声 • 电池容量:5000mAh • USB:Type A *2(OTG/HOST),支持 U 盘、硬盘、键盘、鼠标 • TF 插座 *2 • 有线麦克风插座 *2 •... -
Page 39: 设备保修凭证注意事项
8. 设备保修凭证注意事项 1. 设备机身及包装盒表面贴有产品专有序列号标签。 2. 保修卡、序列号标签、发票是产品保修时的重要凭证。 3. 当设备需要保修时,用户需要出示上述证明。如果上述证明材料遭到破坏, 无法辨认或者人为撕毁,本公司将不予保修,只能提供有偿维修服务。 4. 并非所有的使用环境都适合本设备的使用,本公司仅对设备本身质量按照本 公司承诺的保修条款提供售后服务,但对由于使用本设备导致的数据资料损 失,或者其它相关责任, 本公司不予负责。 5. 设备保修期为一年。 6. 最终解释权归本公司所有。... -
Page 40: 非保修条例
9. 非保修条例 属于下列情况,不在保修服务范围之内。 1. 无有效发票。 2. 未按产品说明书的要求使用、维护、保管而造成的损坏。 3. 因水灾、火灾、雷击等不可抗力造成的损坏。 4. 保修卡上设备型号或编码与商品实物不符。 5. 非指定服务者拆修造成的损坏。 6. 设备在使用过程中正常的脱色、磨损和消耗不在保修范围内。... - Page 41 Content 1 Welcome 1.1 Product Functions 2 Important Notices 2.1 Special Announcement 2.2 Disclaimer 2.3 Precautions 3 Your Smart Meeting Recorder 3.1 Supply Scope 3.2 Overview 4 Start to Use 4.1 Main Page 4.2 Network Configuration 4.3 Usage of Remote controller 5 Introduction to Functions 5.1 File Management 5.2 Videoconference...
- Page 42 5.13 About Microphone 6 FAQ 6.1 How to quickly turn the video conference 6.2 How to discuss the contents of PPT or PDF files during video conference 77 6.3 Maximum participants in video conference and requirements on network 6.4 Sudden exit during multi-person video conference 6.5 How to enter the full-screen mode during PPT speech 6.6 No response in loudspeaker function and how to change the background 78 6.7 How to automatically identify different languages by speaking in commercial...
-
Page 43: Welcome
1 Welcome Welcome to the World of Philips! We feel delighted that you choose to buy from Philips. You can always visit our website to get all-inclusive technical support from Philips, including user manual, software download and information on warranty. - Page 44 • t can be outputted conveniently. • Phone projection: the mobile phone content is wirelessly projected to Smart Meeting Recorder for convenient and fast sharing of personal required content. • Entertainment function: The user can download film and TV programs and run third-party applications.
-
Page 45: Important Notices
2 Important Notices 2.1 Special Announcement Before using this product, please read the IFU carefully, and pay attention to backup the important materials separately. In case of any loss of data, or any damage to the machine due to human operation or non-force majeure elements, the Company is not responsible for that, which is a special warning. - Page 46 3 months to extend the service life of the internal lithium battery. • For the lithium battery inside, please do not leave the device near the heating equipment, and its storage temperature range is 0-40C. • A short circuit occurs easily to this device when wet, so do not place the device in the place where there is water or is damp.
-
Page 47: Your Smart Meeting Recorder
3 Your Smart Meeting Recorder 3.1 Supply Scope 3.2 Overview... - Page 48 OTG socket Remote controller 2 Microphone socket 1 Camera Microphone socket 2 Display screen TF card socket 1 TF card socket 2 Audio output socket VGA socket HOST socket HDMI socket Return button wired network socket power button Power socket Resetting button Recording button Remote controller 1...
-
Page 49: Start To Use
4 Start to Use 4.1 Main Page 4.1.1 Turn On Long press the power button, and then the shield logo of Philips will appear on screen, which means that the device is successfully turned on. 4.1.2 Dormant State When the device is normally working, short press the power button and then the de- vice will immediately get into the dormant state. - Page 50 ① Return button ⑤ Volume decrease button ② Main menu button ⑥ WIFI ③ Task button ⑦ batterey ④ Volume increase button ⑧ Time...
-
Page 51: Network Configuration
4.2 Network Configuration The Smart Meeting Recorder device supports two network connection modes: wire- less network (WLAN) or wired network. 4.2.1 WLAN Configuration When using the Smart Meeting Recorder for the first time, please click the icon “My Setting” on main menu to enter the next page, click “WLAN” to enter the network. After the network is connected, the icon “... - Page 52 4.3.2 Microphone Button In the main screen when click the microphone icon to speak to the microphone, the wireless microphone can be used, and the screen will show the "microphone" icon and text. Using the intelligent voice command to open the folders, such as "file man- agement", "video conference", "business translation", "audio", etc., the corresponding function can be opened.
-
Page 53: Introduction To Functions
5 Introduction to Functions 5.1 File Management In the file management function of Smart Meeting Recorder , the files will be archived by PPT, PDF, WORD, EXCEL, audio, video, picture and others. You can directly open a file by clicking the corresponding file icon. In order to better display the contents of file, you can connect a projector or large-screen display equipment. - Page 54 Note 1. The opening method of the USB flash device, click the “File management” on the main menu first and the “All”, then click the icon “USB” to open the USB memory device. Drop down from the top of the screen, and click the icon “pop-up”...
-
Page 55: Videoconference
5.2 Videoconference The videoconference function adopts the high-definition camera, echo cancellation and noise reduction. You can carry out video conversation anywhere anytime. 5.2.1 Click the icon “Videoconference” to enter the videoconference screen. 5.2.2 Adding a contact: If your current account has not been bound with Smart Meet- ing Recorder, please bind your account first: Click the “Contact”... - Page 56 2) Display in background small suspension window: When “Key” is set on, a small video suspension window will be displayed when you return to the desktop by clicking on the Main Menu key during the videoconference, and “Key” is off by default.
- Page 57 2) Multi-party mode: Select “Creating a Conference Room” or “Joining a Conference Room” on the “Conference” screen.(The name displayed during the videoconference should be set as prompted for the first use.) Click “Creating a Conference Room”, and the conference room is created successfully, when you invite contacts to join the conference;...
- Page 58 5.2.6 When a conference room is created successfully, its effect is as shown above. When appear below, this means that the media sound and camera have been turned on; if appear below, this means that the camera and media sound have been turned off; you can click the video window on the right to enlarge the corresponding video screen.
-
Page 59: Commercial Interpretation
5.3 Commercial Interpretation The business interpretation function supports face-to-face simultaneous interpretation and the real-time interpretation of 60 languages. There are three operation modes: 1) Via built-in microphone of device; 2) Via externally-connected wired microphone; 3) The Built-in microphone of remote controller; The user can freely select the language to be identified and interpreted and the voice pickup mode for commercial interpretation, as indicated in the figure below: 5.3.1 Use of Built-in Microphone of System... - Page 60 1)The remote controller has been matched with the Smart Meeting Recorder at the factory; if the user uses a new remote controller or the remote controller has an error, it has to be matched again. Click “My Settings” on the main menu screen to enter “Remote Controller Pairing”...
-
Page 61: Loudspeaker
Note 1.The commercial interpretation function has sound-playing mode and no-sound-playing mode. In the sound-playing mode, the interpreted contents will be played. In the no-sound-playing mode, the interpreted contents will only be displayed on screen. 2. In the input mode via microphone of remote controller, if you want to set the language to be identified as Chinese and set the language interpreted as English, please long-press the microphone button on remote controller 1 and speak Chinese towards the microphone, and... - Page 62 5.4.2 Smart Recognition Assistant Click any location on screen, and then a menu will pop up on bottom of screen. Click the smart recognition assistant button, and then the smart recognition assistant will pop up. The user can select whether to turn on the voice-to-text function, and can also select whether to turn on the smart interpretation function and change the lan- guage to be identified, as indicated in the figure below: 5.4.3 Historical Text...
-
Page 63: Start Of Conference
Note The built-in microphone of this device will not support the loudspeaker function! When using a loudspeaker, please use the wired microphone or microphone on remote controller. 5.5 Start of Conference 5.5.1 Check-in for Conference Click the icon “Start the conference”, and then the two-dimensional code icon will appear on the page. - Page 64 5.5.2 During Conference You can turn on the conference recording by clicking the icon “Next step for entering the conference” and then clicking “Confirmation”. During the conference, you can ini- tiate the video conference, telephone conference, real-time commercial interpretation and file sorting. After the recording is turned on successfully, the icon will be displayed on top right corner;...
- Page 65 2) When the size and name of file are displayed for conference minutes, this means that the conference minutes have been generated successfully. Then you can save it in USB disk or share it via e-mail by clicking the icon “Share it with participants”. Save it in USB disk: save the file in external USB disk;...
-
Page 66: Conference Recording
3) Finally, you can leave the current conference by clicking the icon “Exit the confer- ence” and then clicking “Confirmation” or return button. Note If no recording is turned on for current conference, the conference minutes file will not be generated and can’t be shared with participants. Please don’t turn off the conference recording . - Page 67 1) Click the icon “Start recording”, and when the recording sign appears on top right corner, the device will start the recording. 2)During recording, click the icon “stop recording”, and then the recording sign on top right corner will disappear and the current recording will stop and the recording file will be saved automatically.
-
Page 68: Screen Projection For Mobile Phone
1) Display the file name, recording time and conversion state respectively by reading all audio files in the recording memory. 2) When the word “completed” is displayed for a recording file, this means that such audio has been converted, and you can also click it to view or re-convert the text. 3) You can click the icon “Share”... - Page 69 The The mobile phone screen can be projected onto this product via a WLAN. First, download the HappyCast software from the “App Store” on the main screen, click “Mobile Phone Projection” on the main screen to enter the projection screen, and then select “Apple”...
-
Page 70: Cloud File
screen projection (as indicated by the mark in the right figure below). 5.8 Cloud File Click the icon “Cloud File” on the page to activate the cloud file function. The cloud file function is the function which can realize the transmission and view of files be- tween Smart Meeting Recorder and mobile phone or computer. -
Page 71: Browser
5.8.2 File Receiving To receive a file, the user scans the file receiving QR code on Smart Meeting Recorder via the mobile phone, opens the file uploading page on the mobile browser, and up- loads the file on this page. When the file is uploaded successfully, Smart Meeting Re- corder will display the uploaded file, as shown below: 5.9 Browser... -
Page 72: App Store
Click the icon “Browser” on the page to enter the Google browser. You can directly search the desired contents and information. 5.10 App Store “App Store” on the main screen offers some apps suitable for this product. The user may download and use apps as necessary. 5.11 My Account Click the icon “My Settings”... -
Page 73: My Setting
5.12 My Setting In “My Settings”, you can set the account number, WLAN, time/date, display, remote controller pairing, application, language, etc., as indicated in the figure below: 5.12.1 Advice for First Configuration When you use Smart Meeting Recorder for the first time, you’re advised to set the WLAN or enter the wired network directly, and then complete account registration using your mobile phone number or mail account. - Page 74 nected”, as indicated in the figure below: Matching method for remote controller: 1.Remove the remote controller from the device, Long press both the buttons “Return” and “OK” on remote controller, and release them when the indicator flashes quickly in blue. This means that the remote controller enters the matching mode. 2.Click “remote controller 1”...
- Page 75 Note 1.The TF card shall be formatted as FAT32 file system, TF card insert face down into the slot, and the TF card with the capacity up to 128G can be supported. 2.The TF card content of the recording black box cannot be played by this product directly, and the TF card should be removed first.
- Page 76 5.12.7 Safty In order to ensure the operational security, the administer shall set up the relevant password to protect the system. Whenever the screen is turned on, the Smart Meet- ing Recorder system will be activated only after such password is entered, as indicated in the figure below: 5.12.8 Updating Check You can view the date and version number of every software;...
- Page 77 5.12.9 Restore the Factory Setting In light of the actual situations of use, you can click “Restore the Factory Setting”. 5.12.10 Legal Information You can view the relevant information, such as open-source software/overview of open source/open code license. 5.12.11 About Smart Meeting Recorder As indicated in the figure below, you can view the relevant information of this device, such as version number/core version /serial number: Note...
-
Page 78: About Microphone
5.13 About Microphone 5.13.1 Microphone channel 1 . Remote control channel: View in the remote control pairing interface:Remote control 1 is the right channel;Re- mote control 2 is the left channel. 2.Wired microphone channel: View the MIC port label of the device:MIC 1 is the right channel;MIC 2 is the left channel. -
Page 79: Faq
This section has listed all the frequently asked questions to help you address the sim- ple issues during the use of Smart Meeting Recorder . If such issues persist, please consult our dealers or visit our official website: www.philips.com/support. 6.1 How to quickly turn the video conference There are two methods for immediately convening the video conference: 1) The initiator sets up the conference room (Smart Meeting Recorder—Videoconfer-... -
Page 80: Sudden Exit During Multi-Person Video Conference
2Mbps. 6.4 Sudden exit during multi-person video conference At present, the video conference function supports the two-party video conference without time limit and supports the multi-party video conference with the time limit of 40 minutes. These are services provided free of charge. Upon expiration of time limit, all participants will automatically leave the video conference. -
Page 81: How To Change The Sharing Sender To My Own Email Address
will correspond to Chinese, the other will correspond to English, and the language will be automatically identified and interpreted. (If you are not sure, please say several words, and make judgment on the basis of the language displayed). If you use the built- in microphone, you have to click the screen so as to change the language to be identi- fied. -
Page 82: Technical Parameters
7 Technical Parameters 7.1 Hardware • Charger: 12V/2.5A • DDR: 2G • Flash: 16G • Wifi: 2.4/5.0G dual-frequency WIFI, supporting WIFI 802.11ac/b/n/g • Display screen: 7 inch (1024*600IPS) *2 • Camera: double 5 million industrial camera • Loudspeaker: 4Ω/5W*2 stereo •... -
Page 83: Warrany
8.Warrany 1.There is a serial number label on the body and the package surface. 2.The warranty card, serial number label, and invoice are important documents for product warranty. 3.When the warranty is necessary, the user should present the above documents; if any of the above documents are destroyed and becomes illegible, we will offer no warranty.Our company shall not provide warranty, only provide paid maintenance services. -
Page 84: Non-Warranty
9.Non-warranty The following items are not covered by the warranty: 1.There is no valid invoice; 2.Any damage arising from failure to operate, maintain and keep the device according to the instruction manual; 3.Any damage arising from force majeure, such as a flood, fire or lightning; 4.Nonconformity of the device model or number on the warranty card with the real object 5.Any damage arising from disassembly or repair by a non-designated service provider;... - Page 86 VTR9800...
- Page 88 © 2019 Speech Processing Solutions GmbH. Register your product and get support at 版权所有文档版本 1.0, 2019/12/27 www.philips.com/welcome...
Need help?
Do you have a question about the VTR9800 and is the answer not in the manual?
Questions and answers