Advertisement
Available languages
Available languages
Quick Links
Advertisement

Related Manuals for Joy Sport Relax 2010


Summary of Contents for Joy Sport Relax 2010
- Page 1 HANDLEIDING Joy Sport Relax Model 2010...
-
Page 2: Geachte Klant
Mocht u nog vragen hebben dan helpen wij u graag verder. Garantie, Deze garantie geldt gedurende 12 maanden voor elke fabricagefout aan uw JOY SPORT product die door een JOY SPORT dealer werd verkocht. Wanneer u garantie claimt bied JOY SPORT de mogelijkheid om naar eigen goeddunken het defecte apparaat of het betreffende onderdeel te herstellen of te vervangen. - Page 3 1 Veiligheidsvoorschriften. Waarschuwing: De loopband dient te worden opgeklapt en vastgezet voor u de loopband verplaatst. Blijf van de vergrendeling tijdens het transport. Verplaats de machine nooit als deze niet is opgeklapt en gezekerd. Attentie: Lees deze voorschriften zorgvuldig en neem de volgende punten in acht. De loopband dient binnen te worden opgesteld en u dient te zorgen dat er geen vocht of ander materiaal in of op het apparaat komt.
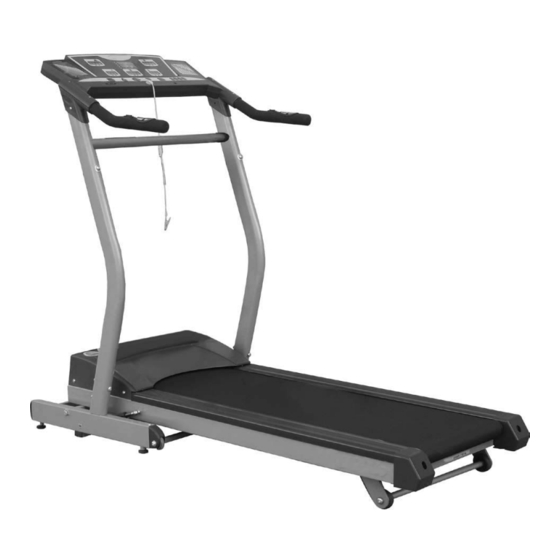
- Page 4 3 INTRODUCTIE Dit is een luxe loopband voor thuisgebruikers. Het beschikt over de volgende functies: 1. Drie manuele programma’s en vijf automatische variabele snelheidsprogramma’s. 2. Hartslagmeting op de handgrepen. 3.Vier knoppen voor directe snelheidsinstelling 4 Montage handleiding. 1. Verbind de stekker uit het hoofdframe met die uit de paal, zorg dat de verbinding goed zit.
- Page 5 5. Beschrijving en functies van het controlepaneel. 1 Stopknop Als de loopband werkt kunt u hem met deze knop stilzetten, terwijl alle gegevens behouden blijven. Tweede druk op de knop zet alle gegevens op nul. . 2 Start knop Als de band stilstaat kunnen we hiermee starten. 3 Setup knop Dient om de programma’s in te stellen.
- Page 6 6. Opstarten. 1 Na montage,plaats de veiligheidsstop en de hartslagsensor op de juiste plaats 2 Voor starten, controleer of de stroom geschikt is en of de band vrij loopt zonder bijgeluiden. 3 Schakel de stroom in en alle gegevens in de vensters zullen nul aangeven.
- Page 7 P1-P5 zijn automatische programma’s, sporters kunnen kiezen uit de door hen gewenste grafiek. Na drukken van de startknop zal de band beginnen te lopen afhankelijk van de gekozen vorm met een aanpassing elke tweehonderd meter. 4. Slow en fast knop Hiermee kan men manueel de snelheid verhogen en verlagen. De knoppen op de handsteunen hebben de zelfde functie 5 Pause en stop Indrukken als de band loopt zal deze stoppen en de ingegeven data zullen blijven bewaard.
- Page 8 9. Stellen loopband. Alle loopbanden zijn in de fabriek afgesteld maar kunnen na verloop van tijd of scheef lopen of losliggen. Dit kan meerdere oorzaken hebben.: (1) Het frame staat niet vlak. (2) De gebruiker loopt niet in het midden van de band. (3) De gebruiker loopt niet gelijk.
- Page 9 10. Stellen motorsnaar. Alle snaren zijn op de fabriek gespannen maar kunnen na verloop van tijd iets oprekken. De gebruiker kan deze zelf nastellen. handelwijze: Draai de motorbouten los. Draai de stelbout aan Controleer de spanning van de snaar Draai de motorbouten weer vast. Paklijst: benaming verpakking...
- Page 10 Storingsmelding en oplossing symptoom Mogelijke oorzaak oplossing 1. de stekker zit er niet goed in. 2 .de stekker in de 1. controleer stekker. 2. Als hoofdschakelaar wordt steun is niet goed controleer de stekkertjes in aangezet reageert scherm niet bevestigd of losgegaan. de steun.
- Page 11 USER MANUAL Joy Sport Relax Model 2010...
-
Page 12: Dear Customer
Dear customer, We want to thank you for having chosen a JOY SPORT product, and wish you a lot of fun and success during training with your JOY SPORT exercisers. Please note and follow the enclosed safety and assembly instructions carefully. - Page 13 SAFETY CONSIDERATION Special Warning:The treadmill must be folded and locked before moving or carrying it, don’t touch the safe lock when you carry the treadmill. Carrying machine is strictly prohibited as it is unfolded or unlocked. Attention: Please read this manual carefully before you use this treadmill and notice the follows: The treadmill should be put inside of room and avoid aquosity, water on the treadmill is prohibited and any object is forbiden to be put on or inserted into treadmill.
- Page 14 TECHNOLOGICAL DATA HORSE POWER:2.5HP PEAK 3HP Input Voltage:220V(50HZ or 60HZ) Speed scope:0.8--16(km/h) Distance scope:0000.000—9999.999(km) Time scope:00:00--99:59(min:sec) THE INTRODUCTION OF THE PRODUCT This a kind of luxury home use motorized treadmill. It possesses the functions asfollows: 1. With three kinds of manual programs and five kinds of automatic variable speed running programs.
-
Page 15: The Parts Name&Function Of Control Meter
4. Fix the covers of gage stand with bolts M4×12. THE PARTS NAME&FUNCTION OF CONTROL METER 1 When the treadmill is working, first press of this key will make the machine stop running, keep all the data; Second press of this key will make all the data become zero. -
Page 16: Debugging Guide
When the machine runs, press this key, the speed will become fast; in setup state, press this key, the amended data will increase. 7 Four kinds of speed direct choose keys: We can directly choose the speed that is suitable for us. 8 Window of calorie 9. - Page 17 OPERATING GUIDE 1. Switch on power: Insert three poles plug into socket (note: it must have a complete earthing); and insert safe key, then switch on power, the monitor will moo, and all data become zero, here the treadmill is in stop state. 2.
- Page 18 5 Pause and stop During treadmill runs, first press stop key, the treadmill will stop and keep all data, if here press start key, the treadmill will run as per original state; if press stop key in second time, all data in the windows will become to zero. 6 Handle pulse sensor Two hands hold the pulse sensor, pulse window display the instant pulse.
- Page 19 5. Adjust flab or tight belt All running belt are adjusted before the treadmill leaving the factory or after assembling, but after a period of time of use, the belt will become flab, for example: the user will have a feeling of stop when they are using it.
- Page 20 8. Adjust motor belt All motor belts are adjusted before the treadmill leaving the factory, but after a period of time of use, the belt will become flab, the users adjust it by oneself. Adjusting steps: Loosen the screw of the motor. Turn the adjustment screw in order with spanner.
- Page 21 Special Purpose Tools SUIT Specification Silicon Oil BOTTLE COMMON FAULT AND THE PROCESSING METHOD Fault Symptom Possible Causes Solution 1. The attaching plug is When turning on switch not inserted well. 2 .The power, the treadmill can not 1. Insert it again. 2. Connect electrical head’s attaching display when the electric it once more.
Need help?
Do you have a question about the Relax 2010 and is the answer not in the manual?
Questions and answers