Advertisement
Available languages
Available languages
Quick Links
Advertisement

Related Manuals for Joy Sport Marathon


Summary of Contents for Joy Sport Marathon
- Page 1 Joy Sport Marathon Handleiding ...
- Page 2 Geachte klant, Wij feliciteren u met de aankoop van dit JOY SPORT product. Tevens wensen wij u veel sportplezier toe met uw goede keuze. Volg aandachtig de montage handleiding. Mocht u nog vragen hebben, dan helpen wij u graag verder.
- Page 3 INHOUD ⅠVeiligheidsmaatregelen Ⅱ Installatie Ⅲ Bediening Ⅳ Dagelijks onderhoud Ⅴ Lijst van onderdelen in het pakket Ⅵ Probleemoplossing Technische gegevens: ● Snelheidsbereik: 0.5—16(km/h) ● Hellingsbereik: 0—10% ● Stroominvoer: 220V(50Hz/60Hz) ● Afstandsbereik: 00.0—99.9(km) ● Tijdsbereik: 00:00‐‐99:59(min:sec) ● Verbruik: 1800W ● Maximaal gebruikersgewicht: 175 kg ...
- Page 4 Ⅰ Veiligheidsmaatregelen Lees alle voorschriften en instructies in de handleiding voordat u de loopband gebruikt. De loopband moet opgevouwen en vastgezet worden voordat u deze verplaatst of optilt. Raak de veiligheidsbeveiliging niet aan als u de loopband optilt. Optillen en verplaatsen van de loopband is ten strengste verboden als hij uitgevouwen of niet vastgezet is. Om ongevallen te voorkomen, legt u de veiligheidssleutel na het trainen op een plaats waar kinderen hem niet kunnen vinden. Om ongevallen te voorkomen, raakt u de armsteunen niet aan met uw vingers met het opklappen en uitklappen van het loopvlak. Houd kinderen altijd uit de buurt van de loopband. Kinderen en huisdieren moeten minimaal 3 meter uit de buurt blijven. ...
- Page 5 De sensor van de hartslagmeter is geen medisch apparaat. Deze is vaak onnauwkeurig en is er alleen voor het meten van het resultaat. Patiënten met hart‐en vaatziekten mogen de loopband niet gebruiken als ze alleen zijn of ze moeten gebruik maken van de QuickSpeed functie. Selecteer de snelheid die past bij uw lichamelijke conditie. Een patiënt mag alleen gebruik maken van de loopband als ze hiervoor advies hebben gekregen van de dokter. Haal altijd de sleutel uit de loopband en de stekker uit het stopcontact als u geen gebruik maakt van de loopband. De loopband moet in een relatief grote ruimte geplaatst worden. Wees er zeker van dat er ongeveer een vrije ruimte is van 2 x 1 meter om de loopband heen. Kinderen mogen geen gebruik maken van de loopband als er geen volwassen persoon bij is. Bewaar de sleutel op een plek waar kinderen deze niet kunnen vinden, om te voorkomen dat zij de loopband gaan starten. Als er te veel gewicht op de loopband staat, zal deze beschadigd worden. Ga dus nooit over het maximale gebruikersgewicht heen. ...
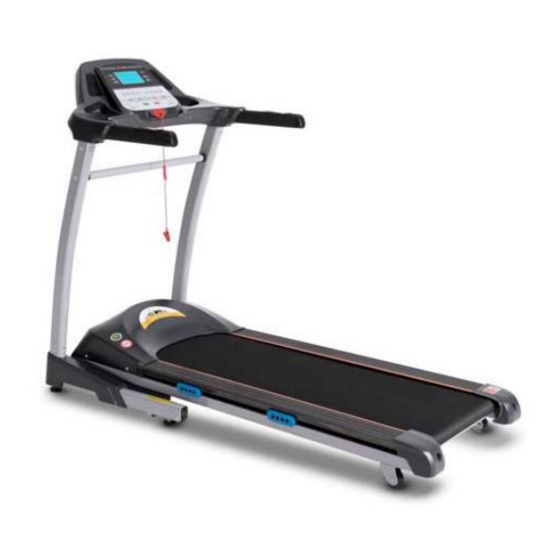
- Page 6 ⅡINSTALLATIE Joy Sport Marathon Nr. Omschrijving Aantal 1 Hoofdframe 1 2 1 Linker afdekkap 3 Linker staander 1 4 Computer 1 5 1 Handvat 6 Stang t.b.v. verbinding 1 linker‐ en rechterstaander 7 1 Rechter staander 8 Rechter afdekkap 1 9 Zijkant railing 2 10 1 Achterste eindkappen set 11 ...
- Page 7 1 Laat de zevenaderige stekker door de 2 Maak de 7 aderige stekkers vast rechter staander gaan en verbind de twee tussen de staanders en het display staanders aan het frame met bout M8×16. console. Maak daarna de linker en rechter afdekkap vast aan de goede staander. 3 Bevestig het console aan de staanders 4 Bevestig de stang tussen de staanders ...
- Page 8 Ⅲ Bediening (‐) Een overzicht van het display: Display & Bedieningsoverzicht ...
- Page 9 Gebruik loopband: 1、Voorbereiding voor bediening: display Bevestig loopband Zet de knop piept, en dan veiligheidsclip staat aan na het staan alle monteren. aan uw kleding. standby-modus. waarden op nul. 2 、Normale bedieningsmodus: Druk op de Pas snelheid aan Druk op stop-knop loopband...
- Page 10 6、Automatische snelheidsafwisseling modus: Druk op Druk 4-21 keer op de set-knop Druk op de De loopband stop-knop voor om snelheidsprogramma 4-18 startknop, de stopt te kiezen. snelheid verandert pause-stand, automatisch druk 2 keer voor iedere 200m. na 2km. standby-modus. Hartslagtest: ...
- Page 11 ⅣDagelijks onderhoud 1. Loopvlak en loopband ●Instructie: De gemotoriseerde loopband maakt gebruik van een lage coëfficiëntie wrijving en heeft een hogere spanningsintensiviteit. Het loopvlak is gemaakt van een speciaal anti shock systeem. Dit zorgt ook voor soepele en comfortabele bewegingen. ●Onderhoud: Het regelmatig schoonmaken van de loopband zorgt ervoor dat deze langer meegaat. Maak de loopband en het loopvlak overal schoon. Maak deze schoon met een vochtige doek, om ophoping van stof te voorkomen. Zorg ervoor dat er geen water onder de loopband en het loopvlak komt. 2. Smeren Het loopvlak moet na een bepaalde tijd van gebruik gesmeerd worden. De stappen zijn als volgt: (1) Draai de bouten die zich bevinden aan beide kanten los met behulp van een inbussleutel. (2) Smeer het smeermiddel gelijkmatig uit. (3) Stel de loopband in zijn oorspronkelijke stand in. (4) Laat de loopband voor enige tijd draaien in een lage snelheid, zodat het smeermiddel zich verdeelt. Suggesties: ‐ Als u de loopband minder dan 3 uur per week gebruikt, smeer dan één keer in de zes maanden. ‐ Als u de loopband 3 tot 6 uur per week gebruikt, smeer dan één keer in de drie maanden ‐ Als u de loopband meer dan 6 uur per week gebruikt, smeer dan elke maand. Onthoudt: Het goed smeren van de loopband is een belangrijke factor voor een langer gebruik van dezelfde loopband. 3. Schoonmaken Stof regelmatig weghalen na een bepaalde periode van gebruik, om het paneel en de ...
- Page 12 4. Evaluatie van de wrijving Als er meer stof in de loopband ophoopt zal hierdoor de wrijving toenemen. Het stof kan ook de motor kapot maken. Als u de loopband niet goed schoonmaakt kan het volgende gebeuren: (1) Als u de stroom uitschakelt, kan de band moeilijk rondgedraaid worden. (2) De motor kan beschadigd worden en de zekering kan door branden. 5. Aanpassing van de loopband Na een bepaalde periode van gebruik kan het voorkomen dat de loopband niet meer in het midden loopt. Dit kan de volgende oorzaken hebben: (1) Het motorframe is niet stabiel. (2) U rent niet in het midden tijdens het gebruik van de loopband. (3) De kracht in de voeten is niet gelijk. Als de loopband scheef is gaan zitten door uzelf, moet u de loopband een paar minuten laten lopen zonder erop te gaan staan. Als dit niet werkt , draai dan de stelbout een halve slag met behulp van een inbussleutel. Als de loopband dicht bij de linkerkant is, draai dan de linker bout met de klok mee of draai de rechter bout tegen de klok in. (zie afbeelding A) Als de loopband dicht bij de rechterkant is, draai dan de rechter bout met de klok mee en de linker bout tegen de klok in. (zie afbeelding B) 6. Aanpassing van de loopband Na een bepaalde periode van gebruik kan de loopband een beetje los komen te zitten en u het gevoel geven dat hij wil stoppen tijdens het gebruik. Wanneer dit gebeurt draait u beide bouten met de klok mee en maakt u beide zijdes gelijk door deze een halve slag te draaien. (Zie afbeelding C). Als de loopband te los zit, zullen de loopband en de roller slippen als u erop gaat staan. Als de loopband te strak zit kan dit schade veroorzaken aan de motor, band, roller enz. ...
- Page 13 7. Aanpassing van de motorband Na een bepaalde periode van gebruik kan de band wat los komen te zitten waardoor hij een beetje kan gaan slippen. Dit kan worden opgelost als u de volgende stappen volgt: De stappen 1. Draai de bout los van de motor. 2. Draai de stelbout met de spanner. 3. Draai hem vast totdat de band niet meer slipt. 4. Na het afstellen, draait u alle bouten vast. Ⅴ Lijst van onderdelen Omschrijving Aantal Hoofdframe Staanders Kapjes Display Veiligheidssleutel Montage Accessoires Siliconen Olie Stroomkoord Specificaties Tussenstang...
- Page 14 Ⅵ Probleemoplossing Problemen Mogelijke oorzaken Oplossing Er is geen display 1. De stroomdraad zit 1.Sluit opnieuw aan. wanneer de loopband niet goed aangesloten. 2. Verbind opnieuw. Vervang als de loopband 2. De stekker zit niet zekering. aanstaat. goed aangesloten. zekering beschadigd. Hij stopt uit zichzelf De automatische 1.
- Page 15 Geen display of De stekker maakt geen Zet de display functioneert goed contact. stroomschakelaar uit, niet goed. zet hem 1 minuut later weer aan. Door sommige redenen kan de technische indicator wat afwijken. Dit kunt u dus niet als criteria nemen om de status van uw gezondheid te beoordelen.
- Page 16 Joy Sport Marathon Owner’s Guide ...
- Page 17 Joy Sport Importer Fitness‐Import Timmermannsweg 46 5813 AP Ysselsteyn (LB) info@joysport.nl www.joysport.nl Dear customer, We want to thank you for having chosen a JOY SPORT product, and wish you a lot of fun and success during training with your JOY SPORT exercisers. Please note and follow the enclosed safety and assembly instructions carefully. If you have questions please do not hesitate to contact us. Guarantee, This guarantee covers all manufacturing and material flaws on JOY SPORT products purchased from an authorized JOY SPORT dealer for a period of 12 months from purchase. If you wish to make a claim under the guarantee, JOY SPORT shall be entitled to repair or replace the defective unit or part at its discretion. The owner of the unit must pay for the transport costs and any dealer's workshop costs. To make a claim under the guarantee, take your guarantee card to your dealer. The dealer will then take the necessary action. If this is not possible, contact your national JOY SPORT importer. The following are not covered by the guarantee : normal wear and tear and the consequences of improper treatment or damage caused by the purchaser or third persons and faults which are due to other circumstances. Claims may not be made under the guarantee if modifications have been made to the original construction or equipment or if JOY SPORT original parts were not used to repair the unit. In no event the manufacturer shall be liable for incidental or consequential losses, damages or expenses in connection with exercise products. Fitness‐Import ...
-
Page 18: Table Of Contents
CONTENTS ⅠSAFETY PRECAUTIONS ⅡINSTALLATION ⅢOPERATION ⅣDAILY MAINTENANCE ⅤLIST OF ITEMS IN THE PACKAGE ⅥTROUBLESHOOTING TECHNICAL DATA Speed range: 0.5—16(km/h) Incline range: 0—10% Input Voltage: 220V(50Hz/60Hz) Distance range: 00.0—99.9(km) Time range: 00:00‐‐99:59 (min:sec) Power: 1800W Biggest supporting value: 175kg ... -
Page 19: Ⅰsafety Precautions
Ⅰ SAFETY PRECAUTIONS FRIENDLY REMIND: Due to technology development, if there are changes, all interpretation rights shall belong to our company. Read all precautions and instructions in the manual before using the treadmill. The treadmill must be folded and locked before moving or lifting .Do not touch the safety lock when you lift the treadmill. Lifting and moving the treadmill is strictly prohibited when it is unfolded or unlocked. Lock method: To avoid accidentally injury, put the safety key to the place where children can not find after using the machine. To avoid accidentally injury, please do not touch the armrest with your fingers when opening and folding the main frame. Keep children away from the treadmill at all times. Children or pets should be kept 3 meters away. It is important for users over the age of 35 or with medical history to consult physician before beginning any exercise or using the treadmill. WARNINGS: Keep the treadmill indoors, away from moisture and dust. Do not put the treadmill in a garage or covered patio, or near the water. Place the treadmill on a level surface with eight feet of clearance behind it and two feet on each side. Ensure the power cord is plug into a grounded circuit. No other appliance should be on the same circuit. Wear appropriate sportswear and shoes while using the treadmill. Bare feet is forbidden while using. Do not use the machine by two or more persons. Never start the machine when you are standing on the running belt, always stand on the side rails and hold the handles before starting the machine. Use it after starting it normally. ... - Page 20 Select the speed according to your physical condition. Patient should use the treadmill under doctor’s advice. Always remove the key and unplug the power cord when not in use. The treadmill should be laid in the comparatively spacious place, forbid putting incidentals around, guarantee that there is the security area of 2m *1m. The children must not use the treadmill alone,if use,must be under the supervise of the adult. To avoid the children starting the machine by accidentlly,please pull out the power line and put it on the place where they can not find. Overloading will damage the treadmill.Never exceed the maximum user weight. Sensors covered in dust will affect the accuracy of the reading. Wipe off the dust with a dry cloth when needed. Static electricity will disturb the operation of the electricity table , even damage it ,so we must keep the room wet in winter. Never touch any moving part while using the treadmill. The runner must keep the body center of gravity on the forward 1/3 or 1/2 part of the running belt when running. If we do this, we will operate the electricity table easily. ...
-
Page 21: Ⅱinstallation
ⅡINSTALLATION Structure&List NO. DES UNIT Qty 1 Mainframe PC 1 2 Left Base Jacket PC ... - Page 22 1 Let the seven core line through the 2 Connect the seven core lines right poling, connect the polings and between the polings and the console. mainframe with bolt M8×16. Then, put the left and right jackets into the corresponding polings. 3 Join the console and the polings with 4 Link up the Poling transverse bracing panhead bolt M8×16. and the polings with panhead bolt ...
-
Page 23: Ⅲoperation
ⅢOPERATION (‐)The parts name of console: ... - Page 24 Debugging guide: 1、Preparation for operation: The meter has a Turn on the Keep safety key The machine in clip your moo, then all standby mode switch after display data is clothes installation zero 2 、Normal operation mode: Press start key, Press stop key in The machine djust speed...
- Page 25 5、Pulse control speed mode:(Corresponding normal mode light bright) Press three times Pulse control Press STOP key Press fast or slow Press START key to mode speed initial date pause,Press key set pulse start pulse control standby state is 100,speed is twice to stop 50-160 speed,0.5-10 4.8km/h ...
-
Page 26: Ⅳdaily Maintenance
Ⅳ DAILY MAINTENANCE 1. Running board and running belt ●Brief: The motorized treadmill use imported running belt, with lower coefficient friction,and higher tension intersity. The running board is specially made with doublevshock absorption system.Its special smoothness and perventive abrasion make the movement more comfortable and runs smoothly. ●Maintenance Maintaining the treadmill’s cleanliness will prolong its life.Clean the exposed running board on both sides of the running belt and foot belt. Reduce the accumulation of dust and trash under the running belt. Clean the running belt with a damp cloth if needed.Do not let water flow into the the treadmill and under the running belt. 2. Lubricating The running board/belt must be lubricated by special lubrication after a period of use. The methods and steps are as below: (1) Loosen the adjustable bolts on both sides with inner hexagon spanner to make the running belt loose. (2) Lubricate the sport zone of the running board evenly. (3) Adjust the running belt to its original setting. (4) Let the treadmill run for some time in low speed after adjusting the running belts. ... - Page 27 Suggestion: If use less than 3 hours every week,lubricate once every six months; If use from 3 to 6 hours every week,lubricate once every three months; If use more than 6 hours every week,lubricate once every month. Please remember: reasonable lubricating is an important factor for extending treadmill’s life! 3. Clean Dusts regularly after a period of use, to keep the power panel and the head of the sensor clean. 4. Evaluation of friction The friction between the running belt and the board will increase as dust dust collects or lubrication reduces.It may also break the motor.Increased friction is with the following characters: (1) When power is turned off, the belt can’t be moved or it’s difficult for user to move by foot. (2) Motor controller will be damaged and the fuse blows. 5.Adjusting the running belt After a period of using, the belt will be off‐centered.This may be caused by the following reasons: (1) The motor frame is not steady. (2) The user is not running in the center of the running belt when using. (3) The force on the feet is not even. If the running belt is skewed by the user, run the treadmill without stepping on the belt for a few minutes.If this does not work, adjust the running belt regulator with the inner hexagon spanner, by turning it half circle once. If the running belt is near the left side, adjust the left bolt clockwise or adjust the right bolt counter clockwise. (Look at picture A) If the running belt is near the right side, adjust the right bolt clockwise or adjust the left bolt counter clockwise.(Look at picture B). ...
- Page 28 6.Adjusting the running belt After a period of using, the running belt may become loose and give us some feeling of stopping when we are running. When this happens, adjust the running belt’s bolts clockwise and make the two sides equal by turning half a turn.(Look at picture C). If the running belt is too loose, skidding will happen between the belt and the roller when is stepped on. If the belt is too tight, it may damage the motor, belt and roller, and so on. 7. Adjusting the motor belt After a period of using, the belt will loosen and skidding occurs.This can be solved by following these steps: ...
-
Page 29: Ⅴlist Of Items In The Package
The adjustment steps: 1. Loosen the bolt of the motor. 2. Turn the adjustable bolt with spanner. 3. Adjust until the belt doesn’t slip. 4. After adjusting ,lock all bolts. ⅤLIST OF ITEM IN THE PACKAGE: NO DESCRIPTION UNIT QUANTITY 1 Mainframe SET 1 2 Polings SUIT 1 3 Base Jacket SUIT 1 4 Console PC 1 5 Safety Switch PC 1 6 Assemble Accessories SUIT 1 7 Silicon Oil ... - Page 30 The running belt runs Check whether the Adjusts the running belt normal by itself but running belt is too loose. accordingly. disoriented when setpped on. No display or display not The plug head not working Turn off the power switch, functioning properly. because of external then turn it on in one disturbance . minute Because of some reasons, the technical parameter may has a little difference. So we can not take it as criterion to measure our state of health, all the data is just as a reference. Cut off the power immediately and call our customer service if you need further assistance. We will provide you the best service in time. ...
Need help?
Do you have a question about the Marathon and is the answer not in the manual?
Questions and answers