Table of Contents
Advertisement
Quick Links
GD-36
DIGITAL RECORDER AND PLAYER
OF MESSAGES AND BGM
FAULT
MUSIC MESSAGE
ON
MADE IN
SPAIN
SD CARD
EQUIPOS Y SISTEMAS MEGAFONÍA / INTERCOM
Tel.: +34 934 772 854 / +34 609 914 787
REC
MIC
USB
0 dB
OUTPUT
L
R
10 IN
BACKGROUND
REMOTE
MUSIC
CONTROLS
GD-36
10 OUT
IP
REMOTE
CONTROL
CONTROLS
ude@udeaudio.com
OUTPUT TL
INPUT TL
10
9
8
7
6
5
4
3
2
1
10
9
8
7
6
5
¡CAUTION! DISCONNECT FROM POWER SUPPLY BEFORE OPENING
MARKETING
SOLUTIONS
ANNOUNCEMENTS
REG
OPTIONS
PUBLIC ADDRESS SYSTEMS
BARCELONA - SPAIN
GD-36
OK
FAULT
POWER
24 VDC
FUS DC
4
3
2
1
F 1A
¡ATENCION! DESCONECTAR LA RED ANTES DE ABRIR
SCHEDULED
2 EN54
MESSAGES
MP3
230 VAC
PLAYER
POWER SUPPLY
MENU
230 VAC
50/60 Hz
OFF
FUS
ON
T 0,5A
1
28
1
610.396C
rev.
Advertisement
Table of Contents

Related Manuals for Ude GD-36


Summary of Contents for Ude GD-36
- Page 1 GD-36 DIGITAL RECORDER AND PLAYER OF MESSAGES AND BGM MENU FAULT MUSIC MESSAGE GD-36 MADE IN 0 dB 230 VAC OUTPUT FAULT POWER SPAIN OUTPUT TL INPUT TL 24 VDC 50/60 Hz FUS DC F 1A SD CARD T 0,5A ¡CAUTION! DISCONNECT FROM POWER SUPPLY BEFORE OPENING...
-
Page 2: Table Of Contents
GD-36 SUMMARY PAGE DESCRIPTION FRONT AND BACK VIEWS TECHNICAL SPECIFICATIONS BASIC OPERATIONS 4.1.- Digital audio storage 4.2.- Screen information 4.3.- Keyboard 4.4.- Operating indicator lights (LED) 4.5.- Turn ON / OFF the unit BASIC SETUP 5.1.- Message list 5.2.- Music list 5.3.-... -
Page 3: Description
GD-36 1.- DESCRIPTION The GD-36 is suitable for commercial and for security sound uses in rooms with large crowds, which requires the diffusion of automatic reminders (ads), emergency, evacuation, and so on, due to the basic features detailed below: The GD-36 digital recorder can digitally record and play an unlimited number of ads, the limitation is the size of external memory available. -
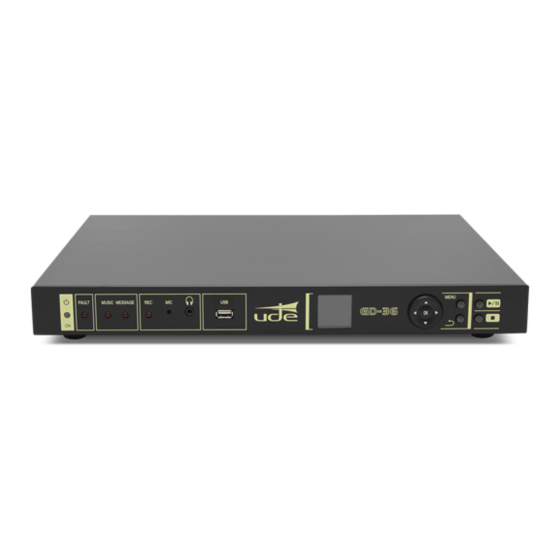
Page 4: Front And Back Views
GD-36 2.- FRONT AND BACK VIEWS MENU FAULT MUSIC MESSAGE GD-36 12 14 1. STANDBY / ON indicator lamp. 8. USB receptacle. 2. FAULT indicator lamp. 9. LCD screen. 3. MUSIC indicator lamp. 10. NAVIGATOR. 4. MESSAGE indicator lamp. 11. MENU button. -
Page 5: Technical Specifications
• USB 2.0 A-Type (BGM): Front panell. Media support • SDHC Card (High Capacity): 4GB o upper, FAT32 formatted. GD-36 not compatible with microSDHC type cards, or even using a size adaptor. • USB Flash Memory: 2.0 type, FAT32 formatted. Remote LAN Connection Ethernet type, RJ-45 connector (8 pins) •... -
Page 6: Basic Operations
GD-36 required for a proper operation that the audio directories containt at least a correct file, ie a “.mp3” track on the “MUSIC” folder, a “.wav” file on the “VOICE” folder and a “.wav” file on the “SOUND” folder. -
Page 7: Screen Information
GD-36 4.2. Screen information. The basic screen we find in the GD-36 is detailed below. 12:03:55 PLAYING MUSIQUE 1.- Clock / Calendar. 5.- Playing Mode. 2.- Logo. 6.- Playing Time. 3.- Status line. 7.- Percentage progress. 4.- Track or Message title. -
Page 8: Keyboard
GD-36 4.3. Keyboard. To manage the behavior of the device, it features a navigator keypad comprising 4 arrow keys (up, down, left and right) plus a validation key (OK), and additionally to use the basic functions, have been provided to the GD -36 of 4 shortcut keys (MENU, BACK, PLAY / PAUSE, STOP), all in the front panel. -
Page 9: Message List
GD-36 5.1. Message list. At any time the user can select one of the existing messages in the SDCARD and activate it. These include the TM output is closed for the duration of any message, to indicate message priority issue and manage external public address (PA) system. -
Page 10: Program List
GD-36 5.3. Program List. At any time the user can select one of the 100 programs in the SDCARD and activate it. This feature allows you to verify any program created independently of the condition of predetermined schedule, but also lets you run programs that have not been linked to calendar events, and can provide voice output with preset remote control outputs. -
Page 11: Adjustments
GD-36 5.5. Adjustments. The user can select some basic adjustments, as Sound (Volume) or Screen (Contrast). Adjustments 5.5.1. Contrast Adjustment. The user must select the contrast of the LCD screen to improve readability of the Contrast characters depending on the ambient lighting on the work environment. To adjust Volume the contrast should follow the following sequence. -
Page 12: Advanced Setup
GD-36 6. ADVANCED SETUP. To access the advance settings you must enter a Level 1 access PASSWORD from the "MAIN MENU". Service menu Enter Password 1. Press " " to select the input data line. **** Wrong password 2. Press "OK" to activate the input password mode. -
Page 13: Supervised Messages
GD-36 6.2. Supervised Messages. It is possible to select up to 2 messages to be constantly monitored to detect degradation and alert the security system by activating the FAULT signal, opening the FAULT contact in the rear panel. The monitoring function works continuously in the background after activation. -
Page 14: Ethernet Setup (Remote Access)
GD-36 4.4.1. Ethernet Setup (Remote Access). The GD-36 can be connected to the local network (LAN) using two kinds of cables, depending of the device which you link it, viz. 1. RJ-45 or "Patch Cable". It's used when the GD-36 is connected to a router/switch/hub or to a DSL modem/router, already installed and that are working as Gateways. -
Page 15: Local Network Setup (Ip Mode)
In complex systems, the network administrator can force to use a specific IP address, landline calls, for each of the teams that want to connect to it. In this case, the GD-36 should be set in "MANUAL". You should also use the "manual" mode, when you want GD-36 connect directly to a computer using a crossover cable or "CrossOver Type"... -
Page 16: Recording Messages
GD-36 6.4.2. Recording Messages. The GD-36 can record messages using the integrated microphone on the front panel. The recording menu is included on the "Service Menu". To access it press "OK" over the "Rec" option. The filename is create automatically every time the REC utility is called. The used auto format match with the "YYMMDDXX.wav"... -
Page 17: Clock And Date Setup
GD-36 6.4.3. Clock and Date Setup. The clock/calendar must be adjusted on some occasions, eg, after changing the lithium battery that power it, or when during the initial installation, and keeps on time when mains and secondary power supplies fail. -
Page 18: Remote Input Messages Setup
GD-36 6.4.5. Setup of Remote Input Messages 1. Press " " to select the Activation Mode. Remote In 1/2 2. Press "OK" to enter in edit mode. Remote In 3. The "[Close Contact]" will appear indicating the Activation Mode option can be changed using the "... -
Page 19: Calendar Events Setup
6.4.6. Calendar Events Setup. GD-36 supports management of up to 100 different programs, based on events related to the calendar. For each program it is possible to control auxiliary outputs will be activated during playback, when it automatically switched to the message and the repeat cadence in fractions of 5 minutes. -
Page 20: Webserver
To access the WEBSERVER, simply open your computer's web browser and enter http://gd36 or the IP address associated with your GD-36 device (which by default is http://192.168.0.200 ) in the address bar of your computer. After a few seconds, the "HOME"... -
Page 21: System Status
In addition, qualified personnel will be required to perform some tasks: - It is recommended to contract a Fixed IP service with your Internet provider, to ensure that the GD-36 is always available at the same EXTERNAL IP address. - Page 22 The music playback is always continuous, although the song selection can be set to random "RANDOM" or sequential "NORMAL". It is possible to switch between the two playback modes by pressing the "RAMDOM" button on the GD-36 player. To select the next song, simply press the "NEXT" button. To select a song from those available, press "DOWN" or "UP" in the "MUSIC LIST"...
-
Page 23: System Network
7.- OUTPUTS By simulated LED indicators, it indicates the status of the 10 output remote controls and the general remote control of the GD-36 "TLM". The illuminated LED indicates active remote control, the LED off indicates remote control in standby. -
Page 24: System Time/Date
"SETUP" drop-down panel. There are other time change options that depend on the country where the GD-36 is installed. If this is your case, select "AUTO OTHERS" in the drop-down menu and fill in the different sections for the date and time designation in which the changes are to be made. -
Page 25: Calendar Events
GD-36. 7.3.5 LANGUAGE Allows you to select the language displayed on the GD-36 screen. It has three options, English, French and Spanish. It is essential, once the desired language parameters have been updated, to press the "SAVE LANGUAGE" button to update the internal data of the GD-36. - Page 26 Remember that after modifying parameters that have an associated "SAVE CHANGES" button, this button must be clicked to make the changes effective in the GD-36. 7.4.2 DAILY With this programming mode, the selected audio message will be broadcast every day in the time slot starting at "START TIME"...
-
Page 27: Remote Events
(in multiples of 5 minutes) must also be activated by modifying "REPEAT PERIOD". If the message repetition period is not set in "REPEAT PERIOD", the programme will not be broadcast. 7.5 REMOTE EVENTS This screen is used to configure common parameters for all the remote control inputs of the GD-36 (IN1 to IN10 and INH). 610.396A... -
Page 28: Change Password
"NEW PASSWORD" box (4 numeric digits), repeat the new password in the "REPEAT NEW PASSWORD" box. Do not forget to press "SAVE PASSWORD" to make the changes effective in the GD-36. NOTE: Remember that the default password is 1234. -
Page 29: Restore To Default
This option is selectable as described in section 6.4.4. To activate or deactivate this function, simply select the desired option from the drop-down menu under "INHIBITION INPUT". Do not forget to press "SAVE" to make the changes effective in the GD-36. 610.396A rev. -
Page 30: Ftpserver
During the update configuration process you will be asked for the IP address of the server or HOST, i.e. the GD-36. This address when working in AUTO mode (DHCP) is \GD36 or \GD36, or in MANUAL mode 192.168.0.200 (or the one that appears in the configuration). - Page 31 It is not allowed to upload files with a name longer than 8 characters excluding the 4 characters of the extension (.mp3, .wav or .bin). It should be noted that in the case of MP3 files, the GD-36 will use the ID3 data and will display the name of the song in an extended size on the screen of the equipment.
Need help?
Do you have a question about the GD-36 and is the answer not in the manual?
Questions and answers