Table of Contents
Advertisement
Quick Links
Advertisement
Table of Contents

Related Manuals for Ada TOPLINER 3-360


Summary of Contents for Ada TOPLINER 3-360
- Page 1 OPERATING MANUAL TOPLINER 3-360 GREEN Line Laser adainstruments.com...
- Page 2 English Ceiling Cross Horizontal Line Cross Down Cross...
-
Page 3: Specifications
SET WITHOUT GIVING PRIOR WARNING. APPLICATION Line laser ADA TOPLINER 3-360 GREEN is designed to check the horizontal and vertical position of the surfaces of the elements of building structures and also to transfer the angle of inclination of the structural part to similar parts during construction and installation works. -
Page 4: Button Panel
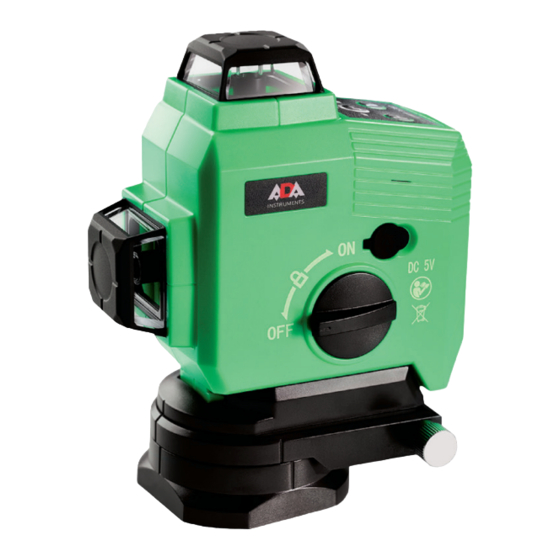
English FEATURES 1. Keypad 2. Jack for charger 3. Battery compartment 4. Rotating base 5. Lock switch (ON/X/OFF) 6. Vertical laser window 7. Horizontal laser window BUTTON PANEL 1. Tilt LED. Indicator lights up in the intermediate position of the compensator lock. -
Page 5: Lock Switch
English MOUNTING THREAD It is possible to place the instrument on the tripod or wall mount during operation. For attachement use thread 1/4” at the bottom part of the instrument or thread 5/8” at the bootom part of the rotating base. LOCK SWITCH Lock switch has tree positions: 1. -
Page 6: Detector Mode
English DETECTOR MODE Use the detector mode in bright light when laser beam is not visible. Press button to switch on the dector mode. Upper LED flashes. Place the detector to the the place of beam location. Follow the instruction of detector usage when searching the beam. -
Page 7: To Check Plumb
English TO CHECK THE ACCURACY OF LINE LASER (SLOPE OF PLANE) Place the line laser on the tripod 5m away from the wall so the horizontal laser line will be directed to the wall. Switch on the power. The instrument starts to self-level. -
Page 8: Laser Classification
English • After line laser has been dropped or hit. Please check the accuracy; • Large fluctuation of temperature: if instrument will beused in cold areas after it has been stored in warm areas (or the other way round) please wait some minutes before carrying out measurements. -
Page 9: Warranty
English • Do not remove warning labels or safety instructions. • Keep instrument away from children. • Do not use instrument in explosive environment. WARRANTY This product is warranted by the manufacturer to the original purchaser to be free from defects in material and workmanship under normal use for a period of two (2) years from the date of purchase. - Page 10 WARRANTY DOESN’T EXTEND TO FOLLOWING CASES: 1. If the standard or serial product number will be changed, erased, re- moved or wil be unreadable. 2. Periodic maintenance, repair or changing parts as a result of their nor- mal runout. All adaptations and modifications with the purpose of improvement and expansion of normal sphere of product application, mentioned in the service instruction, without tentative written agreement of the expert pro- vider.
-
Page 11: Warranty Card
WARRANTY CARD Name and model of the product __________________________________________ Serial number___________________________Date of sale______________________ Name of commercial organization ________________________________________ stamp of commercial organization Warranty period for the instrument explotation is 24 months after the date of original retail purchase. During this warranty period the owner of the product has the right for free repair of his instrument in case of manufacturing defects. - Page 12 ADA International Group Ltd., No.6 Building, Hanjiang West Road #128, Changzhou New District, Jiangsu, China Made In China adainstruments.com...
Need help?
Do you have a question about the TOPLINER 3-360 and is the answer not in the manual?
Questions and answers