Table of Contents
Advertisement
Quick Links
SAFETY PRECAUTIONS
CAUTION: TO REDUCE THE RISK OF ELECTRIC SHOCK, DO NOT
REMOVE COVER (OR BACK). NO USER-SERVICEABLE PARTS
INSIDE.
REFER
PERSONNEL. (This Caution Marking with Rating Label is located at the
bottom and rear enclosure of the unit.)
FCC WARNING: This equipment may generate or use radio frequency
energy. Changes or modifications to this equipment may cause harmful
interference unless the modifications are expressly approved in the
instruction manual. The user could lose the authority to operate this
equipment if an unauthorized change or modification is made.
iPod is a trademark of Apple Computer, Inc., registered in the U.S. and
other countries.
All manuals and user guides at all-guides.com
CAUTION
RISK OF ELECTRIC SHOCK
DO NOT OPEN
SERVICING
DANGEROUS VOLTAGE:
The lightning flash with arrowhead symbol within an
equilateral triangle is intended to alert the user to the
presence of uninsulated dangerous voltage within the
product's enclosure that may be of sufficient magnitude to
constitute a risk of electric shock to persons.
ATTENTION:
The exclamation point within an equilateral triangle is
intended to alert the user to the presence of important
operating and maintenance (servicing) instructions in the
literature accompanying the appliance.
DANGER:
Invisible and hazardous laser radiation when open and
interlock failed or defeated. Avoid direct exposure
to beam.
1
TO
QUALIFIED
SERVICE
Advertisement
Table of Contents

Related Manuals for Memorex Mi1200


Summary of Contents for Memorex Mi1200
- Page 1 SAFETY PRECAUTIONS All manuals and user guides at all-guides.com CAUTION RISK OF ELECTRIC SHOCK DO NOT OPEN CAUTION: TO REDUCE THE RISK OF ELECTRIC SHOCK, DO NOT REMOVE COVER (OR BACK). NO USER-SERVICEABLE PARTS INSIDE. REFER SERVICING QUALIFIED SERVICE PERSONNEL. (This Caution Marking with Rating Label is located at the bottom and rear enclosure of the unit.) DANGEROUS VOLTAGE: The lightning flash with arrowhead symbol within an...
-
Page 2: Safety Precautions
SAFETY PRECAUTIONS All manuals and user guides at all-guides.com INFORMATION This equipment has been tested and found to comply with the limits for a Class B digital device, pursuant to Part 15 of the FCC Rules. These limits are designed to provide reasonable protection against harmful interference in a residential installation. - Page 3 All manuals and user guides at all-guides.com Dear Customer: Selecting fine audio equipment such as the unit you’ve just purchased is only the start of your musical enjoyment. Now it’s time to consider how you can maximize the fun and excitement your equipment offers.
-
Page 4: Important Safety Instruction
IMPORTANT SAFETY INSTRUCTION All manuals and user guides at all-guides.com Before using the unit, be sure to read all openings must not be blocked or covered. operating instructions carefully. Please note The openings should never be blocked by that these are general precautions and may placing the product on a bed, sofa, rug or not pertain to your unit. - Page 5 IMPORTANT SAFETY INSTRUCTION All manuals and user guides at all-guides.com keep from touching such power lines or that have the same characteristics as the circuits as contact with them might be fatal. original part. Unauthorized substitutions may 15. OVERLOADING result in fire, electric shock, or other hazards. Do not overload wall outlets and extension 20.
-
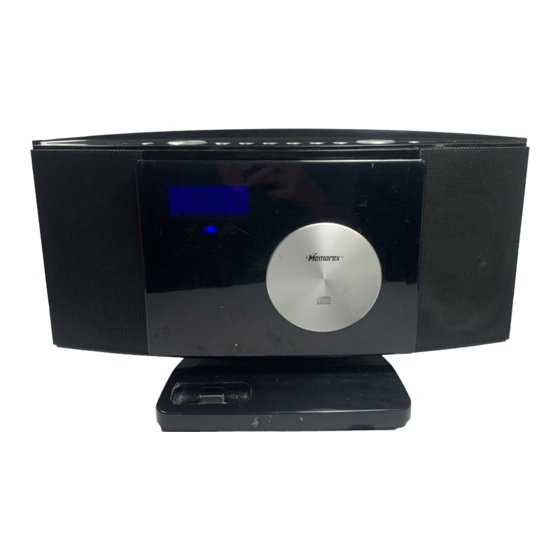
Page 6: Location Of Controls
LOCATION OF CONTROLS All manuals and user guides at all-guides.com FRONT/TOP 1. REPEAT/Mem Down 14. STOP/BAND ( ) Button Button 15. Tune/Skip/Search o/n 2. VOLUME Up/Down Buttons Buttons 3. STANDBY/Power button 16. CD OPEN/CLOSE Button 4. Headphones Jack 17. PLAY/PAUSE (®p)/Mem 5. - Page 7 LOCATION OF CONTROLS (CONTINUED) All manuals and user guides at all-guides.com REAR 1. Carrying Handle 2. AUX OUT Jack 3. AUX IN Jack 4. FM Wire Antenna 5. AC Cord 6. Battery Compartment (Bottom of Unit) (PART NO. GMT207-100010)* *Consumer Replaceable Part (See page 33 to order.)
- Page 8 LOCATION OF CONTROLS (CONTINUED) All manuals and user guides at all-guides.com 1. MUTE Button REMOTE 2. STANDBY/Power Button 3. MENU/Prog/Memory/ Clock Set Button 4. DISPLAY Button 5. Tune/Skip/Search o Button 6. SHUFFLE Button 7. TIMER Button 8. SLEEP Button 9. ALBUM Up/Down Buttons 10.
-
Page 9: Power Source
POWER SOURCE All manuals and user guides at all-guides.com AC CONNECTION Unwind the AC cord and extend it to its full length. Insert the AC plug into any convenient 120V 60Hz household outlet. Please note that this unit is equipped with a AC Outlet polarized AC plug which has one blade wider than the other. -
Page 10: Remote Battery Installation
POWER SOURCE (CONTINUED) All manuals and user guides at all-guides.com REMOTE BATTERY INSTALLATION Remove the Battery Compartment by pressing in on the tab and then sliding the compartment out. Install a CR2025 battery, by popping it in through the back of the compartment, paying attention to the polarity diagram in the compartment (positive side up). -
Page 11: Optional Connections
OPTIONAL CONNECTIONS All manuals and user guides at all-guides.com AUX IN JACK (REAR OF UNIT) Insert one end of the audio cable (not included) into the LINE OUT jack on your external audio unit and the other end into the AUX IN jack on the rear of this unit. -
Page 12: Operation
OPERATION All manuals and user guides at all-guides.com TO SET OR RESET THE ACTUAL TIME With the power off, press and hold Press the Tune/Skip/Search o 1 the Clock Set/Memory button until or Up n 2 button to set the unit to “12”... -
Page 13: Muting The Sound
OPERATION (CONTINUED) All manuals and user guides at all-guides.com ADJUSTING THE VOLUME AND EQ (Equalizer) To adjust the EQ (Equalizer): To adjust the main volume: Press the EQ button to cycle Press the VOLUME Up 1 and/or through the following options: Down 2 button to increase and/or ROCK, CLASSIC, JAZZ, POP or decrease the volume. -
Page 14: Inserting An Ipod
OPERATION (CONTINUED) All manuals and user guides at all-guides.com INSERTING AN iPod Locate the correct iPod dock to Insert the iPod (A) onto the use as shown on pages 28-29. connector (as shown). Gently Insert the dock (A) into the iPod push down so the connector on compartment (as shown), making iPod... - Page 15 OPERATION (CONTINUED) All manuals and user guides at all-guides.com USING AN iPod WITH THIS UNIT If this unit is not already on, turn You can operate the iPod using this unit on by pressing the its own controls, as per its owner’s manual, or you can use STANDBY/Power button 1.
-
Page 16: Repeat Playback
OPERATION (CONTINUED) All manuals and user guides at all-guides.com REPEAT PLAYBACK With an iPod inserted, press the When the Repeat mode is REPEAT/Mem Down button to selected, press the PLAY/PAUSE cycle through the following iPod (®p)/Mem Up button. Repeat modes: Repeat One (will NOTE: To stop Repeat playback, playback the current track press the STOP/Band(X) button. - Page 17 OPERATION (CONTINUED) All manuals and user guides at all-guides.com ALBUM AND PLAYLIST While playing back an iPod, use PLAYLIST: Press the PLAYLIST ALBUM PLAYLIST Up 1 or Down 2 button to select Up/Down buttons as follows a desired playlist; the iPod will go to the next or previous Playlist.
-
Page 18: Using The Radio
OPERATION (CONTINUED) All manuals and user guides at all-guides.com USING THE RADIO Turn this unit on by pressing the Repeatedly press the STOP/ STANDBY/Power button BAND (X) button to select AM or Repeatedly press the FUNCTION FM mode; “AM” or “FM” will appear in the display. - Page 19 OPERATION (CONTINUED) All manuals and user guides at all-guides.com SETTING THE RADIO PRESETS (10 for each band) Follow Steps 1-3 on the previous Press the Tune/Skip/Search o 1 page to tune a station. Press and or n 2 button to select a desired hold the Clock Set/Memory Preset (1-10).
- Page 20 OPERATION (CONTINUED) All manuals and user guides at all-guides.com USING A CD WITH THIS UNIT Turn this unit on by pressing the Press the OPEN/CLOSE button and gently press a CD onto the center STANDBY/Power button 1; the spindle with the label side facing display’s backlight will light blue.
- Page 21 OPERATION (CONTINUED) All manuals and user guides at all-guides.com TO PAUSE A CD During playback, press the PLAY/ PAUSE (®p)/Mem Up button to pause playback, and press yet again to resume playback. DISC PLAYBACK NOTES: • See the page 13 for how to adjust the volume and set the EQ. •...
- Page 22 OPERATION (CONTINUED) All manuals and user guides at all-guides.com FORWARD/REVERSE SKIP/SEARCH To skip forward or backward on To search forward or backward the disc: on the disc: Press and hold the Tune/Skip/ Press the Tune/Skip/Search o 1 Search o 1 or n 2 button to or n 2 button to skip to the search within the currently-playing beginning of the current/previous,...
- Page 23 OPERATION (CONTINUED) All manuals and user guides at all-guides.com RANDOM PLAYBACK randomly play To stop Random playback, press tracks/files on the disc, while in the STOP/Band (X) button 1. To the Stop mode, press the just cancel Random playback, SHUFFLE button on the remote; press the SHUFFLE button 2 Random playback will begin until “RAND”...
- Page 24 OPERATION (CONTINUED) All manuals and user guides at all-guides.com TO PROGRAM THE MEMORY (UP TO 20 TRACKS) Programming is the ability to preselect the order in which a series of tracks will be played. While in the Stop mode, press the Select a track to be programmed Clock Set/Memory...
-
Page 25: Programmed Repeat
OPERATION (CONTINUED) All manuals and user guides at all-guides.com NOTES ON PROGRAM PLAYBACK: • You can review the program by pressing the Memory/Clock Set button repeatedly while in the Stop mode. • To add a track to the program memory, while in the Stop mode, simply press the Memory/Clock Set button repeatedly until the first empty Program number appears in the display. -
Page 26: To Set The Timer
OPERATION (CONTINUED) All manuals and user guides at all-guides.com TO SET THE TIMER With the unit off, press the TIMER Within a few seconds, press the Tune/Skip/Search o 1 or n 2 button; the Timer On time will button to set the TIMER ON hour. appear in the display. - Page 27 OPERATION (CONTINUED) All manuals and user guides at all-guides.com SLEEP With the unit on, press the SLEEP button on the remote; the SLEEP indicator and "90" will appear in the display for approx. five seconds which indicates the unit will turn off after 90 minutes. Repeatedly press the SLEEP button to select the SLEEP time, 90-10 minutes (i.e., "80"–turns off automatically after 80 minutes, "70"–turns off automatically after 70 minutes, etc.).
- Page 28 OPERATION (CONTINUED) All manuals and user guides at all-guides.com iPod DOCKS Locate your iPod in the chart on the next two pages and select the respective Dock (the Dock No. is engraved at the back of the Docks as shown on the next page) to match with your iPod.
- Page 29 OPERATION (CONTINUED) All manuals and user guides at all-guides.com iPod Type Memory Univ. Dock No. Third 4GB & No. 13 Generation (Part No. iPod GMT207- nano 1000008*) 8GB, No. 14 iPod Touch (Part No. 16GB & GMT207- 32GB 1000009*) NOTES: The seven holders provided with this unit are not Universal Docks.
-
Page 30: Troubleshooting Guide
TROUBLESHOOTING GUIDE All manuals and user guides at all-guides.com If you experience a problem with this unit, check the chart below before calling for service. SYMPTOM CAUSE SOLUTION No sound. Volume is Increase volume. set to minimum. AM or FM, no sound. Power is not on or Turn the unit on, then press AM or FM mode is not... - Page 31 TROUBLESHOOTING GUIDE (CONTINUED) All manuals and user guides at all-guides.com SYMPTOM CAUSE SOLUTION CD mode, no or Not in CD mode. Press the FUNCTION poor sound. button to select CD. Disc(s) inserted incorrectly Reinsert disc(s) correctly. Dirty or defective disc(s). Clean or replace disc(s).
-
Page 32: Care And Maintenance
All manuals and user guides at all-guides.com CARE AND MAINTENANCE Caring for Compact Discs • Treat the compact disc carefully. Handle the compact disc only by its edges. Never allow your fingers to come in contact with shiny, unprinted side compact disc. -
Page 33: Specifications
All manuals and user guides at all-guides.com SPECIFICATIONS GENERAL: Power Source ............AC 120V, 60Hz Battery Backup........2 x 1.5V “AA” size batteries Speaker................2 x 8 ohms Output Power ..............2 x 2 W Weight...................6.6 lbs Dimensions ......17.8 (W) x 6.5 (D) x 9.5 (H) inches RADIO SECTION: Frequency Range (FM) ..........88–108 MHz Frequency Range (AM) ..........530–1710 KHz...
Need help?
Do you have a question about the Mi1200 and is the answer not in the manual?
Questions and answers