Canon XL 2 Instruction Manual
Canon xl2: instruction manual
Hide thumbs
Also See for XL 2:
- Instruction manual (126 pages) ,
- Brochure & specs (21 pages) ,
- Manual (62 pages)

Subscribe to Our Youtube Channel
Related Manuals for Canon XL 2


Summary of Contents for Canon XL 2
-
Page 1: Instruction Manual
PUB. DIM-692 DIGITAL VIDEO CAMCORDER English Instruction Manual CAMESCOPE NUMÉRIQUE Français Manuel d’instruction VIDEOCÁMARA DIGITAL Español Manual de Instrucciones Digital Mini Video Cassette NTSC... -
Page 2: Important Usage Instructions
Do not make any changes or modifications to the equipment unless otherwise specified in the manual. If such changes or modifications should be made, you could be required to stop operation of the equipment. Canon U.S.A. Inc. One Canon Plaza, Lake Success, NY 11042, U.S.A. Tel No. (516)328-5600 CAUTION: TO PREVENT ELECTRIC SHOCK, MATCH WIDE BLADE OF PLUG TO WIDE SLOT, FULLY INSERT. -
Page 3: Important Safety Instructions
IMPORTANT SAFETY INSTRUCTIONS In these safety instructions the word “product” refers to the Canon Digital Video Camcorder XL2A and all its accessories. 1. Read Instructions — All the safety and operating instructions should be read before the product is operated. - Page 4 When replacement of power supply is required, please return it to the responsible nearest Canon Service Center and please replace it with the same type number CA-920. The Adapter can be used with a power supply between 100 and 240 V AC. Contact your Canon dealer for information about plug adapter for overseas use.
-
Page 5: Using This Manual
Using this Manual Thank you for purchasing the Canon XL2. Please read this manual carefully before you use the camcorder and retain it for future reference. Symbols and References Used in This Manual ❍ : Precautions related to the camcorder operation. -
Page 6: Table Of Contents
Checking Supplied Accessories ...8 Components Guide ...9 Preparation Preparing the Power Supply ...13 Installing the Backup Battery ...16 Preparing the Camcorder ...17 Preparing the Lens...22 Using the Wireless Controller ...24 Loading/Unloading a Cassette ...25 Menus and Settings ...26 Setting the Time Zone, Date and Time ...30 Recording Recording ...32... - Page 7 Changing the Remote Sensor Mode ...95 Editing Recording to a VCR or Digital Video Device ...96 Recording from Analog Video Devices (VCR, TV or Camcorder) ...97 Recording from Digital Video Devices (DV Dubbing) ...98 Converting Analog Signals into Digital Signals (Analog-Digital Converter) ...99 Connecting to the Computer Using a DV (IEEE1394) Cable ...101...
-
Page 8: Checking Supplied Accessories
108 mm (with soft case) The serial number of this product can be found at the battery attachment unit of the camcorder. Write down the number and other information here and retain this book as a permanent record of your purchase to aid identification in case of theft. -
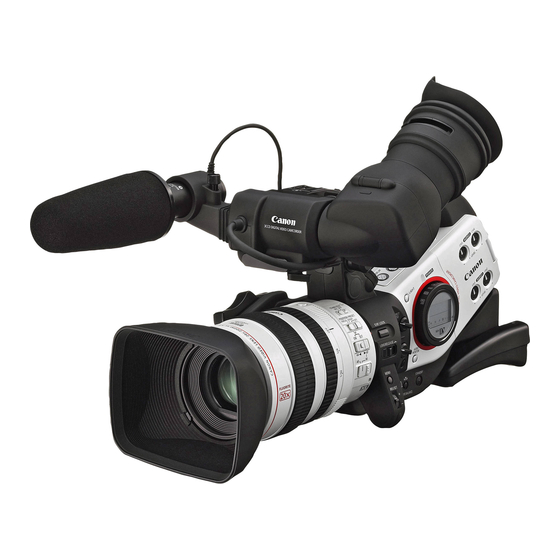
Page 9: Components Guide
Components Guide Viewfinder locking screw Advanced Accessory shoe Microphone locking screw ( Viewfinder cable ( Stereo microphone Focus ring ( Lens hood ( Zoom ring ( EXP. LOCK button ( LENS RELEASE switch ( MENU button ( IRIS/SET dial ( LIGHT Button Press the LIGHT button to illuminate the side panel for approximately 10 seconds. - Page 10 Cassette compartment ( Backup battery compartment * Do not use tripods with fastening screws longer than 0.2 inch (5.5 mm) as it may damage the camcorder. About the m Terminal m (LANC) stands for Local Application Control Bus System. The m terminal allows you to connect and control connected devices.
- Page 11 START/STOP button Handle zoom lever Dioptric adjustment lever ( Viewfinder ( 17-20) Lock release button Lock lever ( ND filter unlock button STABILIZER ON/OFF switch POSITION PRESET switch 39, 41) eAF switch ( 40)/ POSITION PRESET ON/SET switch 39, 41) ND filter operating ring ( Focus selector ( FU-1000 Monochrome...
- Page 12 WL-D4000 Wireless Controller TV SCREEN button ( 104) START/STOP button ( AUDIO MONITOR button 53, 89) SELF TIMER button ( MENU button ( Select buttons ( REC PAUSE button ( 97, 98) SEARCH SELECT button ( REW` button ( button ( REMOTE SET button ( PLAYe button ( STOP3 button (...
-
Page 13: Preparing The Power Supply
Attaching the Battery Pack 1. Turn the POWER dial to OFF. 2. Attach the battery pack to the camcorder. Press lightly and slide it in the direction of the arrow until it clicks. 3. Remove the battery pack after use. -
Page 14: Using A Household Power Source
❍ Disconnect the DC coupler from the power adapter when charging a battery pack. ❍ Turn off the camcorder before connecting or disconnecting the power adapter. ❍ If the adapter is used close to a TV, it may cause picture interference. Move the adapter away from the TV or the antenna cable. - Page 15 ❍ We recommend that you prepare battery packs 2 to 3 times longer than you think you might need. ❍ To conserve battery power, turn off the camcorder instead of leaving it in record pause mode. BP-930 145 min.
-
Page 16: Installing The Backup Battery
The backup battery (lithium button battery CR2025) allows the camcorder to retain date, time ( and other camcorder settings while the power source is disconnected. Connect a power source to the camcorder when replacing the backup battery to retain the settings. -
Page 17: Preparing The Camcorder
1. Slide the viewfinder unit onto the bracket and tighten the locking screw. 2. Connect the viewfinder cable to the upper socket of the camcorder body. Align the mark on the cable with the mark on the camcorder. 3. Hook the viewfinder cable onto the cable clamp. -
Page 18: Attaching The Eye Cup
Detaching and Attaching the Eye Cup You can change the position of the eye cup for use with either the left or right eye. Detach and reattach the eye cup for use with the left eye. Detaching the Eye Cup Detach the eye cup as shown in the illustration. -
Page 19: Dioptric Adjustment
Turn on the camcorder and adjust the dioptric adjustment lever. Prevent direct sunlight getting in the viewfinder. The viewfinder LCD may become damaged due to concentration of the light by the lens. Pay special attention when mounting the camcorder on a tripod, or during transportation. -
Page 20: Adjusting The Viewfinder
3. Plug the microphone cable to the camcorder’s FRONT MIC terminals. When using a microphone other than the supplied one, attach it to the advanced accessory shoe. EVF SETUP ] and press the SET dial. -
Page 21: Attaching The Shoulder Strap
Pass the ends through the strap mount and adjust the length of the strap. Be careful not to drop the camcorder when adjusting the strap. Attaching the Adapter Holder Attach the adapter holder to use the optional CH-910 Dual Battery Charger/Holder or a commercially available wireless microphone receiver. -
Page 22: Preparing The Lens
❍ The XL mount is not compatible with the VL mount. ❍ Do not touch the lens, lens mount and the interior of the mount, or expose them to dust or dirt. If necessary, clean it with a dry soft cloth (make sure to turn off the camcorder during cleaning). -
Page 23: Attaching The Lens Hood
1. Place the lens hood on the front of the lens and screw it clockwise until the Canon logo appears on top. • Be careful not to deform the lens hood. • Make sure that the lens hood is aligned with the thread. -
Page 24: Using The Wireless Controller
❍ When the camcorder cannot be operated with the wireless controller, or when it can only be operated in very close range, replace the batteries. Make sure to replace both batteries at the same time. -
Page 25: Loading/Unloading A Cassette
❍ Be careful not to get your fingers caught in the cassette compartment cover. If the camcorder is connected to a power source, cassettes can be loaded/unloaded even if the POWER dial is set to OFF. -
Page 26: Menus And Settings
Menus and Settings Many of the camcorder’s functions are selected from menus that appear on the screen. Selecting Menus and Settings 1. Press the MENU button to open the menu. 2. Turn the SET dial to select a submenu and press the SET dial. - Page 27 Menu and Default Settings Default settings are shown in boldface. CAMERA MENU Submenu Menu Item TIME CODE FRAME SETTNG COUNT-UP START VALUE CAMERA SETUP 24p MODE SEL ZEBRA ZEBRA LEVEL SKIN D.SET ZOOM HANDLE F SPEED PSET** CLEAR SCAN SELF TIMER INTERVAL T.
- Page 28 Submenu Menu Item VCR SETUP REC MODE POWER SAVE USR BIT DATA AUDIO SETUP AUDIO MODE 1kHz TONE AUD.M.SET R-XLR GAINUP DISPLAY SETUP/ EVF SETUP CENTER MARK TV SCREEN AUDIO LEVEL GUIDE INFO LANGUAGE DATE FORMAT USR BIT DISP SYSTEM CUSTOM KEY 1 CUSTOM KEY 2 WL.REMOTE...
- Page 29 VCR MENU Submenu Menu Item TIME CODE FRAME SETTNG COUNT-UP START VALUE VCR SETUP REC MODE AVaDV USR BIT DATA AUDIO SETUP SEL AUDIO CH MIX SELECT AUDIO MODE R-XLR GAINUP DISPLAY SETUP/ EVF SETUP TV SCREEN AUDIO LEVEL DISPLAYS 6SEC.DATE DATA CODE D/TIME SEL.
-
Page 30: Setting The Time Zone, Date And Time
Setting the Time Zone, Date and Time Set the time zone, date and time when you first start using your camcorder, or when you have replaced the backup battery. Setting the Time Zone/Daylight Saving Time SYSTEM 1. Press the MENU button to open the menu. -
Page 31: Displaying Date And Time During Recording
Once you have set time zone, date and time, you do not need to reset the clock each time you travel to another time zone. Just set the time zone to the one of your destination, and the camcorder automatically adjusts the clock. -
Page 32: Recording
Recording Before You Begin Recording Make a test recording first to check if the camcorder operates correctly. If necessary, clean the video heads ( 110). Recording 1. Remove the lens cap. 2. Press the button and set the POWER dial to a recording program. -
Page 33: Low-Angle Recording
The camcorder activates the power save function after 5 minutes in record pause mode to protect tape and video heads. You have the option to set the camcorder to shut off (SHUT OFF) or to turn off the VCR section leaving the camera section turned on (VCR STOP). In VCR STOP mode, the camcorder retains camera settings such as aperture and shutter speed, so you can adjust the camera section without worrying about the automatic shut-off. -
Page 34: Time Code
“j“ flashes in red when the lithium button battery is not installed, or when it needs replacing. t Recording reminder The camcorder counts from 1 to 10 seconds when you start recording. This is helpful to avoid scenes that are too short. -
Page 35: Displaying The Center Marker
You can select the amount of information shown on the screen from full, partial or no display. The setting changes with each press of the EVF DISPLAY button. Normal screen display Audio level indicator, center marker, recording program, EXP lock, ND filter, custom preset, shutter speed, aperture, AE shift, gain, white balance, skin detail, warning, date/time* Date/time* No display... -
Page 36: Reviewing And Searching When Recording
Press and release the c (record review) button. The camcorder rewinds the tape, plays back the last few seconds, and returns to record pause mode. Record Search In record pause mode, this function allows you to play back the tape (forward or reverse) to locate the point where you wish to begin recording. -
Page 37: End Search
You can use this function to locate the end of the last recorded scene. Press the END SEARCH button. • “END SEARCH” appears. • The camcorder rewinds/fast forwards the tape, plays back the last few seconds of the recording and stops the tape. • Pressing the button again cancels the search. -
Page 38: Zooming
Zooming You can operate the zoom from either the side grip or the carrying handle. You can also use the zoom ring on the zoom lens or the zoom buttons on the wireless controller. Move the zoom lever toward W to zoom out (wide-angle). Move it toward T to zoom in (telephoto). - Page 39 The camcorder returns to the preset zoom position. ❍ The preset setting is canceled when you attach the optional Extender XL with different magnification. ❍ The camcorder uses the zoom speed of the CONSTANT setting when returning to the preset zoom position. 1.6× or mount a lens...
-
Page 40: Adjusting The Focus
Autofocus (Lenses Equipped with the Autofocus Function) Autofocus is set when the focus selector on the lens is set to AF. The camcorder uses TTL autofocus system with a focusing range of 0.8 in. (2 cm) (at wide-angle from the front of the lens barrel) to The camcorder focuses on the subject in the center of the screen. -
Page 41: Manual Focus
If you focus manually then leave the camcorder with the power turned on, you may lose focus on your subject. This possible slight shift in focus is due to a rise in temperature in the camcorder interior and lens. Check the focus before resuming shooting. - Page 42 Returning to the Preset Focus Setting Move the POSITION PRESET ON/SET switch to ON. The camcorder returns to the preset focus setting. The preset setting resets and sets to OFF when you turn the camcorder off or unmount the lens. F SPEED PSET•HIGH...
-
Page 43: Using The Nd Filter (Lenses With Built-In Nd Filter)
Using the ND Filter (Lenses with Built-in ND Filter) When recording under bright conditions, the camcorder sets a small aperture value, and the picture may appear blurred. When you are using a lens with built-in ND filter, turn it on/off according to the screen display. -
Page 44: Selecting The Frame Rate
Selecting the Frame Rate Select from standard 60i, 30p or 24p mode. Furthermore, images captured in 24p mode can be 2:3 pulldown-converted or 2:3:3:2 pulldown-converted. 60i Mode Records in 60 fps interlace mode, same as TV signals. 30p Mode Records in 30 fps progressive mode and outputs signals converted into 60 fps interlace. - Page 45 Selecting the Frame Rate Set the FRAME RATE switch to the desired position. The selected frame rate appears. ❍ The frame rate does not change when you operate the FRAME RATE switch during recording. It changes once you pause recording. ❍...
-
Page 46: Recording In 16:9 Mode
❍ If you play back a 16:9 recording on a normal TV, the image appears horizontally squeezed. ❍ If you connect the camcorder to a TV with an S (S1) terminal or Video ID-1 system, recordings made in the 16:9 mode will be automatically played back in widescreen mode. -
Page 47: Setting The Time Code
(FREE-RUN) time code. In 24p mode, you can select from record run or record run preset. With record run, the time code runs only when you are recording. With free run, the time code runs regardless of the operation of the camcorder. With record run preset and free-run, you can select the starting point. - Page 48 ❍ When setting the free-run time code, the time code starts to run when you press the MENU button in the middle of the setting, or when you press the SET dial after setting the last digits. ❍ To reset the time code to [00:00:00:00], select [RESET] in step 2. ❍...
-
Page 49: Setting The User Bit
❍ To reset the user bit to [00 00 00 00], select [CLEAR] in step 2. ❍ User bit can be recorded when recording with the camcorder or from analog devices. The user bit of your camcorder cannot be recorded when recording from digital devices. -
Page 50: Audio Recording
(12bit CH The sampling frequency in 16 bit is 48 kHz and in 12 bit 32 kHz. The 16 bit mode provides higher sound quality. Audio dubbing cannot be performed with this camcorder. 16bit 12bit CH The channels next to channel 1 and 2 will not be used. -
Page 51: When Using The Front Microphone
Recording on Channels 1 and 2 Select the audio input from FRONT MIC (supplied microphone unit), AUDIO1 (RCA terminals) or REAR (XLR terminals). Refer also to the audio block diagram ( When Using the Front Microphone Set the INPUT SELECT switch to FRONT MIC. Turn on the microphone attenuator (20 dB) as necessary by setting the FRONT MIC ATT. - Page 52 When connecting a microphone not supporting phantom power, make sure to set the +48V switch to OFF. Otherwise the microphone may be damaged. Recording on Channels 3 and 4 Select the audio input from SHOE (optional MA-300 Microphone Adapter), AUDIO2 (RCA terminals) or REAR (XLR terminals).
-
Page 53: Adjusting The Audio Recording Level
When connecting a microphone not supporting phantom power, make sure to set the +48V switch to OFF. Otherwise the microphone may be damaged. Adjusting the Audio Recording Level Hiding/Displaying the Audio Level Indicator on the Screen DISPLAY SETUP/ Open the menu and select [DISPLAY SETUP/ option and close the menu. -
Page 54: Image Stabilizer (Lenses Equipped With Image Stabilizer)
❍ The image stabilizer is designed to compensate a normal degree of camcorder shake. ❍ The image stabilizer may not be effective when attaching an optional Extender. ❍ We recommend turning off the image stabilizer when mounting the camcorder on a tripod. STABILIZER ON/OFF switch... -
Page 55: Using The Programmed Ae Modes
However, in the Auto mode, you have the option of adjusting the settings manually. Shutter-Priority ( Use this mode to select the shutter speed. The camcorder automatically sets a matching aperture setting. Aperture-Priority ( Use this mode to select between 7 aperture settings - from f/1.6 to f/11 (or to... -
Page 56: Easy Recording
❍ Autofocus may not work as well as in other modes. In such case, adjust the focus manually. Easy Recording The camcorder automatically controls focus, shutter speed, aperture, gain, white balance, and AE Shift allowing you to simply point and shoot. This mode locks all of these features and options, making them fixed and unadjustable. - Page 57 Availability of functions in each recording program. Recording programs EXP. LOCK button IRIS dial SHUTTER button i (0) AE SHIFT dial i (auto) GAIN dial i (auto) WHITE BALANCE dial Custom preset adjustments CUSTOM PRESET SELECT button CUSTOM PRESET ON/OFF button Skin detail Frequency selection of Clear...
-
Page 58: Recording In The Shutter-Priority (Tv) Mode
Recording in the Shutter-Priority (Tv) Mode SHUTTER r button SHUTTER t button Available shutter speeds depend on the selected frame rate. 60i/30p 1/8, 1/15, 1/30, 1/60, 1/100, 1/250, 1/500, 1/1000, 1/2000, 1/4000, 1/8000, 1/15000, CS (clear scan) 1/24, 1/48, 1/60, 1/100, 1/250, 1/500, 1/1000, 1/2000, 1/4000, 1/8000, 1/15000, CS (clear scan) 1. -
Page 59: Recording In The Aperture-Priority (Av) Mode
Recording in the Aperture-Priority (Av) Mode Available aperture values (with 20× L IS lens) F1.6, F2.0, F2.8, F4.0, F5.6, F8.0, F11, CLOSE 1. Set the POWER dial to Av. 2. Select the aperture with the IRIS dial. ❍ Other settings such as shutter speed are set automatically. ❍... -
Page 60: Recording In The Manual Mode
Recording in the Manual Mode You can set the exposure at any combination of shutter speed and aperture levels. Available settings Shutter speed 60i/30p Aperture (with 20× L IS lens) 1. Set the POWER dial to M. The exposure indicator appears. 2. -
Page 61: Adjusting The Exposure
Adjusting the Exposure EXP. LOCK button Exposure Lock 1. Set the POWER dial to n, Tv or Av. 2. Press the EXP. LOCK button. The exposure indicator appears. Changing the Aperture after Exposure Lock You can select from 23 aperture settings (with 20× L IS lens). The setting can be adjusted in 1/4 steps. However, only the following numbers are displayed on the screen: F1.6, F2.0, F2.8, F4.0, F5.6, F8.0, F11, CLOSE. -
Page 62: Using Ae Shift
Using AE Shift You can use the AE Shift control to manually override the automatic exposure system to darken or lighten the image. Select from 13 AE levels (+2.0, +1.5, +1.0, +0.75, +0.5, +0.25, ±0, -0.25, -0.5, -0.75, -1.0, -1.5, -2.0). AE SHIFT dial POWER dial 1. -
Page 63: Adjusting The Gain
Adjusting the Gain Gain control adjusts the amount of video signal generated depending upon lighting and shooting conditions. You can select from automatic gain control and preset levels that range from -3 to +18 dB. -3 dB For lowest noise recording for indoor, low light or low contrast scenes. Auto Automatic adjustment of gain. -
Page 64: Setting The White Balance
Setting the White Balance The camcorder uses an electronic white balance process to calibrate the picture for accurate color display in different lighting conditions (i.e. sunlight versus indoor incandescent.) Automated white balance settings include a fully automated mode, an indoor mode and an outdoor mode. - Page 65 2. Set the WHITE BALANCE dial to 1, 2 or 3. 3. Point the camcorder at a white object and zoom in until it fills the whole screen. Keep the camcorder zoomed at the white object until step 4 is completed.
-
Page 66: Using The Zebra Pattern
Using the Zebra Pattern This camcorder has a zebra pattern feature that shows black and white diagonal stripes over the area that is overexposed. The zebra pattern is only displayed on the screen. Use this feature to guide the adjustment of the aperture and shutter speed. Available zebra pattern settings: 80 IRE, 85 IRE, 90 IRE, 95 IRE, and 100 IRE. -
Page 67: Using The Skin Detail Function
Using the Skin Detail Function You can adjust hue, chroma, area and Y level to determine the skin area and soften the details to reduce the appearance of skin imperfections. A zebra pattern identifying the skin area appears, alternating with the normal picture (a white pattern appears on a connected TV or computer screen). Activating the Skin Detail Function CAMERA SETUP Open the menu and select [CAMERA SETUP] and [SKIN D.SET]. -
Page 68: Using The Custom Preset
R gain, G gain, B gain, V detail, sharpness, coring, setup level, master pedestal and NR. You can also import preset settings from another XL2 and save them to your camcorder. Gamma Curve Select between standard gamma curve ([NORMAL]) and cine-like gamma curve ([CINE]). - Page 69 Color Phase Adjust to [G] for adding more green to the image, and to [R] for more red. R Gain Adjust to [-] for white balance toward cyan, and to [+] for white balance toward red. G Gain Adjust to [-] for white balance toward magenta, and to [+] for white balance toward green. B Gain Adjust to [-] for white balance toward yellow, and to [+] for white balance toward blue.
- Page 70 Setting the Custom Preset Settings CUSTOM PRESET 1. Open the menu and select [CUSTOM PRESET]. 2. Select [PRESET SETUP]. The custom preset items appear. 3. Select [SEL PRESET] and select the custom preset file you wish to change. 4. Select the preset items, select the setting options and close the menu. ❍...
- Page 71 2. Press the CUSTOM PRESET ON/OFF button. The setting is activated. Importing a Custom Preset Setting from Another XL2 You can import a custom preset setting from another XL2 and save it to your camcorder. MENU button SET dial POWER dial Preparations 1.
- Page 72 The custom preset file is imported. Make sure that protection is canceled when saving a preset setting. ❍ You can review but not change the preset settings of the connected XL2. ❍ [READ PRESET] can only be selected when another XL2 is connected.
-
Page 73: Using Clear Scan For Recording Computer Screens
Using Clear Scan for Recording Computer Screens This feature allows you to record computer CRT screen or other equipment without displaying black band or flicker on the screen. You can adjust the frequency from 60.0 Hz to 202.5 Hz. SHUTTER r button CAMERA SETUP 1. -
Page 74: Using The Custom Keys
Using the Custom Keys You can assign frequently used functions to the custom keys (for recording and VCR mode independently). Default settings: Recording Mode VCR Mode CUSTOM KEY 1 TIME CODE CUSTOM KEY 2 INDEX WRITE Following functions can be assigned to the custom keys: Recording Mode Time code Index write... -
Page 75: Changing The Custom Keys Setting
• The index signal will be recorded for approx. 6 seconds. • When the camcorder is in record pause mode, the index signal will be written when you start recording. ❍ An index signal cannot be added or erased later. - Page 76 VCR STOP ( In VCR STOP mode, the camcorder retains camera settings such as aperture and shutter speed, so you can adjust the camera section without worrying about the automatic shut-off. VCR STOP can only be operated with the custom keys.
-
Page 77: Recording Color Bars/Audio Reference Signal
Recording Color Bars/Audio Reference Signal Color Bars You can generate and record SMPTE (Society of Motion Picture and Television Engineers) color bars. COLOR BARS SELECT button 1. Press the COLOR BARS SELECT button to display “COLOR BARS”. The setting changes with each press of the button. “COLOR BARS” flashes. 2. -
Page 78: Audio Reference Signal
Audio Reference Signal You can record a 1 kHz audio reference signal (-12 dB or -20 dB) along with the color bars. AUDIO SETUP 1kHz TONE••••OFF Open the menu and select [AUDIO SETUP]. Select [1kHz TONE], select the audio signal and close the menu. -
Page 79: Recording With The Interval Timer
Recording with the Interval Timer With the interval timer, you can record images over a selected time with a selected interval. This function is useful when shooting flowers, animals, and other natural events. You can choose an interval from 30 seconds, 1 minute, 5 minutes and 10 minutes, and a recording time from 0.5 seconds, 1 second, 1.5 seconds, and 2 seconds. - Page 80 • When the interval is set to 30 seconds or 1 minute, the camcorders goes into record pause mode during the recordings. When set to 5 or 10 minutes, the camcorder goes into stop mode during the recordings. To Pause Interval Recording Press the start/stop button.
-
Page 81: Recording With The Self-Timer
” appears. 2. Press the start/stop button. The camcorder starts recording after a 10-second countdown (2 seconds when using the wireless controller). The countdown appears on the screen. ❍ To cancel the self-timer, press the SELF TIMER button. Once the countdown has begun, you can also press the start/stop button to cancel the self-timer. -
Page 82: Using The Dv Control
Using the DV Control This feature enables the XL2 to control the record and stop function of a connected IEEE1394 storage/recording device. The device must comply with the IEEE1394 AV/C protocol. Users of Windows XP can also download the DV-PC Recorder from the Canon Homepage to record video/audio to the computer's hard disk. -
Page 83: Other Camcorder Functions/Settings
SYSTEM Open the menu and select [SYSTEM]. Select [TALLY LAMP], set it to [OFF] and close the menu. The tally lamps still light up when the camcorder receives a signal from the wireless controller, or during self-timer countdown. REC MODE•••••SP CHAR. -
Page 84: Changing The Display Language
Changing the Display Language The language used in the camcorder displays and menu items can be changed to Simplified Chinese or Japanese. DISPLAY SETUP/ To change the display language, open the menu and select [DISPLAY SETUP/ [LANGUAGE ], select a language and close the menu. -
Page 85: Playing Back A Tape
Playing Back a Tape If the playback picture is distorted, clean the video heads using a Canon Head Cleaning Cassette or a commercially available digital video head-cleaning cassette ( REC SEARCH +/– buttons 1. Set the POWER dial to VCR. -
Page 86: Edit Search
❍ There is no sound during special playback. ❍ The picture may become distorted during some special playback modes. ❍ The camcorder stops the tape automatically after 5 minutes in playback pause mode to protect tape and video heads. Shuttle Dial... -
Page 87: Playing Back On A Tv Screen
1. Turn off all devices before starting the connections. 2. Connect the S-150 S-video Cable to the S-video terminals. 3. Connect the STV-150 Stereo Video Cable to the camcorder’s AUDIO1 terminals and the audio terminals of the TV/VCR. 4. If connecting to a TV, set the input selector to VIDEO. If connecting to a VCR, set the input selector to LINE. - Page 88 Refer also to the TV or VCR instruction manual. 1. Turn off all devices before starting the connections. 2. Connect the STV-150 Stereo Video Cable to the camcorder’s VIDEO and AUDIO1 terminals and the audio/video terminals on the TV/VCR. 3. If connecting to a TV, set the input selector to VIDEO. If connecting to a VCR, set the input selector to LINE.
-
Page 89: Audio Output
Audio Output AUDIO MONITOR button Selecting the Audio Output of the RCA Terminals Press the AUDIO MONITOR button. The setting changes with each press of the button in the order of CH Selecting the Audio Channels AUDIO SETUP Open the menu and select [AUDIO SETUP]. Select [SEL AUDIO CH], select a setting option and close the menu. -
Page 90: Returning To A Pre-Marked Position
Returning to a Pre-marked Position If you wish to return to a particular scene later, mark the point with the zero set memory, and the tape will stop at that point when you rewind/fast forward the tape. This function is operated with the wireless controller. REW` button 1. -
Page 91: Index Search
Index Search You can locate the point at which you have recorded the index signal ( This function is operated with the wireless controller. SEARCH SELECT button STOP 3 button 1. Press the SEARCH SELECT button to display “INDEX SEARCH”. 2. -
Page 92: Date Search
Date Search You can locate the change of the date/time zone with the date search function. This function is operated with the wireless controller. SEARCH SELECT button 1. Press the SEARCH SELECT button to display “DATE SEARCH”. 2. Press the + or - button to begin searching. •... -
Page 93: Displaying The Data Code
Displaying the Data Code The camcorder maintains a data code containing recording date and time and other camera data such as shutter speed, gain and exposure (f-stop). When you play back a tape, you can display the data code and select the data code combination you wish to display. - Page 94 Displaying the Data Code Press the DATA CODE button on the wireless controller. The data code will not display the next time you turn on the camcorder. Six-Second Auto Date Date and time appear for 6 seconds when you begin playback, or to indicate that date or time zone has changed.
-
Page 95: Changing The Remote Sensor Mode
Changing the Remote Sensor Mode Two remote sensor modes and an off setting are available to prevent interference from other Canon wireless controllers being used nearby. Turning the Remote Sensor Off SYSTEM Open the menu and select [SYSTEM]. Select [WL.REMOTE], set it to [OFF B] and close the menu. -
Page 96: Recording To A Vcr Or Digital Video Device
Recording to a VCR or Digital Video Device You can copy your recordings by connecting the camcorder to a VCR or a digital video device. If you connect a digital video device, you can copy recordings with virtually no generation loss in image and sound quality. -
Page 97: Recording From Analog Video Devices (Vcr, Tv Or Camcorder)
Recording from Analog Video Devices (VCR, TV or Camcorder) You can record videos or TV programs from a VCR or analog camcorder on the tape in the camcorder. 1. Connect the camcorder to the analog video device. See Playing Back on a TV Screen ( 2. -
Page 98: Recording From Digital Video Devices (Dv Dubbing)
8. Connected Device: Stop playback. ❍ Blank sections may be recorded as anomalous picture. ❍ If the picture does not appear, reconnect the DV cable or turn the camcorder off and back on again. ❍ You can only record signals from devices with the format. -
Page 99: Converting Analog Signals Into Digital Signals (Analog-Digital Converter)
DV terminal. The DV terminal serves as output terminal only. Connecting the Devices Turn off all devices before starting the connections. Unload the tape from the camcorder. Refer also to the instruction manual of the connected device. You can also connect to the VIDEO terminal ( 88). - Page 100 ❍ Depending on the software and the specifications of your computer, you may not be able to transfer converted signals via the DV terminal. ❍ We recommend powering the camcorder from a household power source. ❍ You can also press the AV/DV button on the wireless controller. The setting changes with each press of the button.
-
Page 101: Connecting To The Computer Using A Dv (Ieee1394) Cable
Mac operating systems later than Mac OS 9, and will be installed automatically. Users of Windows XP can also download the DV-PC Recorder from the Canon Homepage to record video/audio to the computer’s hard disk. For details, refer to the ❍... -
Page 102: Settings Retained At Power Off Or Standby Mode
Settings Retained at Power Off or STANDBY Mode The following list shows the settings that are retained when you turn the power off or press the STANDBY button when the backup battery is installed. Recording Mode Aperture setting in Av mode Shutter speed setting in Tv mode Aperture, shutter speed setting in Manual mode Custom white balance... - Page 103 The following list shows the settings that are retained when you change the programmed AE mode or frame rate. Recording Mode When you change to another programmed AE mode other than Easy Recording Aperture setting in Av mode Shutter speed setting in Tv mode Aperture, shutter speed setting in Manual mode...
-
Page 104: Screen Displays
• Tape operation displays appear for 2 seconds. Hiding/Showing the Displays on the TV Screen When you connect a TV for recording, you can select to hide the camcorder displays on the TV screen. For playback, you can show the camcorder displays on the TV screen. -
Page 105: Screen Displays During Recording
Screen Displays during Recording See also Zoom position/ zoom speed ( 38)/ exposure level ( Programmed AE ( Shutter speed* ( 58, 60) Aperture* ( 59, 60) Exposure lock ( 61)/ AE shift ( White balance ( Manual focus ( Skin detail ( Color bars ( Custom preset (... -
Page 106: Screen Displays During Playback
Screen Displays during Playback Audio output ( Mix balance ( Custom keys ( Data code ( Side panel Recording mode Audio mode [AUDIO LEVEL] is set to [MANUAL] Tape operation ( PAUSE STOP EJECT FF 1 ` REW Date search ( 92)/ index search ( Time code... -
Page 107: List Of Messages
Cassette is protected. Replace the cassette or change the position of ERASURE PREVENTION the protect switch. REMOVE THE CASSETTE Camcorder stopped operating to protect the tape. Unload and reload the cassette. CHECK THE INPUT DV cable is not connected, or the connected digital device is turned off. -
Page 108: Maintenance/Others
( Storage ❍ If you do not intend to use the camcorder for a long time, store it in a place free of dust, in low humidity, and at temperatures not higher than 86 ˚F (30 ˚C). - Page 109 Viewfinder 1. Pull up the eye cup and open the protect cover (e.g. using a flathead screwdriver). 2. Clean the glass with a cotton swab. 3. Reattach the protect cover. Be careful not to scratch the glass when cleaning.
-
Page 110: Video Heads
❍ To maintain the best picture quality, we recommend cleaning the video heads frequently with the Canon DVM-CL Digital Video Head Cleaning Cassette or a commercially available dry cleaning cassette. ❍ Tapes already recorded with dirty video heads may not be played back correctly even when you clean the video heads. - Page 111 How to avoid condensation: ❍ Unload the cassette, place the camcorder in an airtight plastic bag and let it adjust to temperature changes slowly before removing it from the bag. When condensation is detected: ❍ The camcorder stops operating, and the warning message “CONDENSATION HAS BEEN DETECTED”...
-
Page 112: Using The Camcorder Abroad
You can use the compact power adapter to operate the camcorder and to charge battery packs in any country with power supply between 100 and 240 V AC, 50/60 Hz. Consult the Canon Service Center for information on plug adapters for overseas use. -
Page 113: Troubleshooting
Troubleshooting If you have a problem with your camcorder, refer to this checklist. Consult your dealer or a Canon Service Center if the problem persists. Power Source Problem Camcorder will not turn on. Battery pack is not correctly attached. The camcorder switches off Power save function has been by itself. - Page 114 Microphone attenuator is turned on. Cause Camcorder is turned off, or is not set to VCR mode. Cassette is not loaded. Video heads are dirty. You attempted to play back or dub copyright protected tape.
-
Page 115: System Diagram
System Diagram ZR-1000 Zoom Remote Controller MA-300 Microphone Adapter Extender XL 1.6× * FS-72U 16× IS II Filter Set Zoom Lens XL 5.5-88 mm 3× Zoom Lens XL 3.4–10.2 mm 16× Manual Zoom Lens XL 5.4-86.4 mm 20× L IS Zoom Lens XL 5.4-108 mm lens** EF Adapter XL... -
Page 116: Optional Accessories
This product is designed to achieve excellent performance when used with genuine Canon accessories. Canon shall not be liable for any damage to this product and/or accidents such as fire, etc., caused by the malfunction of non-genuine Canon accessories (e.g., a leakage and/or explosion of a battery pack). - Page 117 AE functions. Extender XL 1.6× Attach this extender between a Canon XL lens and the XL2 to boost the focal length of the lens by 1.6×. EF Adapter XL This allows you to attach Canon EF lenses to the XL2.
- Page 118 This mark identifies genuine Canon video accessories. When you use Canon video equipment, we recommend Canon-brand accessories or products bearing the same mark. Provided accessories:...
-
Page 119: Specifications
Specifications System Video Recording System 2 rotary heads, helical scanning DV system (consumer digital VCR SD system), digital component recording Audio Recording System PCM digital sound: 16 bit (48 kHz/2 ch); 12 bit (32 kHz/4 ch) Television System EIA standard (525 lines, 60 fields) NTSC color signal Image Sensor 1/3-inch CCD x 3 (horizontal pixel shift), approx. -
Page 120: Battery Pack
Dimensions (W × H × D) Weight (camcorder body only) (fully loaded) Lens Some lens specifications change as shown below when mounting on the XL2. Wide angle 37° 12’ × 27° 42’ (4:3) 20× L IS Lens 48° 24’ × 27° 42’ (16:9) 36°... -
Page 121: Index
16:9 ..... . 46 Abroad, using the camcorder ....112 Accessories ... . . 8, 116 AE shift . -
Page 122: Audio Block Diagram
Audio Block Diagram... - Page 124 This limited warranty does not cover the cabinet (exterior finish) of the digital video equipment, video cassette tapes, head cleanings, nor does it apply to digital video equipment purchased outside Canada. Ship your Canon digital video equipment in its original carton, box or equivalent, properly packed, fully insured with shipping charges prepaid, together with a copy of your bill of sale or other proof of purchase and a description of the problem to any of the Canon Service Facilities in Canada.
- Page 126 CANON CANADA INC. MONTREAL 5990 Côte de Liesse, Quebec H4T 1V7 ● If you have any questions, call the Canon Canada Information Center toll- free at 1-800-828-4040. (Canada only) ● Si vous avez des questions, veuillez téléphoner sans frais au Canada 1-800-828-4040.
Need help?
Do you have a question about the XL 2 and is the answer not in the manual?
Questions and answers