Table of Contents
Advertisement
Advertisement
Table of Contents

Related Manuals for WingHome 480Ace


Summary of Contents for WingHome 480Ace
- Page 1 WingHome 4G Trail Camera Model: 480Ace...
- Page 2 Please scan QR codes below to download WingHome Cam app. - 2 -...
-
Page 3: Table Of Contents
Contents 1. Introduction ............- 5 - 1.1 Overview of Features........- 7 - 1.2 List of Key Specifications/Features ...... - 8 - 2. Quick Start ............- 9 - 2.1 What’s in the Box? ..........- 9 - 2.2 Parts of the Camera ........- 10 - 2.3 How to Set up the Camera ...... - Page 4 4.2 Settings ............... - 34 - 4.3 Changing Settings ........... - 36 - 5. Full Specifications ..........- 49 - 6. Troubleshooting ..........- 53 - 7. After-Sales Service .......... - 59 - 8. Warranty ............. - 61 - - 4 -...
-
Page 5: Introduction
1. Introduction We would like to take this opportunity to thank you for choosing to purchase the WingHome cellular trail camera. It is our confident belief that you will thoroughly enjoy using this trail camera with its many state-of-the-art features, and get many years of reliable service from it. - Page 6 Customer service: support@winghomeview.com Official website: www.winghomeview.com Facebook: www.facebook.com/winghomecamera - 6 -...
-
Page 7: Overview Of Features
1.1 Overview of Features This trail camera has been designed to offer the most stable product quality as well as superior product features, including 4G photo transmission via the WingHome app with WingHome plan, camera configuration remotely via the free app, camera GPS location, 24MP photo &... -
Page 8: List Of Key Specifications/Features
1.2 List of Key Specifications/Features • Trigger speed: 0.4 seconds • FOV: 58 degrees • PIR angle: 52 degrees • Image resolutions: 8/12/24 MP • Highest video resolution: 1080p • IR LEDs: 60pcs 940nm • IR range: 65 feet (20 meters) •... -
Page 9: Quick Start
2. Quick Start 2.1 What’s in the Box? • Mounting Strap × 1 • Trail Camera X 1 • Instruction Manual X 1 • Antenna • Quick Start Guide × 1 • Sim Card X 1 • Usb Cable × 1 - 9 -... -
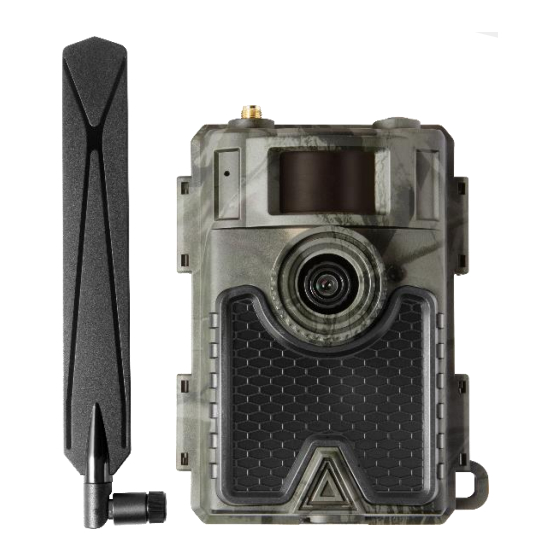
Page 10: Parts Of The Camera
2.2 Parts of the Camera Figure 1: Front View of Camera ④ Indicator LED ① Antenna ⑤ IR LEDs ② PIR ③ Lens - 10 -... - Page 11 Figure 2: Bottom View of Camera *Ensure the SIM card’s chip is facing the front housing of the camera. ⑥ Mini USB Port ⑦ SD Card Slot (Supports 4~32GB) ⑧ DC-in (12V/1~2A) ⑨ Battery - 11 -...
- Page 12 Figure 3: Internal View of Camera ⑩ LCD Color Screen ⑪ Navigation (Up/Down/Left/Right) Buttons/OK Button ⑫ Power Switch (ON/OFF/SETUP(Test) Modes) ⑬ Battery Compartment ⑭ MENU Button - 12 -...
-
Page 13: How To Set Up The Camera
2.3 How to Set up the Camera 1. Insert the batteries Open the camera’s housing and insert the batteries with the polarities in the direction as marked in the battery compartment. Note: 8 Alkaline or Ni-MH AA batteries are recommended. For optimal performance, input the type of batteries you are using in the “Battery Type”... - Page 14 2. Install antenna 3. Insert the SD card: Before insert the SD card, please make sure the write-protect switch on the “UNLOCK” side of the SD card. 4. Insert the SIM Ace (included in the package): - 14 -...
- Page 15 5. Get the APP ready Download and install APP on your phone by scanning APP QR code on right side, or searching "WingHome Cam" in APP Store/ Google Play. Please use a valid email to register, then activate the account through the email you received from: trailcam@wuyuantech.net, and log in.
- Page 16 Click "Add Camera>Next" in APP, scan the camera QR code to add camera to your APP account. Modify camera position. - 16 -...
- Page 17 Exit to APP homepage screen, click icon to enter camera setting list page. Choose "Refill" to top up $10 USD/EUR, then exit to camera setting list page. * You will receive a top-up notification by email. - 17 -...
- Page 18 Click "Activate SIM Card" to choose preferred data plan. 5. Start Using Turn off the camera, then switch Power button to "SETUP" again, wait about 10~15 seconds until screen shows 4G signal bar(s). - 18 -...
- Page 19 Press "OK" button to take a photo, wait about 30 seconds, this photo will be sent to your APP directly. Switch Power button to "ON", camera indicator light will flash 5 times before it enters auto work mode. - 19 -...
-
Page 20: Points Of Attention
2.3.1 Points of Attention 1. Insert the SD memory card correctly (SD card hot swaps are not supported). 2. Please use high-quality AA batteries in order to prevent battery corrosion and/or leakage. 3. If using a power adapter, ensure that it is of the correct type (12V/2A). -
Page 21: Details Of Use
3. Details of Use 3.1 Power Supply A. Batteries The camera runs on 8 AA batteries (9-12V power supply is required to ensure proper performance of all functions); alkaline and high-quality NiMH rechargeable batteries are both compatible, though we recommend using alkaline batteries for best performance. - Page 22 electrodes in the right direction, as marked in the battery compartment. Placing batteries in the wrong direction may cause the device to malfunction. Batteries should replaced/recharged when the power icon on the camera’s screen or photo stamp is empty/very low. Note: do not mix battery types/brands, or old and new batteries.
-
Page 23: Battery Life
3.1.1 Battery life Please refer to the table below to see the camera’s battery life using 8 AA alkaline batteries. Note: due to varying conditions of use, and different brands/quality of batteries being used, figures provided approximations only and you may achieve longer or shorter battery life according to your own method of usage. - Page 24 Testing conditions: 4G OFF_8AA Alkaline Batteries Photos Mode Use Time (days) (/day) IR LEDs On (“Night Mode”) Max. Range Balanced Min. Blur IR LEDs Off (Daytime) Video Time (secs) Use Time (days) (/day) IR LEDs On (“Night Mode”) IR LEDs Off (Daytime) - 24 -...
- Page 25 B. Power Adapter The applicable power adapter is 12V /2A with 4.0mm*1.7mm male plug. We recommend this option if you are using your trail camera for home surveillance purposes. C. Solar Panel This camera is designed to work with most standard 12V/2A built-in lithium battery solar panels.
-
Page 26: Sd Card
3.2 SD Card A memory card must be inserted into the camera before it can be operated. If the camera is in ON mode and no memory card has been inserted, the screen will display "No card". The SD slot of the camera has a 32GB memory capacity. - Page 27 The chart below displays the approximate capacity of different sized SD cards. Please check to see which size of card best suits your requirements. - 27 -...
-
Page 28: Sd Card Storage
3.2.1 SD Card Storage Capacity 4 GB 8 GB 16 GB 32 GB Resolution Photos (no.) 8 MP 2104 4238 8476 16952 12 MP 1445 2910 5816 11632 24 MP 1480 2957 5914 Video (hours) WVGA 05:09:35 10:11:44 20:07:45 40:03:02 02:17:42 04:30:35 08:53:43... -
Page 29: Usb Connection
3.3 USB Connection When the camera is connected via a USB cable, the screen will display “USB is connected”. The camera now can be used as a PC camera. 4. Camera Menu 4.1 Modes and Basic Operations - 29 -... - Page 30 Mode Instructions /Operation 1. Press the left button once to view the Cam Info Left 2. Press the left button Button again to return to the main interface. 1. Press the right button once to view the Cam Status Right 2.
- Page 31 1. Press the down button once to view the QR code Down 2. Press the down button Button again to return to the main interface. In Test Mode you can see the camera’s live view on the screen and take test photos or videos, depending on the Cam Mode 1.
- Page 32 buttons are pressed. To open Test Mode again, move the Power Switch to OFF and then move to SETUP again. In View Mode you can view all the photos/video stored on the SD card. 1. In Test Mode, press the Up button to enter View Mode.
- Page 33 You can choose to delete individual photos/videos or all the photos/videos stored on the camera’s SD card. Note: once files are Deleting deleted from the SD card photos they cannot be reclaimed. /videos 1. In View Mode scroll to find stored on the photo/video you wish to delete...
-
Page 34: Settings
4.2 Settings Default (in red) and Optional (in black) * Camera default settings: Camera Mode Photo/Video Image Size 8M/12M/24M Send Pic Size Thumbnail/Original 5MP OFF/Real Time/Delay 0.5H/1H/2H/3H/4H/6H/1 2H/24H * In Delay 24H, camera will respond your Remote command after 24 hours; control If you would like camera respond... - Page 35 * multi-shot photos will be saved in SD card, could not be send to APP Video Size FHD/HD/WVGA PIR Sensitivity High/Middle/Low/OFF Max.Range/Balanced Night Mode /Min.Blur/No.Blur Flash Power High/Low Time Lapse ON/OFF Delay ON/OFF Work Time1 ON/OFF Work Time2 ON/OFF Max Num/Day Unlimited/01-99 Sync server time MM-DD-YY HH:MM Date Style...
-
Page 36: Changing Settings
4.3 Changing Settings *Open “WingHomeCam” app, go to: “Cameras – Setting – General Setting” * The setting will be saved as long as you click the “Save” button in the top right corner. * The settings will take effect after the camera's new trigger. - Page 37 You can set the camera to capture 3 different photo resolutions: 12MP Image Size 24MP 1. Select “Image Size” 2. Select the desired option: “8M” “12M” or “24M” You can choose the camera Send to send you pictures in Picture Thumbnail or Original 5MP Size size.
- Page 38 Delay 3H Delay 4H Delay 6H Delay 12H Delay 24H settings will available upon next photo. In Photo modes, you can select how many photos are captured each time the Multi Shot camera’s motion detection sensors are triggered: 1 (“1P”) through 5 (“5P”).
- Page 39 1. Select “Video Size” 2. Select the desired option: “FHD-1080P”, “HD-720P” or “WVGA” 3. New settings will be available upon next photo. You can choose to set the camera’s PIR (motion detection sensor) to one of 4 sensitivity modes: a) High: the camera is triggered by the movement of objects that are smaller and further away –...
- Page 40 c) Low: the camera is triggered by the movement of objects that are larger and closer – false triggers less likely (recommended in low temperature conditions). d) OFF: By turning this setting off you can program the camera to disable its motion detection sensor.
- Page 41 The intensity of the light in night vision mode. Flash High: Brighter night mode Power photos/ videos Low: Darker night mode photos/ videos This setting allows you to program the camera to automatically take photo/video after a specific period of time, i.e. without needing to be triggered by an object.
- Page 42 be saved and you will automatically return to the Cam Menu b) “ON”: you will go to a screen with the current setting (units time: Hours, Minute, Second) 4. Set a new time: a) “Hours”: scrolling up (0-23), or down (23-0) b) “Minute”: scrolling up (0-59), or down (59-0) c) “Second”: scrolling...
- Page 43 By turning this setting on you can program the camera to temporarily disable its motion detection sensor after capturing a photo/video for the duration of the delay you set. Setting longer delay times will reduce the number of photos/videos captured, so is helpful in extending Delay battery life.
- Page 44 setting (units of time: Hours, Minute, Second) 4. Set a new time: a) “Hours”: scrolling up (0-23), or down (23-0) b) “Minute”: scrolling up (0-59), or down (59-0) c) “Second”: scrolling up (0-59), or down (59-0) 5. Once you have inputted a time, press Save Note: you should not use the Delay setting and the...
- Page 45 the camera to capture photos/videos only at specific times. 1. Select “Working Timer” 2. Select the desired option: “OFF” or “ON” 3. a) “OFF”: the setting will be saved and you will automatically return to the Cam Menu b) “ON”: you will go to a screen showing start time time (Hour,...
- Page 46 (0-23), or down (23-0) b) “Minute”: scrolling up (0-59), or down (59-0) 5. Once you have inputted a start and end time, press Confirm to save it. 6. Press the Save button to return to the Cam Menu. You can set a limit on the number of photos taken per day (0-99).
- Page 47 please set the Date/Time before operating your camera for the first time. 1. Select “Date Style” 2. You will go to a screen showing the current date and time settings: You can choose different data format: dd-mm-yy or mm-dd-yy. When the SD card is full and this setting is turned off, no more photos/videos will be captured.
- Page 48 1. Select “SD Cycle” 2. Select the desired option: “OFF” or “ON” 3. Your setting will be saved and you will automatically return to the Setting Menu. - 48 -...
-
Page 49: Full Specifications
5. Full Specifications Image 5 Mega Pixels Color Sensor CMOS Effective 2560x1920 Pixels Day/Night Mode IR range IR Setting 60pcs,940nm-IR LED SD Card (4GB – 32GB) Memory Operating keys F=3.0; FOV=58° ; Auto Lens IR-Cut-Remove (at night) PIR Angle 52° 2.4”TFT, RGB, 262k LCD Screen PIR Distance 20m... - Page 50 Format WVGA(848x480), Video HD (1280x720), resolution FHD (1920x1080) Video Format MOV Video Length 10sec. Shooting 1P-5P Numbers Trigger Time 0.4s Trigger 4s-7s Interval Time Lapse SD Card ON/OFF Cycle Operation Battery: 12V; DC: 12V-2A Power Battery Type External DC Stand-by 0.165mA Current - 50 -...
- Page 51 Stand-by 6 months Time In Test mode, camera Auto Power will automatically power off in 3 mins if there is no keypad touching. LTE Cat.4 module; 2G & Wireless 3G networks are also Module supported some countries. USB/SD Card/SIM Interface Card/DC Port Mounting Strap...
- Page 52 Waterproof IP66 spec Dimensions 128x96x76mm Weight 260g Certification CE FCC RoHs - 52 -...
-
Page 53: Troubleshooting
6. Troubleshooting 1.The camera takes photos/videos without any target objects in them (false triggers) The PIR sensitivity is set too high: In addition to troubleshooting using the solutions below, you should first check the camera’s PIR sensitivity level Hot air: The camera is triggered by detecting the movement of heat sources, so avoid mounting the camera near any equipment... - Page 54 So as to avoid targeting the sun as it rises or sets, mount the camera to face north or south. Unstable mounting: If the camera’s mounting is not stable, then it may move and mistake this for the movement of objects in its field of view. When mounting the camera check that it is completely stable and avoid mounting it on anything that can move or shake, e.g.
- Page 55 b) Mount it at a 45° angle to the trail. Tree leaves/branches: Grass swaying in the wind, falling leaves or falling/moving tree branches/twigs can reflect the sun’s heat and potentially cause false triggers. a) Mount the camera away from such objects, preferably slightly higher up (around 5ft from the ground) to avoid swaying grass...
- Page 56 2.The camera is not capturing any photos/videos Camera is not in ON Mode: In addition to troubleshooting using the solutions below, you should first ensure that the Power Switch is set to ON. Batteries have insufficient power: Check the battery power bar directly on the camera’s screen.
- Page 57 become corrupted. If this happens, you will need to format/reformat the SD card. 3.Night vision range is limited “Night Mode” is set to “Min.Blur”: In addition to troubleshooting using the solutions below, you should first ensure that “Night Mode” is set to “Max.Range” or “Balanced”...
- Page 58 Target area is too open: The camera’s night vision works via infrared light that is emitted and reflected back off the objects in the target area, then captured by the camera’s image sensor. Therefore, if the target area is too open, i.e. with very few objects to reflect the IR light, then the night vision image will appear very dark.
-
Page 59: After-Sales Service
7. After-Sales Service At WingHome we have devoted many years to providing the highest quality and most complete after-sales service to our customers. Ensuring customer satisfaction is the most important part of our business. You can be confident that the quality of our products and our after-sales service is to the highest international standards. - Page 60 If in any way you are not satisfied with a WingHome product or service, please contact our support team immediately and we will do whatever possible to satisfy your requirements.
-
Page 61: Warranty
24 hours. In order for the free 12-month warranty to be effective, WingHome products must have been purchased from our Amazon store or the official WingHome online store. Thank you for choosing WingHome! Contact address: support@winghomeview.com Official website: http://www.winghomeview.com...
Need help?
Do you have a question about the 480Ace and is the answer not in the manual?
Questions and answers