Table of Contents
Advertisement
Available languages
Available languages
Quick Links
Advertisement
Chapters
Table of Contents

Subscribe to Our Youtube Channel
Related Manuals for EAS Electric E300WHF


Summary of Contents for EAS Electric E300WHF
- Page 1 MANUAL DE USUARIO Combo type 300L A+ Acumulador aerotérmico para ACS Todo en uno Modelo:E300WHF Guarde este manual de instrucciones correctamente y léalo cuidadosamente antes de la Instalación y uso.
- Page 2 Prefacio Gracias por escoger nuestro acumulador aerotérmico. * Este manual está indicado para proporcionarle información importante relevante de seguridad, instalación, operación y mantenimiento. Lea atentamente este manual antes de abrir o poner en marcha o realizar tareas de mantenimiento con la unidad. * Esta unidad debe ser instalada por personal profesional autorizado.
-
Page 3: Table Of Contents
Contenido 1.Precauciones de seguridad...................... 4 2.Instrucciones del producto...................... 8 2.1 Introducción del producto....................8 2.2 Principio de funcionamiento..................... 8 3. Instrucciones del producto..................... 9 3.1 Apariencia ........................9 3.2 Dimensiones........................9 3.3 Parámetros de funcionamiento..................11 4. Instrucciones de instalación....................12 4.1 Elección del lugar de instalación..................12 4.2 Instrucciones de instalación..................... -
Page 4: Precauciones De Seguridad
1. Precauciones de seguridad Precauciones de seguridad Para evitar que los usuarios y otras personas dañen la unidad y evitar daños en la unidad u otra propiedad, utilícela correctamente. Lea este manual detenidamente y comprenda correctamente la siguiente información. Significado Marca Un funcionamiento incorrecta puede provocar la muerte o lesiones graves en las personas. - Page 5 Cuando instale la unidad en una habitación pequeña, tome medidas para evitar la asfixia causada por la fuga de refrigerante. Por favor, Límites de consulte con el distribuidor para obtener medidas concretas. concentración La unidad no se puede instalarse cerca de gas inflamable. Se Lugar de pueden producir fugas de gas que ocasionen incendios.
- Page 6 1. Precauciones de seguridad Movimiento y reparación Cuando la unidad deba moverse o instalarse nuevamente, confíe esa tarea en el distribuidor o persona cualificada. La instalación incorrecta provocará fugas de agua, descargas eléctricas, lesiones Confianza o incendios. Está prohibido que el usuario repare la unidad, de lo contrario podría producirse una descarga eléctrica o un incendio.
- Page 7 Advertencia de uso Este aparato puede ser utilizado por niños a partir de 8 años y personas con capacidades físicas, sensoriales o mentales reducidas o por falta de experiencia y conocimiento si se les ha dado supervisión o instrucciones sobre el uso de la unidad de una Advertencia manera segura y entiendendo los peligros involucrados.
-
Page 8: Instrucciones Del Producto
2. Instrucciones del producto 2.1 Introducción del producto El acumulador aerotérmico es uno de los últimos calentadores de agua ecológicos y de bajo consumo. Es una nueva opción para reemplazar el calentador solar y la caldera en muchos mercados. 2.2 Principio de funcionamiento Según el principio del Principio de Circulación Inversa de Kano, la unidad, impulsada por electricidad, calienta el agua mediante la transferencia de calor. -
Page 9: Instrucciones Del Producto
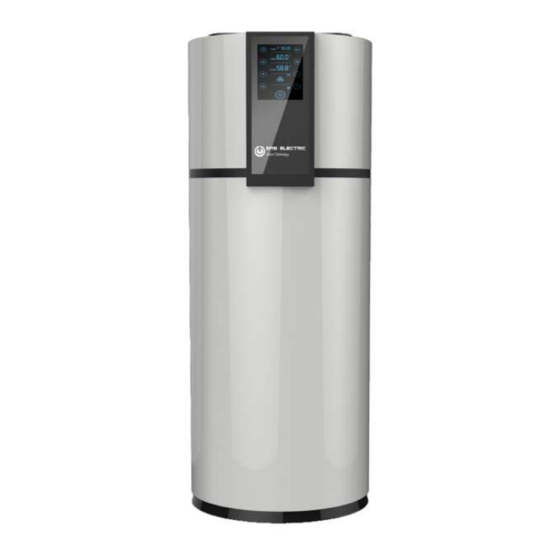
3.Instrucciones del producto 3.1 Apariencia 3.2 Dimensiones... - Page 10 Cable de alimentación Salida de agua condensada Válvula PT (de protección de Presión y Temperatura) Salida de agua Soportes Cubierta del calentador eléctrico Entrada de agua salida de drenaje...
-
Page 11: Parámetros De Funcionamiento
3.3 Parámetros de funcionamiento Especificaciones del producto Modelo E300WHF AAa21R1/200E AAa21R1/260E AAa21R1/300E Capacidad de calentamiento nominal(W) 2100 2100 2100 2100 Potencia de entrada de calefacción (W) Bomba Corriente de entrada de calefacción (A) de calor Rendimiento de agua (L / H) COP(W/W) 3.92... -
Page 12: Instrucciones De Instalación
4. Instrucciones de instalación 4.1 Elección del lugar de instalación 1. Esta unidad se puede instalar en interior o en un balcón cerrado. Nunca puede verse afectada por la lluvia. 2. El panel LCD no debe estar expuesto a la exposición prolongada al sol. 3. -
Page 13: Instrucciones De Instalación
4.2 Instrucciones de instalación 4.2.1 Atención en la instalación * Solicite la instalación profesional de instaladores autorizados que tengan conocimiento profesional relevante. Si los usuarios instalan la unidad por su cuenta, podría funcionar incorrectamente y provocar una descarga eléctrica, lesiones, fugas de agua, incendios, etc. * Por favor, fije la unidad para evitar ruidos y vibraciones. -
Page 14: Conexión De Tubería
4.Instrucciones de instalación 4.3 Conexión de tubería 4.3.1 Diagrama de conexión de la tubería de agua 4.3.2 Instrucciones de conexión de la tubería de agua * Por favor, primero fije la unidad en un terreno plano, luego instale la tubería de entrada y salida. * Por favor, conecte los tubos y las piezas como se indica arriba. -
Page 15: Esquema Eléctrico
4.4.1 Esquema eléctrico 4.4.2 Circuito de conexión *Se debe usar una fuente de alimentación acorde con la unidad. El voltaje de suministro debe cumplir con la tensión nominal requerida en la placa de identificación. *El circuito de suministro de energía de la unidad debe estar conectado a tierra de manera fiable. *La instalación del cableado debe ser realizada por personal técnico de instalación profesional de acuerdo con el diagrama de cableado. - Page 16 Ancho cubierta > 650mm ≥400mm ≥400mm *Si la máquina se instala en el exterior, se debe agregar una tubería flexible de entrada de aire durante la instalación. Por favor, cómprela (tubería de unión flexible de salida de aire). Este diagrama de tubería y abrazadera es de ø180mm.
-
Page 17: Instrucciones De Funcionamiento
5. Instrucciones de funcionamiento 5.1 Uso Opere en el siguiente orden: 1. Inyección de agua: no encienda la corriente eléctrica hasta que el tanque se haya llenado completamente con agua cuando la unidad se usa por primera vez o cuando se vuelva a usar después de haber vaciado el tanque de agua. - Page 18 5. Instrucciones de funcionamiento ESTERILIZACIÓN ABAJO ARRIBA RELOJ AJUSTE MODO WIFI (reservado) MODO VACACIONES La unidad tiene cuatro modos de funcionamiento: modo AUTO, modo ECO, modo RÁPIDO y modo MULT. Hay cuatro formas de producir agua caliente en la unidad: bomba de calor, calentador eléctrico auxiliar, energía solar y caldera.
-
Page 19: Pautas De Funcionamiento Del Panel
5. Instrucciones de funcionamiento Para el modo Eco, la unidad funciona solo con bomba de calor. Para el modo fast (rápido), funciona tanto con la bomba de calor como con el calentador eléctrico en todo tipo de condiciones. A través del controlador, se puede seleccionar una temperatura máxima de 75 ° C (esta es la limitación predeterminada). - Page 20 5. Instrucciones de funcionamiento Después de la concluir configuración, presione el botón para salir de la misma. Observaciones: (1) Si no se realiza ninguna operación durante 30 segundos, la configuración se cerrará automáticamente con el fallo; (2) Presione el botón para completar la configuración y salir;...
- Page 21 5. Instrucciones de funcionamiento 7. Ajuste del temporizador semanal Esta función es automática. Después de ajustar el temporizador, la unidad se ejecutará a la hora establecida todos los días. El usuario puede configurar la hora de inicio y apagado de cada día según las necesidades, y también puede determinar una hora diferente en un día específico de la semana de acuerdo a las necesidades.
- Page 22 5. Instrucciones de funcionamiento 10. Cancelación del ajuste de vacaciones Después de realizar el ajuste correctamente, mantenga presionada la tecla durante 3 segundos (si no tiene la tecla , presione al mismo tiempo). La configuración de tiempo se cancelará . 11.
- Page 23 5. Instrucciones de funcionamiento 15. Consulta de parámetros Mantenga presionado el botón durante 5 segundos para acceder a la consulta de parámetros. El código Fxx se mostrará en el área de tiempo, "xx" son dos números digitales que representan el código del parámetro. El valor específico del parámetro se mostrará en el área de la zona de temperatura.
- Page 24 Indicador temperatura C del aire de retorno Indicador temperatura C bobina Indicador temperatura de C escape Indicador temperatura C tanque de agua Indicador del compresor Grado de apertura 0 - 480 actual de EEV Presione el botón + o - para visualizar el histórico de errores después de Histórico de fallos presionar el botón "ajuste"...
-
Page 25: Manejo De Errores Y Mantenimiento
Diferencia temperatura 0 – 20 ℃ bobina al comenzar a descongelar Series Protección actual del 1.0 - 99.9 sobrecarga compresor Series Protección de temperatura 50 – 125 C Alarma de escape 0: auto Series Esterilización automática Ajuste de 1 : cierre funciones Pre-reserva Nivel básico de apertura... - Page 26 Fallo del sensor del fondo Para de calentar Recuperación automática del tanque de agua Fallo del sensor de Para de calentar Recuperación automática temperatura de la bobina Fallo del sensor Recuperación automática del aire de escape Fallo del sensor Recuperación automática del aire ambiente Fallo del sensor del Para de calentar...
-
Page 27: Mantenimiento De La Unidad
6. Mantenimiento y manejo de errores 6.2 Mantenimiento de la unidad Esta unidad solo puede ser abierta y reparada por personal autorizado. Cualquier daño causado por tareas de reparación desautorizadas, provocará el fin de la garantía. 1. Esta unidad puede funcionar bien en un rango de -7 ℃ ~ 46 ℃. 2. - Page 28 USER’S MANUAL Air Source Heat Pump Water Heater All In One Model:E300WHF Please keep this instruction manual properly and read it carefully before Installation and use.
- Page 29 Preface Thank you to choose our product for air source heat pump water heaters *This manual is to provide relevant important safety, installation, operation and maintenance information for you. Please read this manual carefully before you open or maintain the unit. * This unit should be installed by authorized professional personnel.
- Page 30 Content 1.Safety Precaution ........................31 2.Product instruction ........................34 2.1 Product introduction ......................35 2.2 Working Principle ......................35 3. Product Instruction ........................36 3.1 Appearance ........................36 3.2 Dimension ........................36 3.3 Performance Parameter ....................38 4. Installation Instruction ......................39 4.1 Installation place choose....................39 4.2 Installation Instruction ......................40 4.2.1 Installation attention.....................
-
Page 31: Safety Precaution
1. Safety Precaution Safety Precaution To prevent the users and others from the harm of the unit, and avoid damage on the unit or other property, please use the heat pump properly, please read this manual carefully and understand the following information correctly. Mark Meaning A wrong operation may lead to death or heavy injury on people. - Page 32 When install the unit in a small room, please take some measures to prevent the asphyxia caused by the leakage of refrigerant. Concentration Please consult the dealer for concreate measures. Limits The unit Cannot be installed near the flammable gas. Once there Installation is any leakage of the gas.
- Page 33 1. Safety Precaution Move and repair When the heat pump needs to be moved or installed again, please entrust dealer or qualified person to carry it out. Improper installation will lead to water leakage, electrical shock, injury or Entrust fire. It is prohibited to repair the unit by the user himself, otherwise electrical shock or fire may be occurred.
- Page 34 Usage Warning This appliance can be used by children aged from 8 years and above and persons with reduced physical, sensory or mental capabilities or lack of experience and knowledge. If they have been given supervision or instruction concerning use of the Usage Warning appliance in a safe way and understand the hazards involved.
-
Page 35: Product Instruction
2. Product Instruction 2.1 Product introduction Air source heat pump water heater is one of the latest environmental friendly and energy saving water heaters. It’s a tread to replace solar heater and boiler in many markets. 2.2 Working principle According to the principle of Reverse Kano Circulation Principle, the unit, driven by electricity, heats water by the heat transfer medium, which absorbs heat effectively from the air or the unusable low-grade heat from other low-temperature heat source, are compressed to the usable high-grade heat and then released the heat into water, In this way, the unit will supply user with sufficient hot water and space heating. -
Page 36: Product Instruction
3.Product Instruction 3.1 Appearance 3.2 Dimension Dimension... -
Page 38: Performance Parameter
3.3 Performance parameter Product specification E300WHF Model AAa21R1/200E AAa21R1/260E AAa21R1/300E 2100 2100 2100 2100 Rated Heating Capacity(W) Heating Input Power(W) Heat Heating Input Current(A) Pump Water Yield(L/H) COP(W/W) 3.92 3.92 3.92 3.92 Type Electric Heater Electric Heater Electric Heater Electric Heater... -
Page 39: Installation Instruction
4. Installation Instruction 4.1 Installation place choose 1. This unit can be installed indoors or in the closed balcony, but shall not be subjected to the rain. 2. LCD panel shall not be subjected to long-term exposure to the sun. 3. -
Page 40: Installation Instruction
4.2 Installation instruction 4.2.1 Installation attention * Please ask for professional installation from authorized installers who have relevant professional knowledge. If the users install the water heater on their own, wrong operation will result in electric shock, injury, water leakage, fire etc.; * Please fix the unit to prevent noises and vibration, you must fixed the unit on the floor or fixed the unit lean on wall. -
Page 41: Pipe Connection
4.Installation Instruction 4.3 Pipe connection 4.3.1 Water pipe connection diagram 4.3.2 Water pipe connecting instruction * Please fix the unit on the level ground first, then to install the inlet and outlet pipe. *Please connect the pipes and parts as above request. If ambient temperature for working and installation is below 0℃, all the pipes must be heat preservation treated. -
Page 42: Electrical Schematic And Circuit Connection
4.4.1 Electrical schematic 4.4.2 Electrical schematic *Dedicated power supply shall be used for water heater. The supply voltage shall comply with the rated voltage required in the nameplate; *The power supply circuit of the water heater must be reliably grounded; *Wiring construction must be carried out by professional installation technical personnel according to wiring diagram;... - Page 43 4.5.3 If the machine is installed in outdoor, An air inlet flexible pipe should be added during installation. Please purchase by yourself(air outlet flexible pipe attached itself). This pipe and clamp diagram is ø180mm. 4.5.4.If the machine is installed in outdoor, and the region of winter temperature is lower than 0℃, please be sure to keep the water pipes warm to prevent freezing;If necessary, add piping heating device to avoid pipe freezing.
-
Page 44: Operating Instruction
5. Operating Instruction 5.1 Usage Operate in the following order: 5.2. Operating guideline 5.2.1 Operating panel intion... - Page 45 5.Operating Instruction The unit has four operating modes: AUTO mode, ECO mode, FAST mode and MULT mode. There are four ways to make hot water in the unit: heat pump, auxiliary electrical heater, solar energy and boiler. Under different modes, hot water is heated by different way, as shown in the following table: Hot Water Heating Way Operating Solar...
-
Page 46: Panel's Operating Guideline
For Eco mode, It works with only heat pump. For Fast mode, it work with both heat pump and E heater under any conidtion. By controller, use can select Max.75ºC temperature(This is default limitiation, that we can make judgement inside factory). With heat pump only, max. water out temperature is 68ºC. With both heat pump+ E heater, it can be read the selected max. - Page 47 setting, press the button to exit the setting. Remarks: (1) If no operation for 30 seconds, the setting will automatically exit with failure; (2)Press the button to complete the setup and exit; (3) If the error is found in the previous setting, the user can press the button before completing the setting to switch the hour and minute setting.
- Page 48 5. Operating Instruction 8. Special date timing Long pressing the button for more than 3 seconds. The digital light will be light from number 1 to 7 cyclically every one second, and the 7 numbers correspond to the 7 days of the week. When the button is released, when the button is released, the corresponding date time setting can be started.
- Page 49 5. Operating Instruction 10. Vacation setting cancelling After timing setting successful, press and hold the button at the same time for 3 seconds (if without the button, press the buttons at the same time). The time setting is cancelled. 11. The priority of vacation mode and weekly timer. The vacation setting priority is higher than the weekly time setting.
- Page 50 5. Operating Instruction 15. Parameter inquiry Press and hold Reset button for 5 seconds, enter into parameter inquiry. Code Fxx would be displayed on time area, xx is two digital numbers which represents parameter code. The specific value of the parameter would be displayed on the temperature zone area.
- Page 51 Return air temperature C display Coil temperature display C Exhaust air temperature C display Water tank bottom water temperature C display Compressor current display Current opening degree 0 - 480 of EEV Press button + or – to display fault list Faults history after press button SET Do not set the value...
- Page 52 Coil temperature difference when starting 0 – 20 ℃ to defrost Overload Compressor current 1.0 - 99.9 series protection Alarm Exhaust temperature 50 – 125 C series protection 0: auto Function Automatic sterilization 1 : close setting series Pre-reservation Basic opening degree of 150 - 400 EEV.
- Page 53 Water tank bottom Stop heating Automatically recovery sensor failure Coil temp. sensor Stop heating Automatically recovery failure Exhaust air sensor Automatically recovery failure Ambient air sensor Automatically recovery failure Suction air sensor Stop heating Automatically recovery failure Solar water outlet Automatically recovery sensor failure DC fan motor failure...
-
Page 54: Maintenance And Faults Handling
6. Maintenance and Faults Handling 6.2 Unit Maintenance The unit is only open and repaired by assigned agency or maintenance agency. Any damages caused by unauthorized dismantling will end the warranty. 1. Our household Air-Source Heat Pump Water Heater can work well in a range of -7℃~46℃. 2. - Page 55 www.easelectric.es 966 18 18 88...
Need help?
Do you have a question about the E300WHF and is the answer not in the manual?
Questions and answers