
Related Manuals for Taylor RD30

Summary of Contents for Taylor RD30
- Page 1 OPERATOR’S MANUAL Model RD30 and RC25 Remote Slush Freezer Original Operating Instructions 051060-M 11/99 (Original Publication) (Updated 10/16/2020)
- Page 2 Only instructions originating from the factory or its authorized translation representative(s) are considered to be the original set of instructions. © 1999 Taylor Company 051060-M Any unauthorized reproduction, disclosure, or distribution of copies by any person of any portion of this work may be...
-
Page 3: Table Of Contents
Setup Procedures ....................1-3 Section 2: To the Operator Compressor Warranty Disclaimer ..............2-2 Section 3: Safety Section 4: Operator Parts Identification Model RD30 ....................... 4-1 Beater Door Assembly ..................4-2 Section 5: User Interface Control Switch ....................5-1 Fill Switch ......................5-1 Mix Out Light ...................... - Page 4 Table of Contents Section 8: Troubleshooting Guide Section 9: Parts Replacement Schedule Section 10: Limited Warranty on Equipment Section 11: Limited Warranty on Parts 051060-M...
-
Page 5: Section 1: To The Installer
Taylor distributor. This machine is made using USA sizes of hardware. All Note: All repairs must be performed by a Taylor service metric conversions are approximate and vary in size. technician. To the Installer... -
Page 6: Electrical Connections
IEC 60417-1) on both the removable panel and the Failure to follow these instructions may result in machine's frame. electrocution. Contact your local authorized Taylor distributor for service. WARNING! Avoid injury. • DO NOT operate the machine unless it is properly grounded. -
Page 7: Beater Rotation
For information regarding applicable local laws, It is recommended that beater rotation adjustment be please contact your local authorized Taylor distributor. performed by a Taylor service technician. Refrigerant IMPORTANT! Refrigerants and their associated lubricants may be extremely moisture absorbent. -
Page 8: Setup Procedures
Adjust the fill system pressure to deliver product to the hopper at 1.5 oz. to 2. Turn the fill switch in the front of the RD30 to the FILL 2.5 oz. (42.5 g to 70.9 g) per second. (Approximately position. -
Page 9: Section 2: To The Operator
In the event you should require technical assistance, please contact your local authorized Taylor distributor. Note: Your Taylor warranty is valid only if the parts are authorized Taylor parts, purchased from the local authorized Taylor distributor, and only if all required service work is provided by a Taylor service technician. -
Page 10: Compressor Warranty Disclaimer
TO THE OPERATOR Compressor Warranty Disclaimer It should also be noted that Taylor does not warrant the refrigerant used in its equipment. For example, if the The refrigeration compressor(s) on this unit are refrigerant is lost during the course of ordinary service to... -
Page 11: Section 3: Safety
Safety Section 3 We at Taylor Company are concerned about the safety of the operator when he or she comes in contact with the freezer and its parts. Taylor has gone to extreme efforts WARNING! This machine must NOT be... - Page 12 Failure to follow these instructions may result in electrocution. Contact your local authorized Taylor NOTICE! Cleaning and sanitizing schedules distributor for service. are governed by your federal, state, or local regulatory agencies and must be followed accordingly.
-
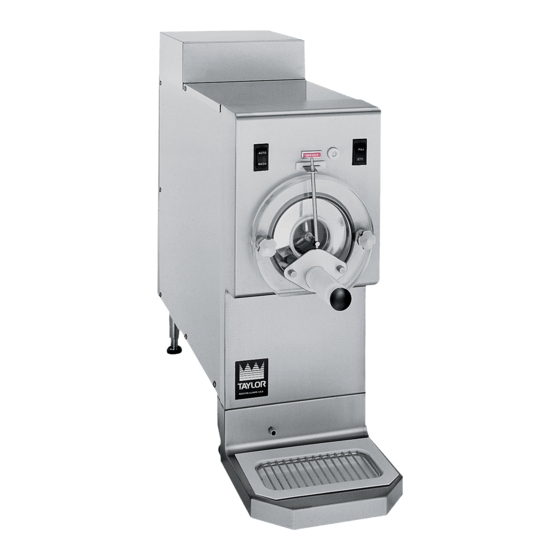
Page 13: Model Rd30
Operator Parts Identification Section 4 Model RD30 Figure 4-1 Item Description Part No. Item Description Part No. Cover-Rear 049201 Washer-Freezer Stud 049032 Cover-Hopper 049081 Panel A.-Front X49760 Retainer-Clip 049419 Support-Tray-Left 049056 Panel A.-Rear X48983 Support-Tray-Right 049057 Panel-Side-Right 048977 Tray A.- Drip X49182 Leg A.- 4”- 3/8- 16 Stud w/Cap... -
Page 14: Beater Door Assembly
032560 Door A.- Partial X50172 Nut-Stud 045644 Note: Optional Door Assembly X50654 has a larger O-ring 5.5” OD x 5.234 ID x .13 049077 draw valve, spout, and door port for thick product. Bearing-Front 013116 Operator Parts Identification Models RD30/RC25... -
Page 15: Section 5: User Interface
The OFF position terminates the fill function. The refrigeration system is disabled when the Fill switch is in the OFF position. User Interface Models RD30/RC25... - Page 16 USER INTERFACE Notes: User Interface Models RD30/RC25...
-
Page 17: Section 6: Operating Procedures
Note: When lubricating parts, use an approved food-grade lubricant (example: Taylor Lube HP). Every 3 months discard rubber parts and install new rubber parts. 1. Lubricate the O-ring groove. Slide the O-ring into the first groove on the driveshaft. Lubricate the groove, O-ring, and shaft portion that comes in contact with the rear shell bearing on the beater driveshaft. - Page 18 O-ring. Do not lubricate the guide bearing. Apply the appropriate Taylor approved food safe lubricant. Figure 6-5 6. Holding the blades in position, insert the beater assembly into the freezing cylinder, and slide the Figure 6-8 assembly into position over the driveshaft.
- Page 19 Replace any damaged parts. 10. Slide the draw valve O-ring into the groove on the draw valve and lubricate the O-ring. Apply the appropriate Taylor approved food safe lubricant. Apply the appropriate Taylor approved food safe lubricant. Figure 6-13 14.
- Page 20 Apply the appropriate Taylor approved food safe lubricant. LUBRICATE AROUND GASKET ONLY. Figure 6-18 Figure 6-16 19.
-
Page 21: Sanitizing (Without Post Mix Valve)
Important! The machine must not be placed in Auto mode until all sanitizing solution has been removed from the freezing cylinder and proper priming procedures have been completed. Failure to follow this instruction may result in damage to the freezing cylinder. Operating Procedures Models RD30/RC25... - Page 22 Important! The machine must not be placed in Auto mode until all sanitizing solution has been removed from the freezing cylinder and proper priming Figure 6-28 procedures have been completed. Failure to follow this instruction may result in damage to the freezing cylinder. Operating Procedures Models RD30/RC25...
-
Page 23: Priming (Without Post Mix Valve)
Figure 6-32 Important! Failure to remove all sanitizing solution may result in damage to the freezing cylinder. Figure 6-30 5. Replace the hopper cover and the upper rear cover. Figure 6-31 Operating Procedures Models RD30/RC25... -
Page 24: Priming (With Post Mix Valve)
When the rinse water stops flowing from the door Closing Procedure spout, close the draw valve and place the control To disassemble the Model RD30, the following items will switch in the off position. be needed: Repeat this procedure until the rinse water being •... -
Page 25: Cleaning
1. Remove the torque arm, handscrews, freezer door, beater assembly, scraper blades, torque rotor, and driveshaft, and take these parts to the sink for cleaning. 2. Remove the front drip tray and splash shield and take them to the sink for cleaning. Operating Procedures Models RD30/RC25... - Page 26 OPERATING PROCEDURES Notes: 6-10 Operating Procedures Models RD30/RC25...
-
Page 27: Section 7: Operator Checklist
Clean and sanitize the product lines regularly to prevent syrup residue buildup that would restrict the proper flow of syrup. On a regular basis, take a brix reading to ensure a consistent, quality product (post mix valve systems only). Operator Checklist Models RD30/RC25... -
Page 28: Winter Storage
Your local Taylor distributor can perform this service for you. 1. Disconnect the freezer from the main power source to prevent possible electrical damage. - Page 29 Do not lubricate the square end of the driveshaft. end of the driveshaft. driveshaft. Contact a service technician for driveshaft removal. b. Rounded corners of the driveshaft, b. Replace the driveshaft, drive drive coupling, or both coupling, or both components. components. Troubleshooting Guide Models RD30/RC25...
- Page 30 Probable Cause Remedy Ref. 6. Excessive mix leakage a. Improper or inadequate lubrication a. Use the correct lubricant (Taylor in the rear drip pan. on the driveshaft O-ring or seal. Lube) and follow proper lubrication procedures. b. Worn or missing O-ring or seal on b.
- Page 31 Annually Scraper Blade Inspect and replace if Minimum necessary. Driveshaft Seal Freezer Door O-ring Door Port O-ring Front Bearing Door Spout O-ring Drive Shaft O-ring Torque Arm O-ring Brushes Inspect and replace if Minimum necessary. Parts Replacement Schedule Models RD30/RC25...
- Page 32 PARTS REPLACEMENT SCHEDULE Notes: Parts Replacement Schedule Models RD30/RC25...
- Page 33 LIMITED WARRANTY Taylor warrants the Product against failure due to defect in materials or workmanship under normal use and service as follows. All warranty periods begin on the date of original Product installation. If a part fails due to defect during the applicable warranty period, Taylor, through an authorized Taylor distributor or service agency, will provide a new or ...
- Page 34 LEGAL REMEDIES The owner must notify Taylor in writing, by certified or registered letter to the following address, of any defect or complaint with the Product, stating the defect or complaint and a specific request for repair, replacement, or other correction of the Product under warranty, mailed at least thirty (30) days before pursuing any legal rights or remedies..
- Page 35 Taylor warrants the Parts against failure due to defect in materials or workmanship under normal use and service as follows. All warranty periods begin on the date of original installation of the Part in the Taylor unit. If a Part fails due to defect during the applicable warranty period, Taylor, through an authorized Taylor distributor or service agency, will provide a new or remanufactured Part, at Taylor’s option, to replace the failed defective Part at no charge for the Part.
- Page 36 Taylor. 5. Replacement of wear items designated as Class “000” Parts in the Taylor Operator’s Manual, as well as any release sheets and clips for the Product’s upper platen assembly.
- Page 37 LEGAL REMEDIES The owner must notify Taylor in writing by certified or registered letter to the following address of any defect or complaint with the Part, stating the defect or complaint and a specific request for repair, replacement, or other correction of the Part under warranty, mailed at least thirty (30) days before pursuing any legal rights or remedies.
- Page 38 LIMITED WARRANTY ON PARTS Notes: 11-4 Limited Warranty on Parts Models RD30/RC25...
Need help?
Do you have a question about the RD30 and is the answer not in the manual?
Questions and answers