
Related Manuals for Canam Hoops FLEXTREME Platinum 72

Summary of Contents for Canam Hoops FLEXTREME Platinum 72
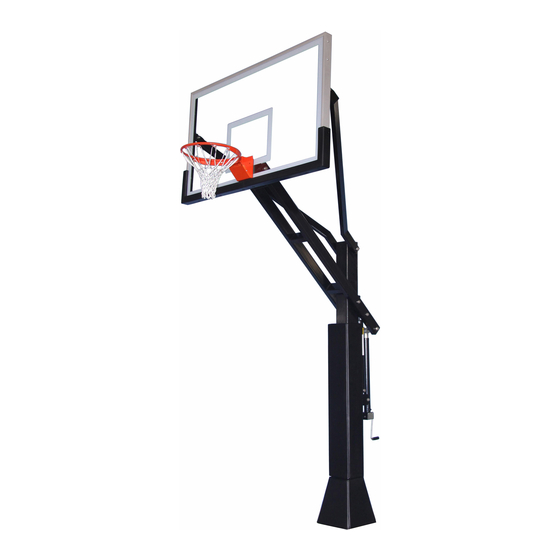
- Page 1 Platinum 72 Installation Instructions CANAM HOOPS © all rights reserved. Version 2.0...
-
Page 2: Safety Instructions
: utilities are a safe distance away from the anchor www.canamhoops.com system. Make sure there are no overhead power lines within a 20 foot radius of the basketball system. All parts and components necessary to complete proper installation are included within this product. Do not use parts not included with our system. Failure to follow this requirement could cause product malfunction and will void warranty of this product. Keep all organic materials away from parts and components to avoid corrosion. Hoop. Please use caution when performing this Do not climb on any part of the basketball system as it was not intended for this activity. Do not use the basketball system as a lift or to hoist anything 2 CANAM HOOPS © all rights reserved. Version 2.0... -
Page 3: Hardware List
(4 pieces - Rim Kit) (2 pieces - Rim Kit) 10mm Hex Bolt 10mm Lock Washer (4 pieces - Rim Kit) 10mm Flat Washer (4 pieces - Rim Kit) (8 pieces - Rim Kit) CANAM HOOPS © all rights reserved. Version 2.0... - Page 4 HARDWARE LIST C, E, G Rubber Gasket for Rim Attachment 20mm x 12.75” 10” Safety Pin J Bolt Rebar Hex Bolt (4 Pieces) (4 Pieces) CANAM HOOPS © all rights reserved. Version 2.0...
- Page 5 (4 pieces) (4 pieces) (16 pieces) (2 pieces) 14mm Plastic Washer 16mm Plastic Washer 18mm Plastic Washer 20mm Plastic Washer (4 pieces) (4 pieces) (8 pieces) (2 pieces) 18mm Lock Washer (4 pieces) CANAM HOOPS © all rights reserved. Version 2.0...
- Page 6 The CanamHoops lines shou uld be within a 20 ft. radiu s of the system will be a system.) permane nt structured d once installe ed. Overhang g – distance fr rom front of p pole to front The playi ng surface m ust be free of f any hazards s of backbo oard when adj justed to 10’ or obstru uctions. 6 CANAM HOOPS © all rights reserved. Version 2.0 ...
- Page 7 ITEMS NEEDED NOT INCLUDED WITH SYSTEM Post Hole Digger Trowel Shovel Hammer and nails Wheel Barrow Level (20‐22) 80 lbs. bags of concrete or Tape Measure (27‐30) 60 lbs. bag of concrete (2) Large Crescent Wrenches Garden Hose 17mm wrench 2”x4” lumber 16mm deep socket (6) Stakes to secure form boards 7 CANAM HOOPS © all rights reserved. Version 2.0...
- Page 8 The (4) nuts s (K) on the b ottom of the anchor plate e Use 2” x 4 4” lumber or c cardboard fo rms to form will for rever be place ed in the conc crete. the t op of the hol e for finished d aesthetics. T The top edge of the f orm boards s should be leve el with the pl aying surface e. 8 CANAM HOOPS © all rights reserved. Version 2.0...
- Page 9 Use a tape measure to verify that the anchor is square to the playing surface. Use a level to verify that anchor plate is level from front to back and side to side. Allow the concrete to cure for a minimum of 3 Days. 9 CANAM HOOPS © all rights reserved. Version 2.0...
- Page 10 Install (4) metal washe ers(O) on top of anchor bo lts and i install main p pole as shown n in diagram w with (2) gusse ets facin g towards pla aying surface . Place (4) m etal washers (O) o on top of base e plate follow wed by (4) lock k washers (V) Make sure tha at base plate is and ( (4) nuts (K) an nd tighten. M squa re to playing g surface. 10 CANAM HOOPS © all rights reserved. Version 2.0...
- Page 11 Lift the lower extension arm over main pole and lower to point of holes in arm being level with lower holes in main pole. Install bolt (E) with (1) metal washer (O) and (1) plastic washer (S) through hole as shown in diagram. Once the bolt is through the main pole and other side of lower extension arm, install (1) plastic washer (S) and (1) metal washer (O) followed by nut (K). 4. Canam Hoops™ Lift Assist and Height Indicator Assembly Place (2) spring cartridges behind main pole and install upper bolt (D) with (1) metal washer (P), and (1) plastic washer (T) through first side of lower extension arm. 3. Height Actuator Assembly Place height actuator behind main pole and install bottom After the clear height indicator is in place, push bolt (A), metal washers (N), plastic washers (R) and nut (J) upper bolt (D) through (2) spring cartridges and the other as shown in diagram. Rotate handle to lengthen the side of the lower extension arm. Install (1) plastic washer actuator to the point where the upper holes are properly (T) and (1) metal washer (P) followed by nut (L). aligned with the holes on the rear of the upper extension arm. Install top bolt (C), metal washers (O), plastic Align bottom holes of spring cartridges with washers (S) and nut (K). designated holes on extension plate. 11 CANAM HOOPS © all rights reserved. Version 2.0...
- Page 12 Install lower bolt (B) with (1) metal washer (N) and Align (1) Upper Extension Arm with upper hole in main (1) plastic washer (R) through hole as shown in diagram. pole. Install bolt (F) with (1) metal washer (O) and (1) Once the bolt is through both spring cartridges, install (1) plastic washer (S) through hole as shown in diagram. plastic washer (R) and (1) metal washer (N) followed by Once the bolt is through the main pole, install the other nut (J). upper extension arm with (1) plastic washer (S) and (1) metal washer (O) followed by nut (K). 6. Backboard Assembly Raise backboard so front of backboard is facing the playing surface as shown in diagram. Align the holes behind the rim with the holes at the end of the lower extension arms. Install bolt (G) with (1) metal washer (O) and (1) plastic washer (S) through designated holes. Once the bolt is through backboard frame and lower extension 5. Upper Extension Arms Assembly arms, install (1) plastic washer (S) and (1) metal washer (O) followed by nut (K). Do not fully tighten nut until instructed to do so later in the installation process. Raise front of backboard to be perpendicular to playing surface. Align Upper Extension Arms with Upper 12 CANAM HOOPS © all rights reserved. Version 2.0...
- Page 13 Backboard Attachments and install bolts (H), metal washers, (4) lock washers, and (4) nuts as shown in washers (M), plastic washers (Q), and nuts (I) as shown in diagram. Check rim for level and tighten all four nuts. diagram. Install Rim Plate on base of rim with (2) machine screws and tighten. Install net on rim by twisting net loops 90 degrees clockwise and inserting through designated rim attachments and over hooks on the underside of rim. 8. Remove Spacers from Spring Cartridge Remove (2) blue plastic spacers from spring cartridges at this time. 7. Rim and Net Assembly Install (4) bolts with metal washers through holes in rim plate and place rubber gasket on back side of rim plate. Lift this assembly and place bolts through the four designated holes on the backboard. On the opposite side of the backboard install (4) plastic washers, (4) metal 13 CANAM HOOPS © all rights reserved. Version 2.0...
-
Page 14: Maintenance
Clean the backboard periodically with water and a soft cotton cloth. Approved glass cleaners work as well to maintain the clear view glass backboard. To properly clean the system components use a soft, non‐abrasive cloth and water with a mild detergent. Do not use abrasive materials to clean as it could damage the powder‐coated finish on your basketball system. If you see any signs of rust on the system remove the loose paint, gently sand the area, and apply outdoor enamel gloss paint to the affected area. 12. Routine System Inspection Before each use inspect the basketball system for any signs of the following: Loose nuts and bolts All parts and components for excessive wear and tear Any signs of rust or corrosion 10. Protective Padding Assembly Install gusset pad over base of pole as shown in diagram and connect Velcro straps in rear to secure pad. Install pole pad by mounting to pole directly on top of the gusset pad. Connect Velcro straps in rear to secure pole pad. 14 CANAM HOOPS © all rights reserved. Version 2.0... - Page 15 Product or component parts must be delivered in either its original carton or a similar package affording an equal degree of protection. Canam Hoops will not be responsible for any loss or damage incurred in connection with the return of this Product or component parts.
Need help?
Do you have a question about the FLEXTREME Platinum 72 and is the answer not in the manual?
Questions and answers