Table of Contents
Advertisement
Available languages
Available languages
Quick Links
Ceiling-mounted Heater (with Connex
RCH5031CXW
IMPORTANT INSTRUCTIONS
When using electrical appliances, basic precautions should always
be followed to reduce the risk of fire, electric shock and injury to per-
son, including the following:
1.
Read all instructions before using this heater.
2.
The heater is hot when in use. To avoid burns, do not let bare
skin touch hot surfaces. Keep combustible materials, such as
furniture, pillows, bedding, papers, clothes, and curtains at least
a 3 ft. (1 m) from the front of the heater and keep them away
from the sides.
3.
Wiring procedures and connections should be in accordance
with the National Electric Code (NEC & CEC) and local codes.
4.
Extreme caution is necessary when any heater is used by or
near children or invalids and whenever the unit is left operating
and unattended.
5.
Do not operate any heater after it malfunctions. Disconnect
power at service panel and have heater inspected by a certified
electrician before reusing.
6.
To disconnect heater, turn off power to heater circuit at main dis-
connect panel.
7.
Do not use outdoors.
8.
Use this heater only as described in this manual. Any other use
not recommended by the manufacturer may cause fire, electric
shock, or injury to persons.
9.
A heater has hot and arcing or sparking parts inside. Do not use
it in areas where gasoline, paint or flammable liquids are used
or stored.
10. This heater is hot when in use. To avoid burns, do not let bare
skin touch hot surfaces. Keep combustible materials such as:
furniture, pillows, bedding, papers, clothes and curtains away
from heater.
11. Do not insert or allow foreign objects to enter any ventilation or
exhaust opening as this may cause an electric shock or fire, or
damage the heater.
12. To prevent a possible fire, do not block air intake or exhaust in
any manner.
!
NOTE: This equipment has been tested and found to comply with the limits
for a Class B digital device, pursuant to Part 15 of the FCC Rules. These limits
are designed to provide reasonable protection against harmful interference
in a residential installation. This equipment generates, uses and can radiate
radio frequency energy and, if not installed and used in accordance with
the instructions, may cause harmful interference to radio communications.
However, there is no guarantee that interference will not occur in a particular
installation. If this equipment does cause harmful interference to radio or
television reception, which can be determined by turning the equipment off
and on, the user is encouraged to try to correct the interference by one of the
following measures:
•
Reorient or relocate the receiving antenna.
•
Increase the separation between the equipment and receiver.
•
Connect the equipment on a circuit different from that to which the
receiver is connected.
•
Consult the dealer or an experienced radio/TV technician for help.
This device complies with Part 15 of the FCC Rules. Operation is subject
to the following two conditions: (1) This device may not cause harmful
interference, and (2) this device must accept any interference received,
including interference that may cause undesired operation.
FCC CAUTION: Any changes or modifications not expressly approved by
the party responsible for compliance could void the user's authority to operate
this equipment.
This device complies with Industry Canada licence-exempt RSS standard(s).
Operation is subject to the following two conditions: (1) this device may not
cause interference, and (2) this device must accept any interference, including
interference that may cause undesired operation of the device.
SAVE THESE INSTRUCTIONS
)
TM
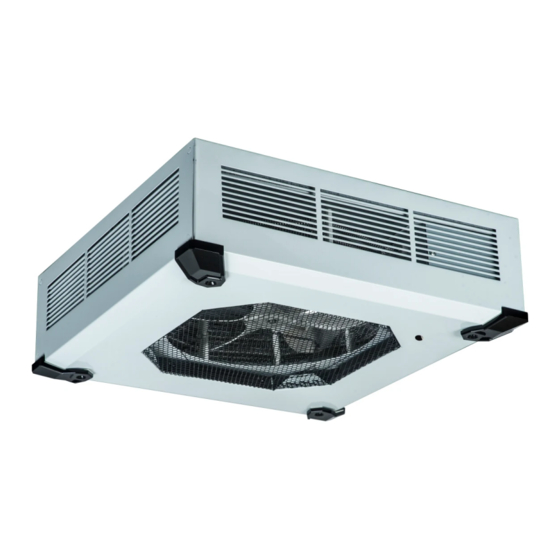
Installation Instructions
Figure 1
Wire Clips
Temperature
Sensor
Grill Box
Securing
Screws
WARNING: Wiring procedures and connections should be in ac-
cordance with the National Electric code (NEC) and local codes.
WARNING: To reduce the risk of fire, do not store or use gasoline
or other flammable vapors and liquids in the vicinity of the heater.
CAUTION: The heater should be mounted for DOWNWARD dis-
charge only.
CAUTION: High temperature, risk of fire, keep electrical cords,
drapery, furnishings, and other combustibles at least 3 feet (0.9m)
from the front of the heater and away from the side and rear.
1.
Unpack the heater from the carton.
2.
With the unit outlet pointing up, using the provided allen key,
remove the 4 screws to remove the grill box off of the unit.
3.
Flip the unit over and loosen 1 screw to remove the mounting
bracket.
4.
Determine the desired location, keeping in mind the minimum
clearances indicated in Figure 2.
5.
Secure the mounting bracket to the ceiling.
CAUTION: The ceiling and mounting hardware must have ad-
equate strength to support the heater. Attachment to a firm support
is a necessity.
6.
Loosen 2 screws to remove the wiring compartment cover. (Fig-
ure 1)
7.
Remove the desired knockout from the terminal box.
!
NOTE: It is only necessary to remove the knockout(s) that will
feed the power supply wiring, keeping in mind the heater mounting
location and supply wire location.
Figure 2
MINIMUM
6" (15.3 cm)
Electrical
Knockouts
Mounting
Bracket
Wiring Compartment
Cover
MINIMUM
8' (244 cm)
7213980100R05
Advertisement
Table of Contents

Related Manuals for Dimplex RCH5031CXW


Summary of Contents for Dimplex RCH5031CXW
- Page 1 Ceiling-mounted Heater (with Connex RCH5031CXW IMPORTANT INSTRUCTIONS Installation Instructions When using electrical appliances, basic precautions should always Figure 1 Electrical be followed to reduce the risk of fire, electric shock and injury to per- Knockouts son, including the following: Mounting Bracket Read all instructions before using this heater.
- Page 2 E. Synchronized Icon The RCH features CONNEX , a wireless technology that works with Dimplex CONNEX controllers to provide simple whole home connectivity and comfort (a single zone controller is included). CON- controllers are available to control one or multiple CONNEX A - Setting/Temperature Display series heaters within a 50’...
-
Page 3: Maintenance Instructions
Any claims under this Warranty must be submitted Setting. Ensure that the desired icons are present when locking is in writing to the Service Manager, Dimplex North America Ltd., 1367 complete. Industrial Rd., Cambridge, Ontario N4H 4W3, Canada. -
Page 4: Instructions D'installation
Appareil de chauffage pour plafond (doté de la technologie Connex RCH5031CXW INSTRUCTIONS IMPORTANTES Instructions d’installation Figure 1 Lors de l’utilisation d’un appareil électrique, il est important de tou- Ouvertures à jours prendre des précautions de base suivantes pour réduire les disque défonçable... -
Page 5: Instructions D'utilisation
Appuyer sur le bouton V pour activer le mode économie d’énergie, représenté par une icône clignotante. Une fois la température réduite réglée, l’icône devient fixe après trois secondes, ce qui active la température www.dimplex.com... -
Page 6: Instructions Pour L'entretien
✚, –, ✚ et –. L’icône apparaît. par écrit au directeur du service à la clientèle à : Dimplex North America Limited, 1367 Industrial Road, Cambridge, Ontario, N1R 7G8, Canada. Pour désactiver la fonction de verrouillage : À l’intérieur de Pièces de rechange... -
Page 7: Instrucciones De Instalación
Calentador de techo (con Connex RCH5031CXW INSTRUCCIONES IMPORTANTES Instrucciones de instalación Figura 1 Cuando se utilizan aparatos eléctricos, siempre se deben seguir cier- Troqueles tas precauciones básicas para reducir el riesgo de incendio, descar- Soporte de eléctricos gas eléctricas y lesiones personales, entre las que se encuentran las... - Page 8 A – Pantalla de configuración/ ciona con controles CONNEX Dimplex para una y para varias zo- temperatura B – Icono de configuración de confort nas, con el fin de brindar una conectividad sencilla para toda la casa C –...
-
Page 9: Piezas De Repuesto
Cualquier reclamación bajo los términos de esta garantía debe ser enviada Presione sostenga durante segundos. por escrito a Service Manager, Dimplex North America Ltd., 1367 Industrial Los iconos comenzarán a parpadear. Rd., Cambridge, Ontario N1R 7 8, Canadá. Para activarlo: En un lapso de 5 segundos presione ✚, lue- Piezas de repuesto go –, después ✚, finalmente –.
Need help?
Do you have a question about the RCH5031CXW and is the answer not in the manual?
Questions and answers
RCH5031CXW heating element not working. The **** runs all the time but heat does not come on. Temperature is set to 72F and the room temperature is 55F
If the Dimplex RCH5031CXW heating element runs continuously but does not produce heat, one possible issue is that the temperature is set to 41 °F (5 °C). At this setting, the heater operates only as a fan and the heating element does not turn on.
This answer is automatically generated