Table of Contents
Advertisement
Quick Links
We appreciate the trust and confidence you have placed in Hampton Bay through the purchase of this gazebo. We strive to
continually create quality products designed to enhance your home. Visit us online to see our full line of products available for your
USE AND CARE GUIDE
HARD TOP GAZEBO
Questions, problems, missing parts? Before returning to the store,
call Hampton Bay Customer Service
8 a.m. - 6 p.m., EST, Monday-Friday
1-855-HD-HAMPTON
HAMPTONBAY.COM
home improvement needs. Thank you for choosing Hampton Bay!
THANK YOU
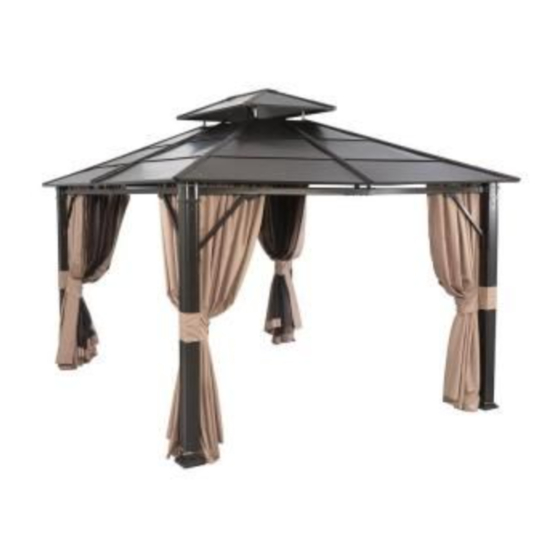
Item #1000 000 000
Model #L-GZ340PST-3I
Advertisement
Table of Contents

Related Manuals for HAMPTON BAY L-GZ340PST-3I


Summary of Contents for HAMPTON BAY L-GZ340PST-3I
- Page 1 THANK YOU We appreciate the trust and confidence you have placed in Hampton Bay through the purchase of this gazebo. We strive to continually create quality products designed to enhance your home. Visit us online to see our full line of products available for your...
-
Page 2: Table Of Contents
Table of Contents Table of Contents ............2 Pre-Assembly ..............3 Planning Assembly ............ 3 Safety Information ............2 Hardware Included ........... 3 Warranty ................. 2 What is Covered ............2 Package Contents ........... 4-6 ... -
Page 3: Pre-Assembly
Pre-Assembly PLANNING ASSEMBLY Before beginning assembly of this product, make sure all parts are present. Compare parts with the Hardware Included and Package Contents lists. If any part is missing or damaged, do not attempt to assemble the product. Contact customer service for replacement parts. -
Page 4: Package Contents
Pre-Assembly (continued) PACKAGE CONTENTS Part name Part Quantity Image Top frame part Long beam Support beam Connector Hook Cover 1 Cover 2 Cover board 1 Cover board 2 Post Post connector Beam connector Stake cover Stake flake Oblique beam connector... - Page 5 Top post connector Lower post connector Short beam Long beam Arc support Long netting beam 1 Long netting beam 2 Short netting beam 1 Short netting beam 2 Top beam Top post Left long cover 1 Right long cover 1 Left long cover 2 Right long cover 2 Left long cover 3...
- Page 6 Left short cover 2 Right short cover 2 Left short cover 3 Right short cover 3 Corner cover Middle cover Short beam(1) Short beam(2) Middle short beam (1) Middle short beam (2) Long beam (1) Long beam (2) Top short beam(1) Top short beam(2)...
-
Page 7: Assembly
Assembly Assemble the lower frame of Attach the small top frame the small top □ Attach the Top frame part (A1) to the long beam □ Attach the support beam (C1) to the connector of (B1) using screws (AA) and flat washers (BB). the top frame part (A1) using screws (AA) and flat washers (BB). - Page 8 Assembly (continued) Assembling the post Attaching the oblique beam connectors and beam connector connectors Assemble the post connectors (B2) to the beam □ Attaching the oblique beam connector (F2) to the post □ connector (B2) using bolts (FF) and flat washers (BB). connectors (C2) using bolts (FF) and flat washers (BB).
- Page 9 Assembly (continued) Attaching the cover and the Attaching the cover board oblique beam connector □ □ Attaching the cover board 1(H1) to support beam (C1) Attach the cover 1 (F1) and oblique beam connector and secure using screws (EE) and flat washers (BB). (F2) to the support beam (C1) and secure them using Repeat for the Repeat for the remaining cover boards (H1) and support...
- Page 10 Assembly (continued) Attaching the netting beams Secure the netting beam middle beams (X1-X4, and W1-W4) to Secure the other ends of the long netting beams 1 (L2a) □ Attaching the top □ the top beams (A3) using screws (AA) and flat washers and long netting beams 2 (L2b) to the top beams (A3) (BB).
- Page 11 Assembly (continued) Attaching the stake covers to Securing the top assembly the posts Attach the stake covers (D2) and stake flakes (E2) to the □ □ Lift the assembled top and insert the posts connector posts (A2) using screws (AA) and flat washers (BB). (B2) to the post (A2).
- Page 12 Assembly (continued) Finalizing the assembly □ Lift the stake cover (D2) and install the stake (JJ) into the ground through the stake flake (E2). Pull down the stake covers (D2). The gazebo is ready to use.
-
Page 13: Care And Cleaning
Care and Cleaning □ Before using, clean the gazebo completely with a soft dry towel. □ Do not put your gazebo in wet condition where there is a risk of rust developing. □ When not in use, store in a cool, dry area. HAMPTONBAY.COM Please contact 1-855-HD-HAMPTON for further assistance. - Page 14 Questions, problems, missing parts? Before returning to the store, call Hampton Bay Customer Service 8 a.m. - 6 p.m., EST, Monday-Friday 1-855-HD-HAMPTON HAMPTONBAY.COM Retain this manual for future use.
Need help?
Do you have a question about the L-GZ340PST-3I and is the answer not in the manual?
Questions and answers
how do you hook up the bug screen and the wind breaker
To hook up the bug screen and wind breaker (mosquito netting and curtains) for the HAMPTON BAY L-GZ340PST-3I:
1. Attach the ring (II) to the long mosquito netting beams (L2a, M2a, L2b, M2b).
2. Attach the mosquito netting (R) to the beams using the rings.
3. The mosquito netting (R) hangs inside the gazebo.
4. Attach the curtain (O) to the same beams.
5. The curtains (Q) hang outside the gazebo.
This completes the setup for both the bug screen and wind breaker.
This answer is automatically generated