Table of Contents
Advertisement
Quick Links
Advertisement
Table of Contents

Related Manuals for Rosco Miro Cube Series

Summary of Contents for Rosco Miro Cube Series
- Page 1 MIRO CUBE ® USER’S MANUAL...
-
Page 3: Table Of Contents
Table of Contents Your Miro Cube Product Description..................5 What’s In the Box....................7 Miro Cube Interface..................8 Miro Cube Series Miro Cube 4C & 4CA................... 10 Miro Cube WNC/3W..................12 Miro Cube UV365..................... 13 Miro Cube Modes DMX Mode......................14 Manual Mode.................... - Page 4 Table of Contents Mounting and Configuration Linear Array......................30 Safety Cables..................... 32 Miro Cube Support FCC Warning......................33 General Precautions..................34 Warning Messages................... 35...
-
Page 5: Product Description
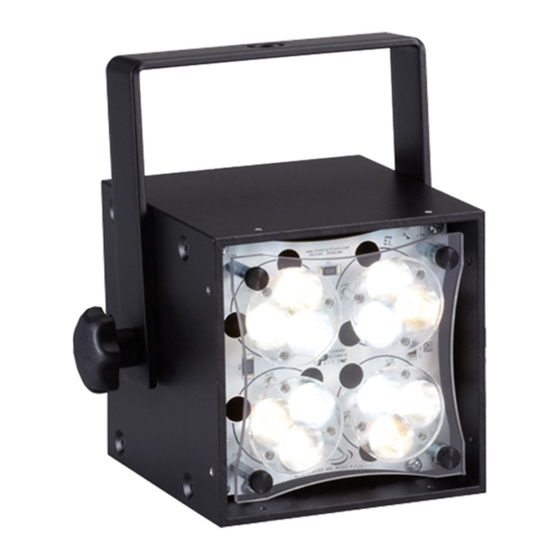
Product Description Miro Cube® Rosco's innovative Miro Cube series of LED wash lights packs 50 watts outputting more than 3400 lumens into a compact and portable 4 inch cube! The sleek yet rugged, geometric design of the Miro Cube is perfectly at home in museums, on track light systems, in stores and lobbies or built into sets, truss and lighting rigs of all styles. - Page 6 Product Description Mounting these compact 4 inch cubes is limited only by the imagination of the installer. The novel through bolted yoke design allows units to be easily ganged into multi-unit strips and arrays for greater output and coverage. Weighing just 2-1/2 pounds, the Miro Cube can be attached to standard architectural lighting track using accessory track adapters.
-
Page 7: What's In The Box
What’s In the Box Miro Cube [2] Power Cable Set of Symmetrical Spread Lenses... -
Page 8: Miro Cube Interface
Miro Cube Interface POWER LIGHT LCD DISPLAY PW R OK KEY MENU KEY M I RO CUBE M E N U D M X O UT PW R D ESI G N ED BY THE BLACK TANK DMX IN POWER CONNECTOR DMX OUT... - Page 9 Miro Cube Interface ARC Version POWER LIGHT LCD DISPLAY PW R OK KEY MENU KEY M I RO CUBE M E N U D M X O UT PW R D ESI G N ED BY THE BLACK TANK DMX IN HARDWIRED CABLE DMX OUT...
-
Page 10: Miro Cube 4C & 4Ca
Miro Cube 4C/4CA Miro Cube 4C & 4CA From walls to washes to uplighters, the From walls to washes to uplighters, the Miro Cube 4C/4CA color mixing wash light Miro Cube 4C & 4CA color mixing wash light o ers a designer maximum creativity in a o ers a designer maximum creativity in a tiny package. - Page 11 color wash mode or allows multiple units to be easily slaved together, stand-alone color wash mode or allows multiple units to be easily synchronized and o set using self-generated DMX for color chases slaved together, synchronized and o set using self-generated DMX for and other dynamic lighting patterns without a console.
-
Page 12: Miro Cube Wnc/3W
Miro Cube WNC/3W Size matters. But quality of light matters more! The Miro Cube WNC/3W embodies what every lighting professional needs - a bright, tunable, beautiful white light. Using 12 high quality Cree XML 4W emitters, the Miro WNC outputs 3400 lumens and can adjust from 2700K to 6500K. -
Page 13: Miro Cube Uv365
Miro Cube UV365 Ideally suited for theme parks, night clubs, casinos, museums and stage applications, Miro Cube UV365 is the smallest, most a ordable high powered UV light available to lighting professionals. Drawing just 50 watts, it outperforms conventional long throw fixtures using 5 times the power, weighing 10 times more, and which need an expensive lamp change every 1000 hours! The fixture allows for full... -
Page 14: Dmx Mode
DMX Mode In DMX mode, the unit is controlled by the data it receives on the 5-pin XLR or RJ45 (ARC) connectors located on the rear panel. The number of DMX channels required to control the fixture is dependent on the factory setting in use. - Page 15 DMX Mode There are four user settings that can be adjusted in DMX mode. The current value of each setting is shown on the main screen. DMX Address: To change the DMX address, press MENU until “CHANGE DMX ADDRESS?” appears on the LCD, and press OK. Select the desired DMX address using keys, and press OK.
- Page 16 DMX Mode Universe1 or Universe2 The Miro Cube can be controlled via two unique DMX universes. DMX can be input on pins 2&3 (Universe1) or pins 4&5 (Universe2) via the 5 pin XLR connectors on the rear panel. This allows two complete universes of DMX to be transmitted on a single cable.
- Page 17 DMX Mode Universe1 or Universe2 (ARC): The Miro Cube can be controlled via two unique DMX universes. DMX can be input on pins 1&2 (Universe1) or pins 3&6 (Universe2) via the RJ45 connectors on the rear panel. This allows two complete universes of DMX to be transmitted on a single cable.
- Page 18 DMX Mode 8 bit or 16 bit DMX: The fixture can run in either 8 bit or 16 bit DMX mode. In 8 bit mode, the Miro Cube accepts one DMX channel for each color. In 16 bit mode, two channels are required for each color. To change from 8 bit to 16 bit mode (or from 16 bit to 8 bit) press MENU until “SET TO 16BIT DMX?”...
- Page 19 DMX Mode DMX Channel Layout: 8 BIT MODE: 16 BIT MODE: 4C & 4CA 4C & 4CA 1 - Red 1 - Red Coarse 5 - Blue Coarse 2 - Green 2 - Red Fine 6 - Blue Fine 3 - Blue 3 - Green Coarse 7 - White/Amber Coarse 4 - White/Amber...
-
Page 20: Manual Mode
Manual Mode WARNING: DO NOT CONNECT ANY MIRO CUBE IN MANUAL MODE TO ANY OTHER DMX SENDING DEVICE AS CONTENTION ON THE DMX512 INPUT WILL RESULT. In Manual Mode, the Miro Cube can be controlled directly from its rear panel without the need of a DMX console or a DMX control device. - Page 21 Manual Mode Miro Cube 4C & 4CA Manual Mode allows you to set the color of your fixture by adjusting the intensity of the LEDs using the rear panel and the LCD display. The current value of each setting is shown on the main screen. To adjust color values, press the MENU key until the desired color is listed on the LCD screen.
- Page 22 Manual Mode Miro Cube WNC/3W When set to Manual Mode, the WNC allows you to set the color of your fixture by adjusting the temperature of the LEDs using the rear panel and the LCD display. The current value of each setting is shown on the main screen.
- Page 23 Manual Mode Miro Cube UV365 Manual Mode can be used to adjust the brightness of a Miro Cube UV365. The current brightness level is shown on the main screen. To adjust color value, press the MENU key until “CHANGE BRIGHTNESS” appears on the LCD screen. Press OK. Use the keys to select a value between “0”...
-
Page 24: Color Wash Mode
Color Wash Mode Color wash is only available in Miro Cube 4C & 4CA. In Color Wash mode, the Miro Cube automatically cycles through its entire saturated color spectrum by modulating the intensity of the red, green, and blue LEDs. There are two user settings that can be adjusted in Color Wash mode. - Page 25 Color Wash Mode Wash Timer The wash timer determines how long it takes for the Miro Cube to complete an entire color cycle, and, by extension, the rate at which the colors change. Choose a short time for a rapid wash or a longer time for a slower wash.
- Page 26 Use the WASH OFFSET function to control the interaction between multiple Miro Cubes in a Color Wash chain. The Wash O set determines the length of delay between each light, or how long it takes to “pass” a color from one light to the next. Set the Wash O set to “0” and the lights will color wash in unison, displaying the same color at the same time.
-
Page 27: Serial Mode
Serial Mode In Serial mode, the unit is controlled by the serial data it receives on the XLR connector located on the rear panel or via CubeConnect®. If your unit does not have Serial Mode you will need to enable it by entering FACTORY SETUP using the MENU button. -
Page 28: Beam Angles
Beam Angles The beam angle can be easily adjusted using a spread lens. Using a Miro Cube without a spread lens will create a 12° beam angle. WARNING: DISCONNECT THE POWER CABLE BEFORE REMOVING THUMBSCREWS. none 20˚ 40˚ 60˚... -
Page 29: Changing The Spread Lens
Beam Angles To change the spread lens, unscrew the thumbscrews from the front panel and remove the acrylic panel. Replace the existing spread lens with the lens of your choice. Place the acrylic panel on top and secure it with four thumbscrews. Custom spread lenses are available upon request. -
Page 30: Linear Array
Mounting WARNING: DISCONNECT THE POWER CABLE BEFORE MAKING ANY CONFIGURATION ADJUSTMENTS. Linear Arrays: The Miro Cube can be used as a single fixture or in multi-fixture arrays. NOTE: ADDITIONAL YOKES AND THREADED ROD ARE REQUIRED. To connect multiple fixtures, remove the threaded rod by unscrewing one of the side knobs and using the other to pull the rod out. - Page 31 Place the fixtures next to each other. Attach a knob to one side of the double length threaded rod. Slide the double bracket around the fixtures. Align the holes and position spacers on both sides of each fixture (do not use multiple spacers between fixtures). Insert the rod on the le side.
-
Page 32: Safety Cables
Safety Cables Single Miro Cubes as well as arrays can be suspended from truss or other major support structures using 3rd party clamping devices. When used in suspended applications, a safety cable (provided by others) is recommended as a positive retaining means between the main support structure and each Miro Cube using the “safety cable hole.”... -
Page 33: Fcc Warning
FCC Warning This equipment has been tested and found to comply with the regulations for a Class A digital device, pursuant to Part 15 of the FCC Rules. These limits are designed to provide reasonable protection against harmful interference when the equipment is operated in a commercial environment. -
Page 34: General Precautions
General Precautions 1. The use of a safety cable is recommended when rigging the fixture. 2. Before use, make sure all screws and safety points are secured. 3. Make sure the light is unplugged before performing any service to the unit. 4. -
Page 35: Warning Messages
Warning Messages The Miro Cube has warning messages built in that will instruct you when an action needs to be taken. On startup, if a DMX signal is not present on the DMX connectors, and the fixture is set to DMX mode, all of the LEDS will glow dimly. - Page 36 Notes...
- Page 37 Notes...
- Page 38 Notes...
- Page 40 MIRO CUBE ® 01/2021-V04...
Need help?
Do you have a question about the Miro Cube Series and is the answer not in the manual?
Questions and answers