Gewiss Chorus NAXOS GW19201WH User Manual
Hide thumbs
Also See for Chorus NAXOS GW19201WH:
- Installation instructions manual (16 pages) ,
- Technical manual (57 pages)
Table of Contents
Advertisement
Available languages
Available languages
Quick Links
Advertisement
Chapters
Table of Contents

Related Manuals for Gewiss Chorus NAXOS GW19201WH


Summary of Contents for Gewiss Chorus NAXOS GW19201WH
- Page 1 Manuale per l’Utente User Guide GW19201WH - GW19201BK 24806590...
-
Page 3: Table Of Contents
INDICE INFORMAZIONI GENERALI . . . . . . . . . . . . . . . . . . . . . . . . . . . . . . . . . . . . . . . . . . . . . . . . . . . . . . . . . . . . . . Pag . Caratteristiche tecniche . -
Page 4: Informazioni Generali
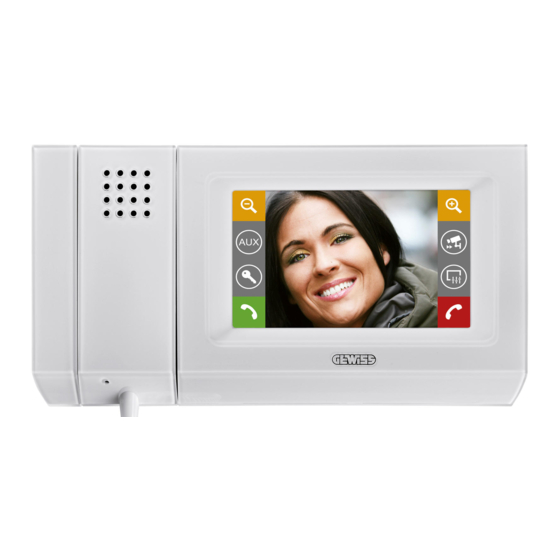
INFORMAZIONI GENERALI Caratteristiche tecniche Naxos è l’innovativo videocitofono a colori touch screen, pensato per gli impianti sistema a due fili . 1 – Altoparlante (vivavoce) 2 – Cornetta 3 – Microfono 4 – Display 16:9 touch screen 4,3” 5 – Alloggiamento penna per touch screen Manutenzione ed utilizzo del Pannello • Utilizzare il Pannello solo con la penna in dotazione; non utilizzare utensili, penne o altri strumenti appuntiti che potrebbero danneggiare il display e comprometterne il funzionamento. -
Page 5: Principali Funzioni Associate Alle Icone Della Schermata Di Apertura
INFORMAZIONI GENERALI Principali funzioni associate alle icone della schermata di apertura La schermata di apertura permette di accedere rapidamente ed in maniera intuitiva a tutte le funzioni gesti- bili dal Pannello Naxos e di avere un immediato feed back degli eventi che interessano il sistema . Menù principale per abitazioni senza Centralino di Portineria Luce scale Comando ausiliario Attivazione sveglia Sveglia attiva... -
Page 6: Funzioni Videocitofoniche
FUNZIONI VIDEOCITOFONICHE Funzioni base Rispondere ad una chiamata Chiamata Inclusione interni video In caso di chiamata, la schermata principale (fig . 1) viene automaticamente sostituita dalla schermata Messaggi Messaggi portineria segreteria di fig . 2 che mostra l’immagine del chiamante ripre- so dal posto videocitofonico esterno . -
Page 7: Trasferire Una Chiamata Verso Altri Interni
FUNZIONI VIDEOCITOFONICHE Trasferire una chiamata verso altri interni Premendo il pulsante (fig . 4) apparirà un elenco degli interni verso i quali è possibile deviare la chiamata (fig. 5); selezionare l’interno desiderato, attendere risposta e chiudere la comunicazione per trasferire la chiamata . Ricevere una chiamata da altri interni (intercomunicazione) Nel caso in cui la chiamata provenga da altri posti interni (intercomunicazione) apparirà la finestra di... -
Page 8: Assegnare Un Nome Ad Un Interno
FUNZIONI VIDEOCITOFONICHE Assegnare un nome ad un Interno Per semplificare il riconoscimento degli interni è Chiamata Inclusione possibile assegnare a ciascuno di essi un nome . interni video Dalla finestra principale (fig. 9) selezionare il pul- Messaggi Messaggi portineria segreteria sante 1 . -
Page 9: Visualizzare Immagini Da Posti Esterni
FUNZIONI VIDEOCITOFONICHE Visualizzare immagini da posti esterni Dalla schermata principale (fig. 12) selezionare l’ico- Chiamata Inclusione na 4, immediatamente sarà possibile visualizzare le interni video immagini riprese dalle telecamere dei posti esterni (se più di uno) . Messaggi Messaggi portineria segreteria Sveglia Setup Accesso al comando ausiliario e luce scale 6 Visualizza immagini da posto esterno successi- vo (se presente) 7 Apriporta del posto esterno visualizzato* 8 Accesso alle regolazioni video... -
Page 10: La Segreteria Videocitofonica
FUNZIONI VIDEOCITOFONICHE La segreteria videocitofonica Naxos consente di registrare un messaggio che Chiamata Inclusione può venire riprodotto dal posto esterno in caso interni video di assenza. Il chiamante, in risposta, potrà lasciare un videomes- Messaggi Messaggi portineria segreteria saggio (riportante data e ora della chiamata) in una videosegreteria consultabile al rientro . -
Page 11: Consultare La Segreteria Videocitofonica
FUNZIONI VIDEOCITOFONICHE Consultare la segreteria videocitofonica La presenza di messaggi videocitofonici non letti in Chiamata Inclusione segreteria è rivelata dall’icona “Messaggi segrete- interni video ria” lampeggiante sulla schermata principale . Messaggi Messaggi portineria segreteria Selezionare l’icona “Messaggi segreteria” 3 . Sveglia Setup La schermata di figura 21 propone un elenco dei messaggi registrati in ordine cronologico, partendo dal più... -
Page 12: Programmare La Sveglia
FUNZIONI VIDEOCITOFONICHE Programmare la Sveglia Selezionare l’icona “Sveglia” 1 . Chiamata Inclusione interni video Messaggi Messaggi portineria segreteria Sveglia Setup Sveglia Per impostare l’ora di sveglia selezionare il pulsante 2 . Impostare ora e minuti nella pagina che appare e confermare con il tasto Nota: Impostazione ora di sveglia Programmando solo l’ora di sveglia la suoneria verrà... -
Page 13: Setup Dispositivo
SETUP DISPOSITIVO Principali funzioni del menù setup Dalla schermata principale, premere sull’icona “Se- Chiamata Inclusione tup” 1 . interni video Messaggi Messaggi portineria segreteria Sveglia Setup Setup Il menù “Setup” raccoglie tutte le impostazioni di base del Pannello Naxos . Melodie Lingue Data/Ora... -
Page 14: Regolare Le Caratteristiche Dei Segnali Acustici
SETUP DISPOSITIVO Setup Premendo il pulsante seguito dal pulsante Melodie “Touch” (fig . 5), sarà possibile attivare/disattiva- re il suono associato alla pressione dei pulsanti e regolarne il volume . Esterno Intercom Pianerot. Sveglia Portiere Touch Regolare le caratteristiche dei segnali acustici Esterno Dalla schermata principale “Melodie” selezionare il... -
Page 15: Registrare Un Messaggio Di Segreteria
SETUP DISPOSITIVO Registrare un messaggio di segreteria Setup Selezionare l’icona “Risposta segreteria” . Melodie Lingue La schermata che appare, contiene i comandi ne- cessari per registrare e riascoltare il messaggio Data/Ora Display da lasciare in segreteria . Risposta Citofonia Nota: segreteria Il messaggio di segreteria può avere una durata massi- ma di 10 secondi al termine della riproduzione del mes- saggio il posto esterno emetterà... -
Page 16: Scelta Lingua Pannello
SETUP DISPOSITIVO Scelta lingua pannello Setup Selezionare l’icona “Lingue” 1 . Melodie Lingue Data/Ora Display Risposta Citofonia segreteria Utilizzare la schermata che appare per scegliere la Setup lingua dell’interfaccia del pannello; dopo la scelta Lingue attendere qualche secondo il riavvio del pannello. Display Setup Display Premendo sul pulsante “Display” si accede ad una schermata che permette di regolare la lumino- Attivo... -
Page 17: Citofonia
SETUP DISPOSITIVO Citofonia Setup Premendo sul pulsante “Citofonia” si accede ad una schermata che permette di esegure il setup Melodie Lingue delle funzioni relative alla videocitofonia. Data/Ora Display In impianti dotati di centralino di portineria, atti- vando la funzione “Building”, verrà attivato sulla Risposta Citofonia pagina principale del pannello il pulsante segreteria la chiamata verso la portineria . -
Page 18: Reset Dispositivo
SETUP DISPOSITIVO Reset dispositivo Ogni volta che anomalie di funzionamento, inter- venti e altre ragioni tecniche richiedono il reset dell’apparecchio, premere leggermente il pulsante collocato all’interno dell’apertura al di sotto della scocca del dispositivo (vedi figura), utilizzando il pennino in dotazione; rilasciare il pulsante appena lo schermo si oscura e attendere che riappaia il menù... - Page 19 CONTENTS GENERAL INFORMATION . . . . . . . . . . . . . . . . . . . . . . . . . . . . . . . . . . . . . . . . . . . . . . . . . . . . . . . . . . . . . . . . Pag . Technical Features .
-
Page 20: General Information
GENERAL INFORMATION Technical Features Naxos is the innovative colour touchscreen video receiver, designed for two-wire systems . 1 – Loudspeaker (hands-free) 2 – Receiver 3 – Microphone 4 – 4 . 3 ” touchscreen 16:9 display 5 – Touchscreen pen housing Maintenance and Use of the Panel • Only use the pen provided with the Panel; do not use utensils, pens or other sharp instruments that could damage the display and prejudice its operation . -
Page 21: Main Functions Associated With The Icons On The Opening Screen
GENERAL INFORMATION Main functions associated with the icons on the opening screen The opening screen provides fast, intuitive access to the functions managed by the Naxos Panel . It also provides immediate feedback on events involving the system . Main menu for homes without Porter Switchboard Stair lighting Auxiliary command Alarm clock activation... -
Page 22: Video Entry System Functions
VIDEO ENTRY SYSTEM FUNCTIONS Standard functions Answering a call Intercom Camera call view In the event of a call, the main screen (fig . 1) is automatically replaced by the screen in fig . 2 , which Porter Audio messages messages shows the image of the caller filmed from the video entry panel . -
Page 23: Transferring A Call To Other Extensions
VIDEO ENTRY SYSTEM FUNCTIONS Transferring a call to other extensions If you press button (fig . 4), a list will appear of the extensions to which you can transfer the call (fig . 5) . Select the desired extension, wait for an answer and hang up to transfer the call . -
Page 24: Assigning A Name To An Extension
VIDEO ENTRY SYSTEM FUNCTIONS Assigning a name to an extension To make it easier to identify extensions, you can give Intercom Camera each of them a name . call view From the main window (fig . 9) select button 1 . Porter Audio messages... -
Page 25: Display Images From Entry Panels
VIDEO ENTRY SYSTEM FUNCTIONS Display images from entry panels From the main screen (fig . 12) select icon 4, it will Intercom Camera now be immediately possible to view images taken call view by the entry panel surveillance cameras (if more than one) . -
Page 26: Video Entry System Voice Mail
VIDEO ENTRY SYSTEM FUNCTIONS Video entry system voice mail Naxos allows you to record voice mail that can Intercom Camera be played back by the entry panel when you are call view absent . The caller can leave a video entry message when Porter Audio messages... -
Page 27: Checking The Video Answer Phone
VIDEO ENTRY SYSTEM FUNCTIONS Checking the video answer phone The presence of unread video entry system messag- Intercom Camera es on your answer phone is indicated by the flash- call view ing icon “Voice mail messages” on the main screen . Porter Audio messages... -
Page 28: To Programme The Alarm Clock
VIDEO ENTRY SYSTEM FUNCTIONS To programme the Alarm clock Select the “Alarm” icon 1 . Intercom Camera call view Porter Audio messages messages Alarm clock Setup Alarm clock To set the time for the alarm clock select button 2 . Set the hour and minutes on the page that appears and confirm with key Note:... -
Page 29: Device Setup
DEVICE SETUP Main functions of setup menu Press the “Setup” icon on the main screen . Intercom Camera call view Porter Audio messages messages Alarm clock Setup Setup The “Setup” menu includes all the basic settings for the Naxos Panel . Melodies Languages Date/Time... -
Page 30: Adjust The Characteristics Of The Acoustic Alarms
DEVICE SETUP Setup By pressing button then the “Touch” button Melodies (fig . 5), it is possible to activate/deactivate the sound associated with pressing the buttons, and adjust its volume . Entries Intercom Floor Alarm clock Porter Touch Adjust the characteristics of the acoustic alarms. -
Page 31: Record A Voice Mail Message
DEVICE SETUP Record a voice mail message Setup Select the “Door Answer” icon . Melodies Languages The screen that appears contains the commands needed to record and listen to your voice Date/Time Display mail message . Answer Door entry Note: phone reply The voice mail message may last up to 10 seconds. -
Page 32: Panel Language Selection
DEVICE SETUP Panel language selection Setup Select the “Languages” icon 1 . Melodies Languages Date/Time Display Answer Door entry phone reply Use the screen that appears to choose the panel in- Setup terface language; after selection, wait a few seconds Languages for the panel to restart . Display Setup Display... -
Page 33: Door Entry
DEVICE SETUP Door entry Setup Press the “Door Entry” button to access a screen that lets you set up the functions relating to the Melodies Languages video entry system . Date/Time Display In systems with a porter switchboard, activate the “Building”... -
Page 34: Device Reset
DEVICE SETUP Device reset Any time that operating anomalies, servicing or other technical reasons require the unit to be reset, press lightly on the button located inside the open- ing under the body of the device (see figure), using the pen provided . Release the button as soon as the screen goes dark and wait for the main menu to reappear before resuming normal use of the unit . - Page 36 According to article 9 paragraph 2 of the European Directive 2004/108/EC and to article R2 paragraph 6 of the Decision 768/2008/EC, the responsible for placing the apparatus on the Community market is: GEWISS S.p.A Via A. Volta, 1 - 24069 Cenate Sotto (BG) Italy Tel: +39 035 946 111 Fax: +39 035 945 270 E-mail: qualitymarks@gewiss.com +39 035 946 111 sat@gewiss.com...
Need help?
Do you have a question about the Chorus NAXOS GW19201WH and is the answer not in the manual?
Questions and answers