
Related Manuals for Jensen CDR171


Summary of Contents for Jensen CDR171
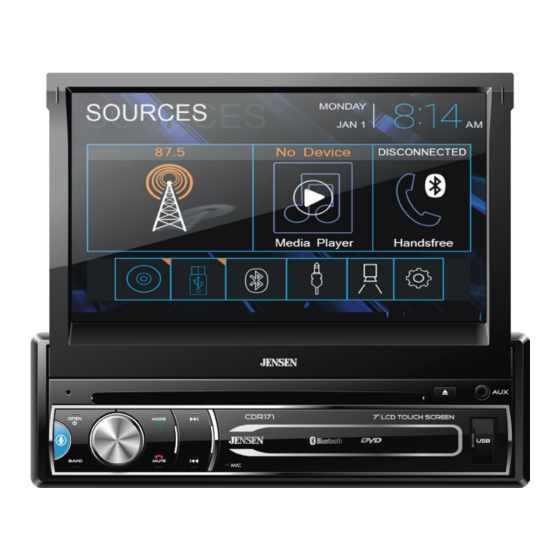
- Page 1 CDR171 DVD Multimedia Receiver with Bluetooth® featuring a 7" Touch Screen Display INSTALLATION & OWNER’S MANUAL...
- Page 2 Safety Notes Video playback will not operate while the vehicle is moving. This is a safety feature to prevent driver distraction. In-dash video functions will only operate when vehicle is in Park and the parking brake is engaged. It is illegal in most jurisdictions for the driver to view video while the vehicle is in motion.
-
Page 3: Table Of Contents
CDR171 Table of Contents Page Warning Statement .......... - Page 4 CDR171 WARNING Upon installation of this monitor/media player (“unit”) into a vehicle, the driver of the vehicle must not operate this unit by watching videos or playing video games while driving. Failure to follow this instruction could lead to driver distraction which could result in serious injury or death to the vehicle’s occupants or persons...
-
Page 5: Safety Information/Precautions
• You cannot view video while the vehicle is moving. Find a safe place to park and engage the parking brake. • If you experience problems during installation, consult your nearest Jensen dealer. • If the unit malfunctions, reset the unit as described on page 10 first. If the problem still persists, consult your nearest Jensen dealer or call tech assistance @ 1-888-921-4088. -
Page 6: Preparation/Mounting
CDR171 Preparation Before You Start • Disconnect negative battery terminal. Consult a qualified technician for instructions. • Avoid installing the unit where it would be subject to high temperatures, such as from direct sunlight, or where it would be subject to dust, dirt or excessive vibration. -
Page 7: Wiring Diagram
CDR171 Wiring Diagram - Inputs/Outputs BACK-UP CAMERA INPUT( VIOLET ) VIOLET/WHITE (Compatible with most SWC Interfaces) BLUE/WHITE ORANGE Note: When replacing a fuse, make sure to use the correct type and amperage. Using an incorrect fuse could cause damage. The unit uses (1) 10 amp ATC mini style fuse located on the power connector. -
Page 8: Control Locations
CDR171 Control Locations Eject Volume / Talk Auxiliary Input Band USB Port Mode / Voice Activation Microphone Open / Power Tune/Track Down Reset Mute / End Call Mode Tune/Track Up... -
Page 9: General Operation
CDR171 General Operation Align the faceplate with the front of the unit, then snap in place Installing the Faceplate beginning with the left side. Momentarily press to turn the unit on or off. Power On/Off Rotate the volume knob to increase or decrease the volume level. - Page 10 CDR171 General Operation Setup Menu From the Main Menu screen, select Settings to access the Setup menu and select from categories displayed on the left side of the screen: General, Clock, Audio, Bluetooth, Display and About. Use the touch screen to navigate and adjust individual options within each category.
-
Page 11: Am/Fm Tuner Operation
CDR171 AM/FM Tuner Operation Select the Radio icon from the Main Menu screen. Radio Operation Current Mode / Displays current mode of operation. Press to return to Main Menu Main Menu screen. Press and hold to set the current station in that preset spot. Press Preset Stations momentarily to recall the desired preset and begin playback. - Page 12 CDR171 AM/FM Tuner Operation 10 11 12 Displays the current station number. Station Number Press to search stations. Station Search Press >> to tune radio to a higher frequency. Press and hold to Tune Up tune the unit up one step at a time.
-
Page 13: Media Player Operation
CDR171 Media Player Operation Select the Media Player icon from the Main Menu screen. Media Player Operation Shows current mode of operation. Press to return to Main Menu. Current Mode/Main Menu Press to access Bluetooth music. Bluetooth Music Press to access files on USB device. - Page 14 CDR171 Media Compatibility - CD/DVD File Type Level 1, Level 2 ISO9660 Level 3 Playback ISO9660 JOLIET File System Extension Filename 32 bytes Playback ROMEO Other Filename Extensions Apple ISO .mp3/.MP3/.Mp3/.mP3 File Extension .rmp/.m4a MPEG 1 ...
- Page 15 CDR171 Media Compatibility - USB File Type FAT 12 File System .mp3/.MP3/.Mp3/.mP3 File Extension .rmp/.m4a MPEG 1 MPEG MPEG 2 Format MPEG 2.5 MPEG 1 32/44.1/48kHz Sampling MPEG 2 12/16/22.05/24kHz Frequency MPEG 2.5 8/11.025/12kHz MPEG 1...
-
Page 16: Media Compatibility
CDR171 Media Compatibility Media Compatibility The following types of discs/files are compatible: • CD-DA, CD-ROM (ISO), CD-R, CD-RW • DVD Video, DVD+R/RW, DVD-R/RW The following types of discs/files are not compatible: • WMA files that are protected by DRM (Digital Rights Management) •... -
Page 17: Dvd Operation
CDR171 DVD Operation Inserting a Disc Insert disc into the slot, and playback will begin automatically. Sub-menus may have to be pressed to access the DVD content. Read the directions of your specific DVD disc for other features. Ejecting the Disc Press to eject the disc. - Page 18 CDR171 DVD Operation Direct Entry Enter a chapter number directly to begin playback. Audio Press to access and adjust audio settings. Repeat Press to repeat current chapter. Random Press to enable or disable random playback. Next Page Press to display the next page of options.
-
Page 19: Bluetooth Operation
Complete the pairing sequence from your Bluetooth device. Refer to the owner's manual for your device for more details. The device name is "JENSES CDR171". The Bluetooth passcode is "0000". The unit can be in any mode of operation when pairing is performed. - Page 20 CDR171 Bluetooth Operation Talk Press to connect a call. Phone Number Shows the phone number dialed. End Call Press to end the current call. Settings Press to transfer call between the head unit and the mobile phone. Press to mute call audio.
-
Page 21: Auxiliary Inputs/Rear Camera Operation
CDR171 Front 3.5mm Aux Input Connect an optional audio source into the 3.5mm (front Auxiliary Input panel) input. Select auxiliary input from the Main Menu to listen to audio. Adjust volume on the external audio source as needed (if connected to the headphone output of the device). -
Page 22: Swc Input Operation
PAC SWI-RC Installation Hints 1. Set "Radio Select Switch". Set the SWI-RC to position 7 - "Pioneer/Other/Sony". 2. To program, use the Pioneer/Sony/Other radio function mapping order for CDR171 units. 3. When programming the SWI-RC, if a function is not supported (or not desired), then function MUST be skipped as per the PAC SWI-RC instructions. -
Page 23: Notes
CDR171 Notes... -
Page 24: Troubleshooting
Please keep your original sales receipt and be prepared to provide this receipt in the event you require service, as your original receipt is considered the best proof of purchase and indicates the date you purchased your Jensen product. Dealer Name... -
Page 25: Specifications
CDR171 Specifications Disc Frequency response: 20Hz-20kHz Channel separation @ 1kHz: >80dB D/A converter: 24 Bit FM Tuner Tuning range: 87.5MHz-107.9MHz Usable sensitivity: 10dBf 50dB quieting sensitivity: 20dBf Stereo separation @ 1kHz: 38dB Frequency response: 30Hz-13kHz AM Tuner Tuning range: 530kHz-1710kHz... -
Page 26: Warranty
JENSEN dealer and used in the U.S.A. • Call us toll-free at (888) 921-4088 • E-mail us at cs@jensenmobile.com... -
Page 27: Fcc Compliance
CDR171 FCC Compliance This device complies with Part 15 of the FCC Rules. Operation is subject to the following two conditions: (1) this device may not cause harmful interference, and (2) this device must accept any interference received, including interference that may cause undesired operation. - Page 28 Customer Support 1-888-921-4088 (Monday-Friday, 9AM-5PM EST) Visit https://www.jensenmobile.com Designed and Engineered in USA All rights reserved. No part of this publication may be reproduced, distributed, or transmitted in any form or by any means, including photocopying, recording, or other electronic or mechanical methods, without the prior written permission of NAMSUNG AMERICA INC.
Need help?
Do you have a question about the CDR171 and is the answer not in the manual?
Questions and answers