Table of Contents
Advertisement
Available languages
Available languages
Quick Links
Advertisement
Table of Contents

Related Manuals for Gicam 06-TRN

Summary of Contents for Gicam 06-TRN
- Page 1 Manuale Manual Handbuch ...
- Page 2 Manuale d’uso Manuale d’uso User manual User manual Bedienungsanleitung Bedienungsanleitung INDICATORE INDICATOR ANZEIGEGERÄT 06‐TRN ...
-
Page 3: Table Of Contents
Indice / Table of contents / Inhaltsverzeichnis Indice / Table of contents / Inhaltsverzeichnis ..................1 Manuale d’uso ............................. 3 Caratteristiche tecniche ........................... 3 Simbologia ............................... 4 Montaggio dello strumento ........................4 Targa identificativa dello strumento......................4 Funzioni tasti ............................5 Accensione / spegnimento ......................... - Page 4 Bedienungsanleitung ..........................23 Technische Spezifikation ........................23 Symbole ..............................24 Montage des Gerätes ..........................24 Typenschild des Gerätes ........................24 Tastenfunktionen ........................... 25 Einschalten / Ausschalten ........................ 26 Wechseln zwischen Anzeige des Netto- und Bruttogewichts ............26 PEAK aktivieren / deaktivieren ......................26 Anzeige des ausgewählten Anzeigemaßstabes ................
-
Page 5: Manuale D'uso
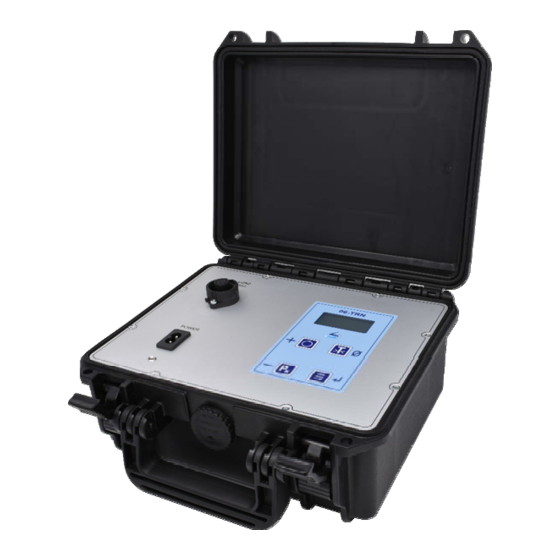
Contenitore ABS; antiurto, galleggiante con chiusura ermetica e valvola di sfogo Dipendente dalla versione dello strumento, posso essere presente sul panello dello 06-TRN uno o due connettori per collegare celle di carico di diversa uscita (2 mV/V oppure 1,5 mV/ V) - in questo caso vedere anche “Password 10”... -
Page 6: Simbologia
Simbologia Attenzione! Questa operazione deve essere eseguita da personale specializzato! Prestare particolare attenzione alle indicazioni seguenti Ulteriori informazioni Montaggio dello strumento Le procedure di seguito riportate, devono essere eseguite da personale specializzato. Tutte le connessioni vanno eseguite a strumento spento Targa identificativa dello strumento È... -
Page 7: Funzioni Tasti
Funzioni tasti 06-TRN Accendere / spegnere lo strumento Inserisce / disinserisce PICCO Ø Alterna visualizzazione peso lordo / peso netto Visualizza la scala selezionata Entra ed esce dai menu (pressione prolungata esce, singolo tocco per entrare) Salva il valore selezionato Pagina –... -
Page 8: Accensione / Spegnimento
Accensione / spegnimento Premere questo pulsante per accendere lo strumento. All' accensione, lo strumento esegue un test di funzionamento del display (vengono visualiz- zati quattro 8, in modo da poter verificare che tutti i segmenti si accendano correttamente); dopodiché viene mostrata la versione del software che comanda lo strumento stesso (esempio 1 07). -
Page 9: Visualizza La Scala Selezionata
Visualizza la scala selezionata Premere questo pulsante dalla schermata di visualizzazione peso per visualizzare il valore di scala selezionato: lo strumento visualizza la scritta MV se lo strumento è impostato per la visualizzazione in millivolt; altrimenti visualizza la scritta SCL, per poi visualizzare il valore di scala. -
Page 10: Scala Visualizzata
Scala visualizzata Il display visualizza “SCL”. Valore del fondo scala applicato. È possibile scegliere tra diversi tipi di fondo scala applicati: MV = visualizzazione 0 a 100,0% del convertitore A/D interno. * 9999 = fondo scala personalizzato da utente (la virgola rispetta il parametro DECIMALI). ... -
Page 11: Abilita Visualizzazione Peso Netto / Peso Lordo
Abilitazione visualizzazione peso netto / lordo (il display visualizza lrd) Flag di abilitazione della possibilità di visualizzazione del peso netto. Settando questo valore ad 1 permette, all'interno della schermata del peso, di cambiare la visualizzazione da peso lordo a peso netto (e viceversa) attraverso la pressione del pulsante Utilizzare i tasti per modificare il valore. -
Page 12: Password 100 (Azzeramento)
Password 100 (azzeramento) Azzeramento del fuori zero del convertitore AD. Il display mostra la scritta tAr. Assicurarsi che il simulatore di cella di carico sia a zero e premere il tasto Se l’operazione va a buon fine, si ritorna alla schermata di visualizzazione peso e si vedrà indicato un valo- re pari a zero. -
Page 13: Allarmi
Allarmi Se la tensione delle batterie scende sotto un livello critico, il display visualizza la scritta BAt . Spegnere lo strumento e sostituire le batterie, oppure spegnere lo strumento e collegare il cavo di ricarica. Accendere quindi lo strumento se si vuole proseguire nelle misurazioni. Il led posto sul frontale dello strumento indica lo stato di ricarica della batteria quando il cavo di alimentazio- ne è... -
Page 14: Garanzia
Garanzia GICAM s.r.l. garantisce i suoi dispositivi da ogni difetto relativo a materiali e fabbricazione per un periodo di 12 mesi dalla data di consegna. Nel caso in cui, durante il periodo di copertura della garanzia, il dispositivo presentasse dei difetti di funzionamento, si prega di contattare l’assistenza tecnica del rivenditore autoriz- zato oppure, in assenza di questi, direttamente GICAM s.r.l. -
Page 15: User Manual
Depending on the version of the instrument, one or two connectors can be present on the 06-TRN panel to connect load cells of different outputs (2 mV / V or 1.5 mV / V) - in this case see also “Password 10” on page 19. -
Page 16: Symbols
Symbols Attention! This operation has to be carried out by specialized personnel! Pay particular attention to the following indications! Further information Installation of the instrument The procedures listed below have to be executed by specialized operators. All connections have to be executed with the instrument shut off! Identification plate of the instrument It is important to communicate this data in case of request for information or indications con- cerning the instrument together with the program number and the version which are shown... -
Page 17: Key Functions
Key functions 06-TRN Switch the instrument on / off Increases the selected value or scrolls through the menus Switches PEAK on / off Decreases the selected value or scrolls through the menus Ø Toggles gross weight / net weight display... -
Page 18: Power On / Off
Power on / off Press this button to switch on the instrument. On power-up the instrument performs a function test cycle of the display (four 8s are being displayed to verify that all segments of the display turn on correcty); after completion of this test, the software version that controls the instrument is being displayed on the screen (example 1.07). -
Page 19: Display The Selected Scale
Display the selected scale Pressing this button from the weight display screen to display the selected scale value: the instrument displays the indication MV if the instrument is set to be displaying in millivolts; oth- erwise it displays the indication SCL, and then displays the scale value. In the data entry pages of the configuration menus, pressing this button saves the value just introduced, while a prolonged pressure allows you to return to the previous screen. -
Page 20: Visualized Scale
Visualized scale The display indicates “SCL”. Applied full scale value. It is possible to choose between different types of ap- plied full scale: MV = display 0 to 100.0% of the internal A / D converter. * 9999 = full scale customized by user (the decimal sign respects the DECIMAL parameter). ... -
Page 21: Enable Net Weight / Gross Weight Display
Enable net / gross weight display (the display shows lrd) Flag to enable the possibility of displaying the net weight. Setting this value to 1 allows, within the weight display screen, to change the display from gross weight to net weight (and vice versa) by pressing the but- Use the keys to change the value. -
Page 22: Password 100 (Reset)
Password 100 (reset) AD converter zero reset. The display shows the text tAr. Make sure that the load cell simulator is zero and press the key. If the operation is successful, you will return to the weight display screen and you will see a value equal to zero. -
Page 23: Alarms
Alarms If the tension of the battery drops below a critical level, the display shows the indication BAt . Switch of the instrument and replace the batteries or switch off the instrument and connect the charging cable. Then switch on the instrument again if you want to continue the measurements. The LED on the front of the instrument indicates the charging status of the battery when the charging cable is connected. -
Page 24: Warranty
Warranty GICAM s.r.l. warrants its devices against any defect in materials and workmanship for a period of 12 months from the delivery date. In the event that, during the warranty coverage period, the device has mal- functions, please contact the technical assistance of the authorized dealer or, in the absence of these, di- rectly GICAM s.r.l. -
Page 25: Bedienungsanleitung
Je nach Version des Gerätes können ein oder zwei Anschlüsse zur Anbindung von Wäge- zellen mit unterschiedlichen Ausgängen (2 mV/V oder 1,5 mV/V), auf dem 06-TRN- Bedienfeld vorhanden sein - in diesem Fall auch “Passwort 10” auf Seite 29 beachten. -
Page 26: Symbole
Symbole Achtung! Dieser Vorgang muss von Fachpersonal ausgeführt werden! Beachten Sie besonders die folgenden Hinweise! Weiterführende Informationen Montage des Gerätes Die unten aufgeführten Aufgaben müssen von Fachpersonal ausgeführt werden. Alle Verbindungen müssen bei ausgeschaltetem Gerät ausgeführt werden! Typenschild des Gerätes Es ist wichtig, diese Daten mit der Programmnummer und der Version, die auf dem Um- schlag des Handbuchs an-gegeben sind und beim Einschalten des Geräts angezeigt werden mitzuteilen, wenn Sie Informationen oder Angaben zum Gerät anfordern. -
Page 27: Tastenfunktionen
Tastenfunktionen 06-TRN Gerät ein-/ausschalten Erhöht den ausgewählten Wert oder blättert durch die Menüs PEAK einschalten/ausschalten Verringert den ausgewählten Wert oder blättert durch die Menüs Ø F1 Schaltet die Anzeige zwischen Bruttogewicht / Nettogewicht um F2 Wert zurücksetzen F1 Zeigt die ausgewählte Skala an F2 Menü... -
Page 28: Einschalten / Ausschalten
Einschalten / Ausschalten Drücken Sie diese Taste um das Gerät einzuschalten. Beim Einschalten führt das Gerät einen Test der Funktion der Anzeige durch (es werden vier mal di Ziffer 8 angezeigt um zu Prüfen ob alle Segmente korrekt eingeschaltet werden können). -
Page 29: Anzeige Des Ausgewählten Anzeigemaßstabes
Anzeige des ausgewählten Anzeigemaßstabes Drücken Sie diese Taste auf dem Gewichtsanzeigebildschirm, um den ausgewählten Ska- lenwert anzuzeigen: Das Instrument zeigt das Wort MV an, wenn das Instrument so einge- stellt ist, dass es in Millivolt zeigt. Andernfalls wird das Wort SCL und anschließend der Ska- lierungswert angezeigt. -
Page 30: Angezeigter Maßstab
Angezeigter Maßstab Das Display zeigt SCL. Skalenendwert angewendet. Es ist möglich, zwischen verschiedenen Arten des an- gewandten Skalenendwertes zu wählen: MV = Anzeige 0 bis 100,0% des internen A / D-Wandlers. * 9999 = Vom Benutzer angepasster Maßstab (das Komma berücksichtigt den Parameter DECIMAL). ... -
Page 31: Aktivierung Der Netto- /Bruttogewichtsanzeige
Aktivierung der Netto- /Bruttogewichtsanzeige (das Diplay zeigt lrd an) Aktivierungsflag für die Möglichkeit, das Nettogewicht anzuzeigen. Wenn Sie diesen Wert auf 1 setzen, können Sie innerhalb des Gewichtsbildschirms die Anzeige durch Drücken der Taste vom Bruttoge- wicht auf das Nettogewicht (und umgekehrt) umschalten. Benutzen Sie die Tasten um den Wert zu ändern. -
Page 32: Password 100 (Zurückstellen)
Password 100 (zurückstellen) AD-Wandler Null Reset. Das Display zeigt den Text tAr. Stellen Sie sicher, dass der Wägezellensimulator Null ist, und drücken Sie die Taste Wenn der Vorgang erfolgreich ist, kehren Sie zum Gewichtsanzeigebildschirm zurück und sehen einen Wert gleich Null. Password 200 (Skalenendwert) Skalenendwert des AD-Wandlers. -
Page 33: Alarme
Alarme Wenn die Batteriespannung unter einen kritischen Wert fällt, zeigt das Display BAt an. Schalten Sie das Instrument aus und tauschen Sie die Batterien aus, oder schalten Sie das Instrument aus und schließen Sie das Ladekabel an. Schalten Sie danach das wieder Instrument ein, wenn Sie die Messungen fortsetzen möchten. Die LED an der Vorderseite des Instruments zeigt den Ladezustand des Akkus an, wenn das Netzkabel eingesteckt ist. -
Page 34: Garantie
Garantie GICAM s.r.l. garantiert seine Geräte für einen Zeitraum von 12 Monaten ab Lieferdatum gegen Material- und Verarbeitungsfehler. Für den Fall, dass das Gerät während des Garantiezeitraums Störungen aufweist, wenden Sie sich bitte an den technischen Kundendienst des autorisierten Händlers oder, falls dies nicht möglich ist, direkt an GICAM s.r.l. - Page 35 Questo manuale è stato redatto con la massima cura ed al momento della pubblicazione è ritenuto privo di errori. GICAM si impegna di mantenere questo manuale sempre aggiornato e pubblicare versioni aggiornati sul suo sito web appena disponibile. Si declina ogni responsabilità per danni causati da errori in questo momento non identificati e si chiede di segnalare eventuali errori o incongruenze usando i nostri contatti indicati sul retro di questa copertina.
Need help?
Do you have a question about the 06-TRN and is the answer not in the manual?
Questions and answers